


13
Seafire Instruction Manual
SEAFIRE
.
12
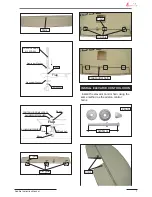
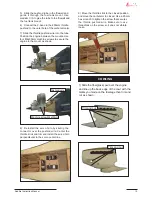
8) Reinstall the servo horn by sliding the
connector over the pushrod wire. Center the
throttle stick and trim and install the servo horn
perpendicular to the servo center line.
9) Move the throttle stick to the closed position
and move the carburetor to closed. Use a 2.5mm
hex wrench to tighten the screw that secures
the throttle pushrod wire. Make sure to use
threadlock on the screw so it does not vibrate
loose.
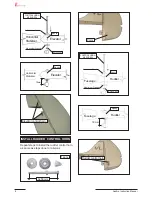
COWLING
Trim and cut.
1) Slide the fiberglass cowl over the engine
and line up the back edge of the cowl with the
marks you made on the fuselage then trim and
cut as shown.
Machine screw M4x30mm.
Pushrod wire.
Trim and cut.
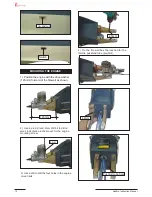
7) Slide the throttle pushrod wire into the tube.
Position the engine between the mounts. Use
four M4x30mm machine screws to secure the
engine to the mount as shown.
5) Slide the pushrod tube in the firewall and
guide it through the fuel tank mount. Use
medium C/A to glue the tube to the firewall and
the fuel tank mount.
6) Connect the Z-bend in the 450mm throttle
pushrod to the outer hole of the carburetor arm.
Содержание Seafire
Страница 23: ...23 Seafire Instruction Manual SEAFIRE 22 Cut M3x25mm 8 5 7 5 7 6 9 9 7 7 ...
Страница 24: ...24 Seafire Instruction Manual 23 M3x25mm 8 1 11 Epoxy 9 8 35mm 40mm 10 11 10 11 ...
Страница 25: ...25 Seafire Instruction Manual Close Position 12mm Open Position servo arm servo arm ...
Страница 26: ...26 Seafire Instruction Manual 25 Cut Epoxy ...
Страница 27: ...27 Seafire Instruction Manual SEAFIRE 26 C A glue 30mm 12mm 48mm 30mm 155mm ...
Страница 38: ...38 Seafire Instruction Manual ...
Страница 39: ...39 Seafire Instruction Manual ...


