10.
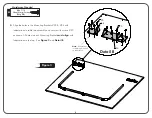
Line up holes in rails with indentations in
top and secure using
eighteen
screws
#20. See
Figure 6
&
Detail E
.
26
25
20
Shorter Distance
Longer Distance
35 (RH)
Note:
Legs not
shown for Clarity
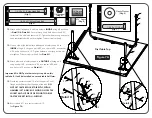
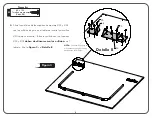
8.
Lay out Right Side Rails #25, Left Side Rails
#29 and End Rails #26, around edges of
table top as shown in
Figure 6
.
Figure 3
Figure 3
Figure 6
20
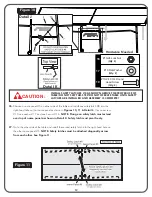
9.
Slide Left #36 and Right #35 Vinyl End
Caps onto the ends of the Side Rails #25
& 29 as shown in
Detail E
.
Detail E
11.
Lay Corner Caps #22 on table as shown
in
Figure 6
. If Corner Cap sticks above
the table top surface of the table, flip over
so shorter distance is against edge.
Secure to bottom of table with three
Screws #21. See
Detail F
.
Detail F
Note:
Rails attach
with #20 screws
7
20
Hardware Needed
21
#8 x 1 7/16
Sheet Metal Screw
(
Qty. 6
)
#8 x 7/16
Sheet Metal Screw
(
Qty. 18
)
Note:
U-Support not
shown for Clarity
(RH Rail)
Note:
Stiga
logo must be on
this end of Rail.
(LH Rail)
29
Note:
Stiga
logo must be on
this end of Rail.


