background image

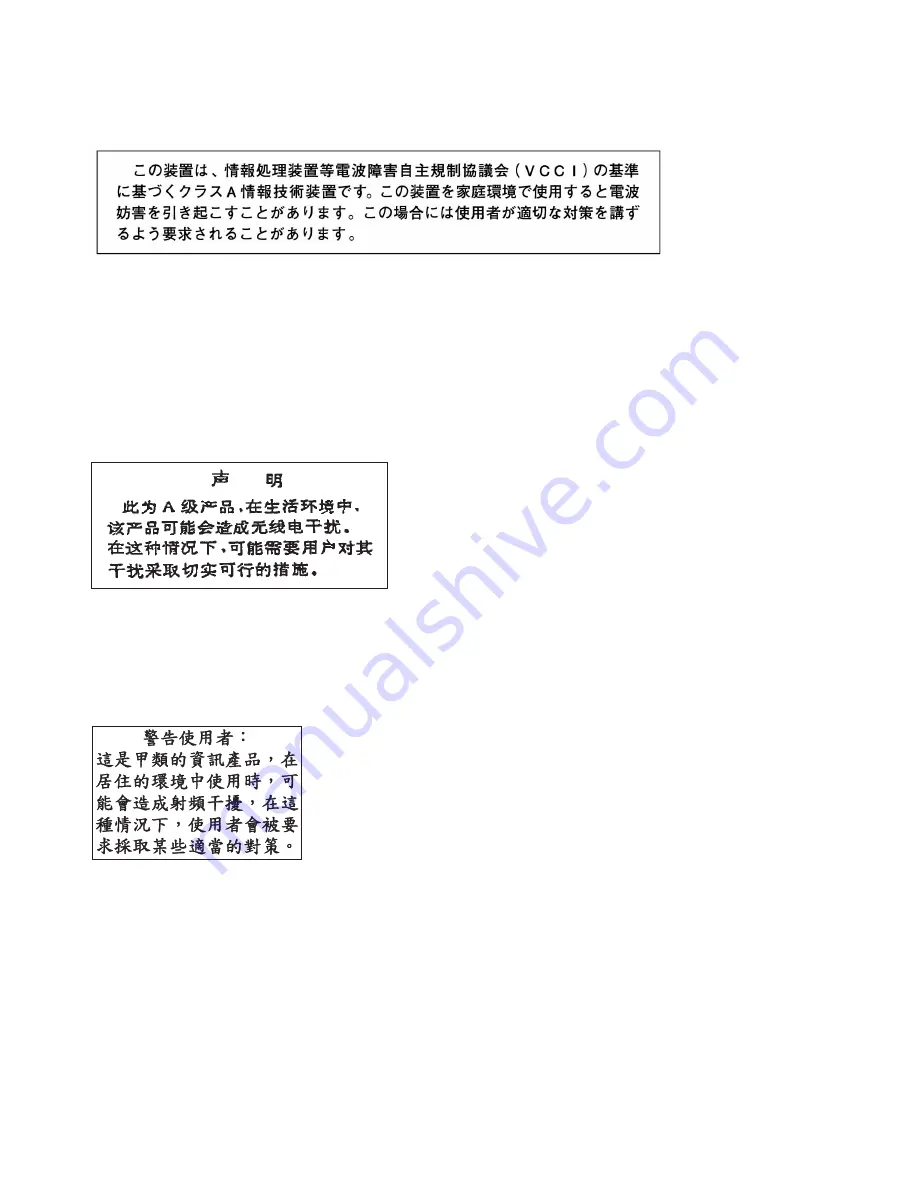
VCCI


Statement


-


Japan


The


following


is


a


summary


of


the


VCCI


Japanese


statement


in


the


box


above.


This


product


is


a


Class


A


Information


Technology


Equipment


and


conforms


to


the


standards


set


by


the


Voluntary


Control


Council


for


Interference


by


Information


Technology


Equipment


(VCCI).


In


a


domestic


environment,


this


product


may


cause


radio


interference,


in


which


case


the


user


may


be


required


to


take


adequate


measures.


Electromagnetic


Interference


(EMI)


Statement


-


People’s


Republic


of


China


Declaration:


This


is


a


Class


A


product.


In


a


domestic


environment


this


product


may


cause


radio


interference


in


which


case


the


user


may


need


to


perform


practical


action.


Electromagnetic


Interference


(EMI)


Statement


-


Taiwan


The


following


is


a


summary


of


the


EMI


Taiwan


statement


above.


Warning:


This


is


a


Class


A


product.


In


a


domestic


environment


this


product


may


cause


radio


interference


in


which


case


the


user


will


be


required


to


take


adequate


measures.


92


Installation


Guide


for


the


03E/4A,


07M/15,


and


08M/25

Содержание PL160R

Страница 1: ...PL160T R PL260T T and PL460T R Installation Guide ESCALA REFERENCE 86 A1 55EW 01...

Страница 2: ......

Страница 3: ...ESCALA PL160T R PL260T T and PL460T R Installation Guide Hardware July 2008 BULL CEDOC 357 AVENUE PATTON B P 20845 49008 ANGERS CEDEX 01 FRANCE REFERENCE 86 A1 55EW 01...

Страница 4: ...e the rights of the proprietors of the trademarks mentioned in this manual All brand names and software and hardware product names are subject to trademark and or patent protection Quoting of brand an...

Страница 5: ...c outlet mounting plate without ac outlets 30 Connecting a dc power source 31 Installing the rack security kit 35 Installing the model in a rack 38 Attaching the mounting hardware to the rack 40 Insta...

Страница 6: ...er s firmware and device microcode through the Integrated Virtualization Manager with an Internet connection 79 Step 1 View the existing firmware level 79 Step 2 Apply firmware and device microcode us...

Страница 7: ...ompliance All lasers are certified in the U S to conform to the requirements of DHHS 21 CFR Subchapter J for class 1 laser products Outside the U S they are certified to be in compliance with IEC 6082...

Страница 8: ...not be metallically connected to the interfaces that connect to the OSP outside plant or its wiring These interfaces are designed for use as intrabuilding interfaces only Type 2 or Type 4 ports as des...

Страница 9: ...ibility features of this product for users who have a physical disability see Accessibility features on page 87 How to send your comments Your feedback is important in helping to provide the most accu...

Страница 10: ...viii Installation Guide for the 03E 4A 07M 15 and 08M 25...

Страница 11: ...o assist you in setting up your system The tasks listed within each section and checklist are listed in chronological order This will help give you an idea of what tasks need to be completed when Not...

Страница 12: ...2 Installation Guide for the 03E 4A 07M 15 and 08M 25...

Страница 13: ...DF file of the Installation and Configuration Guide for the Hardware Management Console SA76 0084 approximately 3 MB in size see sa76 0084 pdf 2 The System Planning Tool SPT helps you design a managed...

Страница 14: ...4 Installation Guide for the 03E 4A 07M 15 and 08M 25...

Страница 15: ...d the rack safety notices before installing equipment Use the procedure in this section to perform this task Before installing a rack rack features or a system or expansion unit into a rack read the f...

Страница 16: ...hat the outlet is correctly wired and grounded to prevent an electrical shock CAUTION v Do not install a unit in a rack where the internal rack ambient temperatures will exceed the manufacturer s reco...

Страница 17: ...the units Place the larger and heavier units in the lower part of the rack This system unit is four Electronic Industries Alliance EIA units high An EIA unit is 1 75 in 44 45 mm in height The rack con...

Страница 18: ...rack mounting template Marking location by using the rack mounting template You might need to mark the installation location by using a rack mounting template Use the procedure in this section to per...

Страница 19: ...igned with a white EIA unit that are located on the rack v The template is two sided When using the template ensure that the appropriate side of the template is facing out Figure 3 shows one EIA unit...

Страница 20: ...on to perform this task To mark the installation location and install the nut clips into a rack without using the rack mounting template complete the following steps 1 Determine where in the rack to p...

Страница 21: ...ory Use the procedure in this section to perform this task If you have not done so complete a parts inventory before installing the unit in the rack 1 Locate the kitting report in an accessory box 2 E...

Страница 22: ...tached to the floor go to Leveling the rack Leveling the rack You might need to level the rack Use the procedure in this section to perform this task To level the rack complete the following steps 1 L...

Страница 23: ...ttaching the rack to a concrete floor on page 14 To attach the stabilizer brackets to the bottom of the rack do the following Note Before installing the stabilizer brackets see Attaching the front or...

Страница 24: ...s to the concrete floor The mechanical contractor must determine that the hardware being used to secure the rack mounting plates to the concrete floor is sufficient to meet the requirements for the in...

Страница 25: ...g kit and the two mounting plates Refer to the following illustration when reviewing the contents of the hardware mounting kit The hardware mounting kit contains the following v 4 Rack mounting bolts...

Страница 26: ...ng location under the rack 7 Create a rack mounting bolt assembly by adding the following items in the order listed to each rack mounting bolt a Thin washer b Top plastic isolator bushing c Thick flat...

Страница 27: ...solator bushing from each of the leveling feet 15 Remove the stabilizer brackets from the marked locations 16 Loosen each of the locking screws on the casters 17 Move the rack so that it is clear of b...

Страница 28: ...oncrete floor Note The size of the anchor bolts and concrete anchors must be determined by the mechanical contractor who will be installing the rack mounting plate 27 Position the rack over the stabil...

Страница 29: ...or does not have a front door to install skip this step Attaching a rack front door You might need to attach a front door to a rack Use the procedure in this section to perform this task To install a...

Страница 30: ...a high perforation front door You might need to attach a front door to the rack Use the procedure in this section to perform this task To install the high perforation front door do the following 1 Re...

Страница 31: ...each other To do this a Lift up the two panel release tabs b Pull the panel up and away from the rack chassis This motion will release the panel from the two lower J brackets c Store the side panels...

Страница 32: ...en areas at the front of the racks All the gaps in the front of the rack must also be sealed including the gaps between equipment This step ensures that proper airflow within the rack is maintained 15...

Страница 33: ...o meet the requirements for the installation To attach the rack to a concrete floor beneath a raised floor do the following 1 Put your rack in its predetermined location and tighten the locking screws...

Страница 34: ...remove the lower plastic isolator bushings 1 Rack chassis 7 Jam nut 2 Rack mounting bolt 8 Leveling foot 3 Thin washer 9 Lower plastic isolator bushing used only on dc powered systems 4 Top plastic i...

Страница 35: ...ack mounting plate when securing the rack to the rack mounting plate 22 For each rack mounting plate select at least two suitable hole locations Select the hole locations as close to the threaded hole...

Страница 36: ...lign the rack over the front and back stabilizer brackets 33 Insert each of the bolt assemblies through a leveling foot 34 Align the rack mounting bolts with the threaded holes in each stabilizer brac...

Страница 37: ...ds Do Not Operate Note All measurements are made with the receptacle faceplate in the usual installed position 2 Some receptacles are enclosed in metal housings For this type of receptacle do the foll...

Страница 38: ...utlets installed on the rack go to Installing the ac outlet mounting plate without ac outlets on page 30 If you want ac outlets installed on the front or back ac outlet mounting plate do the following...

Страница 39: ...6 Position the back ac outlet mounting plate onto the rack frame with the ground lug fully inserted through the mounting holes in the rack 17 Install the front ac outlet mounting plate screws stabiliz...

Страница 40: ...les in the rack Securely tighten the screws Note The bus bar might be located at either the top or bottom of the rack 1 Bus bar mounting plate 3 Hex screws M5 x 20 quantity 2 2 Lock washer quantity 2...

Страница 41: ...he 48 V dc power source and 48 V dc power return cables from the customer s source 48 V dc to the bus bars in the power distribution panel The customer is also responsible for connecting the ground ca...

Страница 42: ...ut tag out to indicate that the power source is turned off intentionally Note Ensure that any oxidation on the copper bus bars is removed c If this is a raised floor installation and you are working a...

Страница 43: ...oard on the back cover of the dc power distribution panel Note Ensure that you remove the oxidation on the copper bus bars g Ensure that the power source ground cable is routed correctly and connects...

Страница 44: ...Install at either top or bottom of the rack 6 Reinstall the 48 V dc bus bar shield 7 Reinstall the top cover on the dc power distribution panel 8 Reinstall the cable channel cover 1 Cable channel cove...

Страница 45: ...consists of the security lock and security slide bars complete the following procedure 1 Read the Rack safety notices on page 5 2 Verify the inventory in the rack security kit v 1 Two lock hardware k...

Страница 46: ...from the existing door latch and reinstall both nuts on the new door lock latch 4 Install the locking latch a Insert the keyed rack lock into the latch slot on the front of the door 6 in Figure 28 b S...

Страница 47: ...rail into the two vertical support channels 10 on the side cover panel Note When installed correctly the slide rail moves from front to back c Reinstall the side panel cover on to the rack d Lock the...

Страница 48: ...ou are installing the system into an existing rack If the rack is not installed go to the instructions for installing the rack and then return to this procedure for instructions on installing the syst...

Страница 49: ...rack mounting hardware kit A and the rack rails B that were included with your system unit as shown in Figure 31 The system rails B are front to back and left to right side dependent The rails are la...

Страница 50: ...re 32 into the rack front flange hole identified by the self adhesive placement dot that you previously installed Have a second person hold the rail securely in the front hole 3 Align the back alignme...

Страница 51: ...from the frame as the rails shown in Figure 33 9 Using three people grasp the two handles located on each side of the system drawer and place the system onto the inner rail as shown in Figure 33 10 Af...

Страница 52: ...taining screws to attach the rack latches to the rack as shown in Figure 35 Figure 34 Inner rail extended Figure 35 Secure system to rack through rack latches 42 Installation Guide for the 03E 4A 07M...

Страница 53: ...ket Left or Right with the cable management arm 3 Use pin F to pin the cable management arm E to the rack frame D as shown in Figure 36 Tip If access to the back of the rack is obscured by a large num...

Страница 54: ...44 Installation Guide for the 03E 4A 07M 15 and 08M 25...

Страница 55: ...your server to connect to service and support on page 60 __ Obtaining updates and upgrades on page 60 __ Obtaining HMC machine code updates and upgrades on page 79 __ Obtaining firmware updates on pa...

Страница 56: ...v The product might be equipped with multiple power cords To remove all hazardous voltages disconnect all power cords v Connect all power cords to a properly wired and grounded electrical outlet Ensur...

Страница 57: ...tion Connecting the external cables Connecting the external cables __ If you are using any optional adapters such as token ring or 8 port EIA 232 connect the cables to the appropriate adapter connecto...

Страница 58: ...ment Console SA76 0084 approximately 3 MB in size see sa76 0084 pdf See Chapter 5 Setting up the HMC Cabling your stand alone HMC for instructions and then return to this step Routing the cables throu...

Страница 59: ...lide it into the slots that are located on the back of the rack as shown here Cabling the server to access the Integrated Virtualization Manager Learn how to access the Integrated Virtualization Manag...

Страница 60: ...or structural damage v Disconnect the attached power cords telecommunications systems networks and modems before you open the device covers unless instructed otherwise in the installation and configur...

Страница 61: ...optional adapters such as token ring or 8 port EIA 232 connect the cables to the appropriate adapter connectors in the PCI slots of your machine Note If the cable was not provided with your server yo...

Страница 62: ...df See Chapter 2 Managing the Advanced System Management Interface ASMI Accessing the ASMI __ If you plan to use the ASCII terminal to access the ASMI the Operations Guide for ASMI and for Nonpartitio...

Страница 63: ...hook slide it into the slots that are located on the back of the rack as shown here Cabling the server to access the Operations Console This section explains how to access the Operations Console conn...

Страница 64: ...or structural damage v Disconnect the attached power cords telecommunications systems networks and modems before you open the device covers unless instructed otherwise in the installation and configur...

Страница 65: ...able from the PC that will serve as the system console to your local network 3 Connect another network cable from the same local network to the adapter to be used for the console It is either located...

Страница 66: ...ng the power cords __ Connect the power cords from the display and attached devices to a power source Routing the cables through the cable management arm __ Is your server installed in a rack v No Pro...

Страница 67: ...nd secure them with the straps that are provided as shown here __ After attaching the cables to the cable management arm go to the front of the rack and move the system drawer in and out Observe the c...

Страница 68: ...se tasks to set up your HMC and to create logical partitions for your system 1 See the Installation and Configuration Guide for the Hardware Management Console To view the PDF file of the Installation...

Страница 69: ...MC Configuring logical partitions using the HMC Complete the steps listed in the section Configuring logical partitions using the HMC and return to this step Setting up Virtual I O Server IVM and logi...

Страница 70: ...can provide two way communication between your server and service and support Each operating environment has requirements to consider when you set up your connections Installing operating systems You...

Страница 71: ...support on page 75 __ Obtaining updates and upgrades on page 76 __ Obtaining HMC machine code updates and upgrades on page 79 __ Obtaining firmware updates on page 79 __ Obtaining operating system fi...

Страница 72: ...em rating plate v Connect any equipment that will be attached to this product to properly wired outlets v When possible use one hand only to connect or disconnect signal cables v Never turn on any equ...

Страница 73: ...Connecting the external cables Connecting the external cables __ If you are using any optional adapters such as token ring or 8 port EIA 232 connect the cables to the appropriate adapter connectors i...

Страница 74: ...ment Console SA76 0084 approximately 3 MB in size see sa76 0084 pdf See Chapter 5 Setting up the HMC Cabling your stand alone HMC for instructions and then return to this step Routing the cables throu...

Страница 75: ...e slots that are located on the back of the rack as shown here Cabling the server to access the Advanced System Management Interface ASMI Learn how to access the ASMI connect external cables and power...

Страница 76: ...nd configuration procedures v Connect and disconnect cables as described in the following procedures when installing moving or opening covers on this product or attached devices To Disconnect 1 Turn o...

Страница 77: ...y __ If your server is equipped with a retention bracket route the power cord under the bracket before you plug it into the back of the server as shown here __ Plug the power cords into the system dis...

Страница 78: ...erver __ Power the system on Note Expect a delay between the time that the power is applied to the server or workstation and the time that an initial program load IPL can be performed When power is in...

Страница 79: ...k slide it into the slots that are located on the back of the rack as shown here Cabling the server to access the Operations Console This section explains how to access the Operations Console connect...

Страница 80: ...or structural damage v Disconnect the attached power cords telecommunications systems networks and modems before you open the device covers unless instructed otherwise in the installation and configur...

Страница 81: ...from the PC that will serve as the system console to your local network 3 Connect another network cable from the same local network to the adapter to be used for the console It is either located in a...

Страница 82: ...ng the power cords __ Connect the power cords from the display and attached devices to a power source Routing the cables through the cable management arm __ Is your server installed in a rack v No Pro...

Страница 83: ...ecure them with the straps that are provided as shown here __ After attaching the cables to the cable management arm go to the front of the rack and move the system drawer in and out Observe the cable...

Страница 84: ...minal Setting up the HMC Follow these tasks to set up your HMC for your system without logical partitions After setting up and configuring the HMC complete the following steps 1 Ensure that the power...

Страница 85: ...de for ASMI and for Nonpartitioned Systems SA76 0094 approximately 2 MB in size see sa76 0094 pdf Setting up the Operations Console or 5250 console Follow these tasks to set up your Operations Console...

Страница 86: ...s and upgrades Follow these steps to obtain updates and upgrades to your HMC machine code firmware and operating systems To obtain updates and upgrades complete the tasks in the following sections v O...

Страница 87: ...n is one of the operating systems that can be installed on your server or logical partition The following information includes instructions for preparation and installation of the Linux operating syst...

Страница 88: ...setting is Direct Internet connection b Complete required contact information Operational setting This is the port that the ESA Web User Interface uses to access Electronic Service Agent The default p...

Страница 89: ...s using the Microcode Survey function in IVM Perform Step 1 through 3 to update the Virtual I O Server s firmware and device microcode through the IVM when you have an Internet connection from the man...

Страница 90: ...Microcode Updates tab 3 Click Generate New Survey A list of devices is displayed 4 Ensure that the current level of firmware that is displayed for any updated devices match the level you installed Upd...

Страница 91: ...ield type optical_device_path microcode for example dev cd0 microcode Note Ensure you type microcode after the optical device path or the firmware will not be found 7 Click Generate New Survey A list...

Страница 92: ...or your operating systems Obtaining operating system fixes for AIX or Linux Learn how to download and install fixes for your operating systems To keep your operating system running smoothly it is impo...

Страница 93: ...is product to properly wired outlets v When possible use one hand only to connect or disconnect signal cables v Never turn on any equipment when there is evidence of fire water or structural damage v...

Страница 94: ...s will exceed the manufacturer s recommended ambient temperature for all your rack mounted devices v Do not install a unit in a rack where the air flow is compromised Ensure that air flow is not block...

Страница 95: ...before you pull the unit out from the rack v Ensure that the cables at the rear of the system or expansion unit do not catch or bind as you pull the unit out from the rack v Ensure the rails are fully...

Страница 96: ...86 Installation Guide for the 03E 4A 07M 15 and 08M 25...

Страница 97: ...chnology products successfully The following list includes the major accessibility features v Keyboard only operation v Interfaces that are commonly used by screen readers v Keys that are tactilely di...

Страница 98: ...88 Installation Guide for the 03E 4A 07M 15 and 08M 25...

Страница 99: ...incorporated in new editions of the publication The manufacturer may make improvements and or changes in the product s and or the program s described in this publication at any time without notice Any...

Страница 100: ...d Users who experience unplanned outages system failures power fluctuations or outages or component failures must verify the accuracy of operations performed and data saved or transmitted by the syste...

Страница 101: ...his device must accept any interference received including interference that may cause undesired operation Industry Canada Compliance Statement This Class A digital apparatus complies with Canadian IC...

Страница 102: ...ake adequate measures Electromagnetic Interference EMI Statement People s Republic of China Declaration This is a Class A product In a domestic environment this product may cause radio interference in...

Страница 103: ...terungskomponenten von Fremdherstellern ohne Empfehlung der IBM gesteckt eingebaut werden EN 55022 Klasse A Ger te m ssen mit folgendem Warnhinweis versehen werden Warnung Dieses ist eine Einrichtung...

Страница 104: ...ufacturer Except as expressly granted in this permission no other permissions licenses or rights are granted either express or implied to the publications or any data software or other intellectual pr...

Страница 105: ......

Страница 106: ...BULL CEDOC 357 AVENUE PATTON B P 20845 49008 ANGERS CEDEX 01 FRANCE REFERENCE 86 A1 55EW 01...

Отзывы: