www.prolight.co.uk
Giga Bar System
User Manual
10
Setting dimmer curves:
To set the dimmer curves, press the
“MODE”
button to show
“DIM CURVE”
on the LCD display.
Now press the
“ENTER”
button and use the
“UP”
and
“DOWN”
buttons to select LED or halogen.
Press the
“ENTER”
button to confirm your setting.
To exit out of any of the above options, press the
“MODE”
button.
Setting static colours for each LED panel:
To set the static colour for each LED panel, press
the
“MODE”
button to show
“DIMMER”
on the
LCD display. Now press the
“ENTER”
button and
use the
“UP”
and
“DOWN”
buttons to select the
LED panel from 01-04. Now press the
“ENTER”
button to set the brightness of the selected LED
panel. Using the
“UP”
and
“DOWN”
buttons set the
LED panel to the desired brightness
(R: 0-99, G: 0-99, B: 0-99). Press the
“ENTER”
button to confirm your setting.
To exit out of any of the above options, press the
“MODE”
button.
Setting the master dimmer:
To set the master dimmer, press the
“MODE”
button to show
“MASTER DIMMER”
on the LCD
display. Now press the
“ENTER”
button and use
the
“UP”
and
“DOWN”
buttons to set the master
dimmer from 0-99. This will effect all the modes
except DMX and I.R remote.
Press the
“ENTER”
button to confirm your setting.
To exit out of any of the above options, press the
“MODE”
button.
Setting flow invert:
To set the flow invert, press the
“MODE”
button
to show
“FLOW INVERT”
on the LCD display. Now
press the
“ENTER”
button and use the
“UP”
and
“DOWN”
buttons to set the flow invert to on or off.
Press the
“ENTER”
button to confirm your setting.
To exit out of any of the above options, press the
“MODE”
button.
Setting the IR remote:
To set the IR remote, press the
“MODE”
button to
show
“IR ACTIVE”
on the LCD display. Now press
the
“ENTER”
button and use the
“UP”
and
“DOWN”
buttons to set the I.R remote to on or off.
Press the
“ENTER”
button to confirm your setting.
To exit out of any of the above options, press the
“MODE”
button.
NOTE: When in IR mode, all other control options will be over-
ridden.
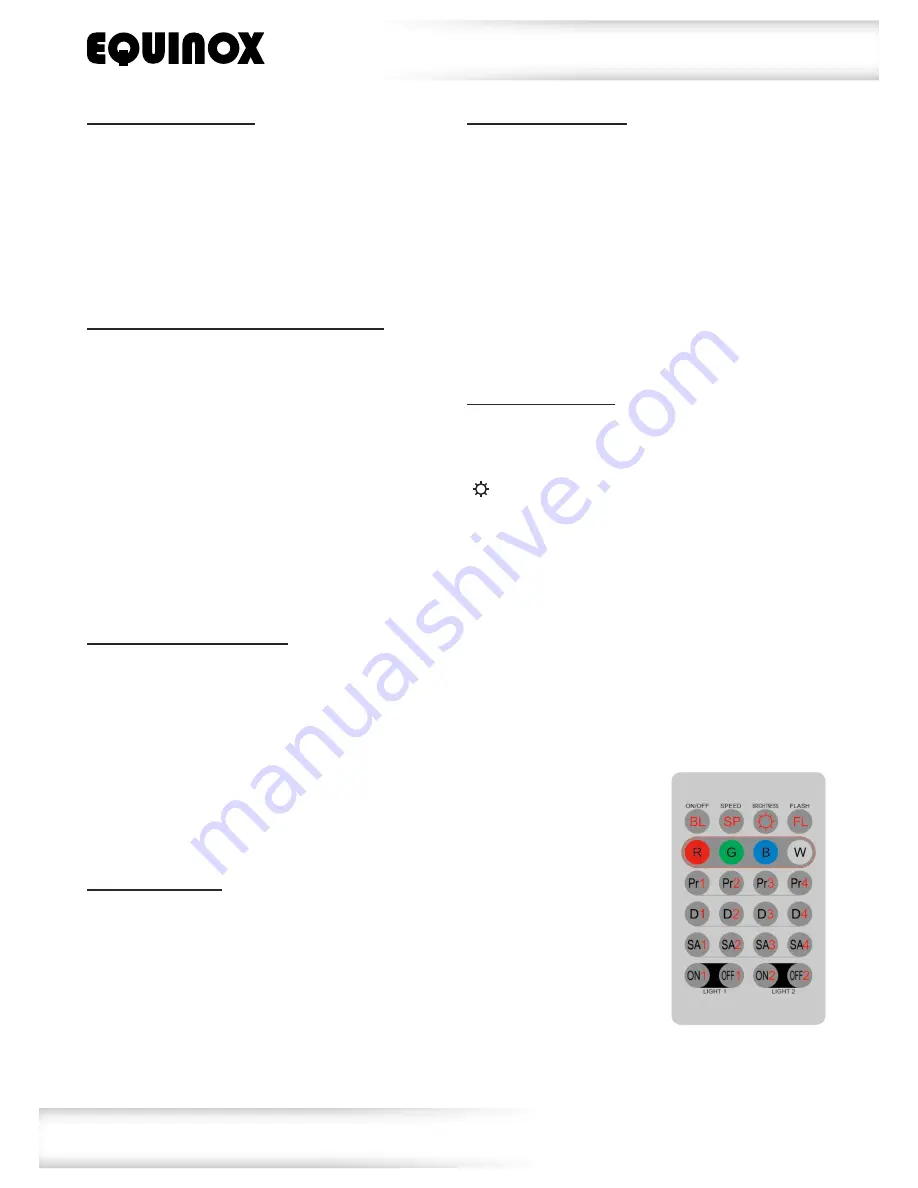
IR remote functions:
Note: When multiple
fixtures are being linked,
the slave units must be
set into slave mode via
the LCD display on the
Giga Bar(s).
“BL” button: Use this button to turn the unit on and off.
“SP” button: Use this button to increase or decrease the speed of
the program
(Press 1 for slow, 2 for medium, 3 for fast and 4 for off)
“ ” button: Use this button to increase or decrease the brightness
of the LEDs (Press 1 for 50%, 2 for 75%, 3 for 100% and 4 for off)
“FL” button: Use this button to add strobe to any of the shows.
(Press 1 for slow, 2 for medium, 3 for fast and 4 for off)
“RGBW” buttons: Use these buttons to increase or decrease the
brightness of each individual colour.
Note: “W” will adjust R,G and B LEDs.
(Press 1 for 50%, 2 for 75%, 3 for 100% and 4 for off)
“PR” buttons: Use these buttons to select one the built-in colour
change programs.
“D” buttons: Use these buttons to select one the built-in colour fade
programs.
“SA” buttons: Use the buttons to select one of the sound active
programs.
“ON1/OFF1” button: Use this button to power up and power down
the IEC power output 1.
“ON2/OFF2” button: Use this button to power up and power down
the IEC power output 2.


