background image

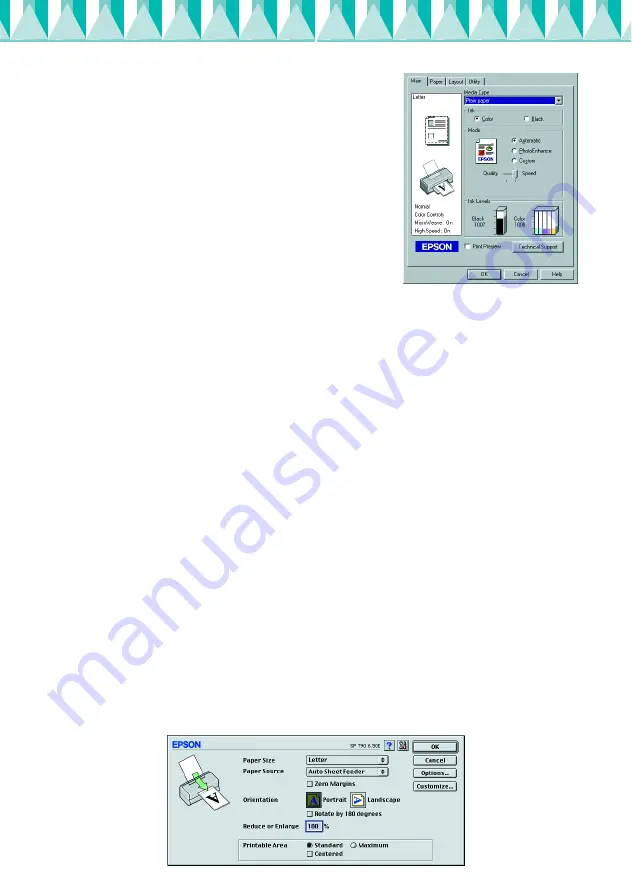
5. Make sure your printer is selected in the 

Name list box, then click 

Properties

. The 

printer driver opens.

6. Click the 

Main

 tab, then click anywhere 

in the Media Type box and select 

Photo 

Quality Ink Jet Paper

.

7. Select 

Color

 as the Ink setting.

8. Select 

Automatic

 as the Mode setting. 

When 

Automatic

 is selected, the printer 

software optimizes other settings 
according to the Media Type and Ink 
settings you make.

9. Click the 

Paper

 tab, then click anywhere in the Paper Size box and 

select the paper size that is loaded in the printer.

10. Click 

OK

 at the bottom of the printer driver window. You return to 

the Print dialog box (or a similar dialog box).

11. Click 

Close

Print

, or 

OK

 to print. You may need to click a 

combination of these buttons.

While printing, the EPSON Progress Meter is displayed, showing the 
printing progress and the status of your printer.

Note:
If the sample file does not print correctly , see “Problem Solver” in the online 
Reference Guide for solutions.

For Macintosh users

Follow these steps to print the sample file.
1. Make sure that A4 or Letter size paper is loaded in the printer.
2. Insert the printer software CD in the CD-ROM drive.
3. Open the 

Install Printer Driver/Utility

 folder in the EPSON folder or 

the 

Installation

 folder in your preferred language folder, then 

double-click the 

README

 file.

4. Click 

Page Setup

 on the File menu. The following dialog box 

appears.

Содержание Stylus Photo 790

Страница 1: ...4013104 00 xxx ...

Страница 2: ...e contents may vary in certain locations The ink cartridges packaged with your printer are for initial setup In order to maintain high quality printouts your printer will use large quantities of ink during the setup process As a result the ink cartridges used for setup will empty faster than normal black color ink cartridges power cord The power cord may come attached to the printer in certain loc...

Страница 3: ...t comes with a USB port or Windows Me upgraded from a Windows 98 pre installed model Using a parallel interface for Windows users To connect the printer to your PC you need a shielded twisted pair parallel cable Follow the directions below 1 Make sure that both the printer and the computer are turned off 2 Plug the cable connector securely into the printer s interface connector Then squeeze the wi...

Страница 4: ...at fits the computer 3 Connecttheother end ofthecableto the computer s USB port Installing the Printer Software After connecting the printer to your computer you need to install the software included on the Printer Software for EPSON Stylus PHOTO 790 CD ROM shipped with your printer Your printer software includes Printer driver and utilities The printer driver runs or drives your printer use it to...

Страница 5: ... that your printer is turned off 2 Turn on your computer and start Windows If the New Hardware Found dialog box or any other Wizard appears click Cancel 3 Insert the printer software CD shipped with your printer in the CD ROM drive The Installer dialog box appears If it does not double click the My Computer icon click the CD ROM icon then click Open on the File menu Then double click EPsetup exe i...

Страница 6: ...to restart your computer do so If you are a Windows 2000 user and using parallel cable click the Stop Search button when the USB device driver installation starts then follow the on screen instructions 6 After turning on the printer the Setup utility opens automatically Follow the on screen instructions to install the ink cartridges check the print head nozzles and clean the print head When a mess...

Страница 7: ... software 1 Turn on your Macintosh and insert the software CD in the CD ROM drive The EPSON printer software CD ROM opens automatically 2 If separate folders for several languages appear double click the folder for your preferred language Open the Installer folder and then double click the Installer icon Note It is possible to install the Reference Guide on your hard drive from the printer softwar...

Страница 8: ... using the last printer selected Follow the steps below to select your printer in the Chooser 1 Choose Chooser from the Apple menu Then select the icon for your printer and the port that your printer is connected to 2 Select the appropriate Background Printing radio button to turn background printing on or off When background printing is on you can use your Macintosh while it is preparing a docume...

Страница 9: ...automatically when your printer software installation is complete Follow the on screen instructions If you cannot access the Setup utility refer to the next section Using the printer s control panel Using the printer s control panel If you are a Macintosh user or cannot access the Setup utility use the printer s control panel to install the ink cartridges Before installing the ink cartridges note ...

Страница 10: ... which is the ink cartridgeinstallation position The P power light flashes and the b error light comes on c Caution Do not move the print head by hand Doing so may damage the printer 3 Push back the release tabs and lift up the ink cartridge clamps 4 Open the ink cartridge packages Next remove only the yellow tape seals from each cartridge ...

Страница 11: ...nt normal operation and printing Do not remove the green IC chip from the side of the cartridge If you install an ink cartridge without a chip the printer may be damaged 5 Align the tabs on each ink cartridge so that they are resting on the tabs protruding from the base oftheopened ink cartridgeclamps Do not apply excessive force to the cartridges c Caution Make sure that the ink cartridge tabs ar...

Страница 12: ...is working correctly by loading paper then printing a nozzle check page and if necessary cleaning the print head Refer to the appropriate section below Loading paper Follow the steps below to load plain paper in the printer 1 Lower the output tray and slide the left edge guide so that the distance between the edge guides is slightly wider than the width of your paper 2 Fan a stack of paper then ta...

Страница 13: ...ur First Page for instructions Cleaning the print head Follow the steps below to clean the print head 1 Make sure that the P power light is on and that the b error light is off 2 Hold down the b maintenance button for three seconds The printer starts cleaning the print head and the P power light begins flashing Print head cleaning takes about thirty seconds to complete c Caution Neverturnoffthepri...

Страница 14: ...on how to use your application Depending on the type of document you are printing and the type of paper you are using you may have to make settings different from those described in this section For Windows users Follow these steps to print the sample file 1 Make sure that A4 or Letter size EPSON Photo Quality Ink Jet Paper is loaded in the printer 2 Insert the printer driver CD in the CD ROM driv...

Страница 15: ... return to the Print dialog box or a similar dialog box 11 Click Close Print or OK to print You may need to click a combination of these buttons While printing the EPSON Progress Meter is displayed showing the printing progress and the status of your printer Note If the sample file does not print correctly see Problem Solver in the online Reference Guide for solutions For Macintosh users Follow th...

Страница 16: ...int dialog box appears 9 Select Plain Paper from the Media Type list 10 Select Color as the Ink option 11 Select Automatic as the Mode setting This causes the printer softwareto optimize other settings according to the Media Type and Ink settings that you make 12 Click Print to start printing While printing is in progress the EPSON Progress Meter is displayed showing the printing progress and the ...

Отзывы: