background image

Replacing Ink Cartridges

33

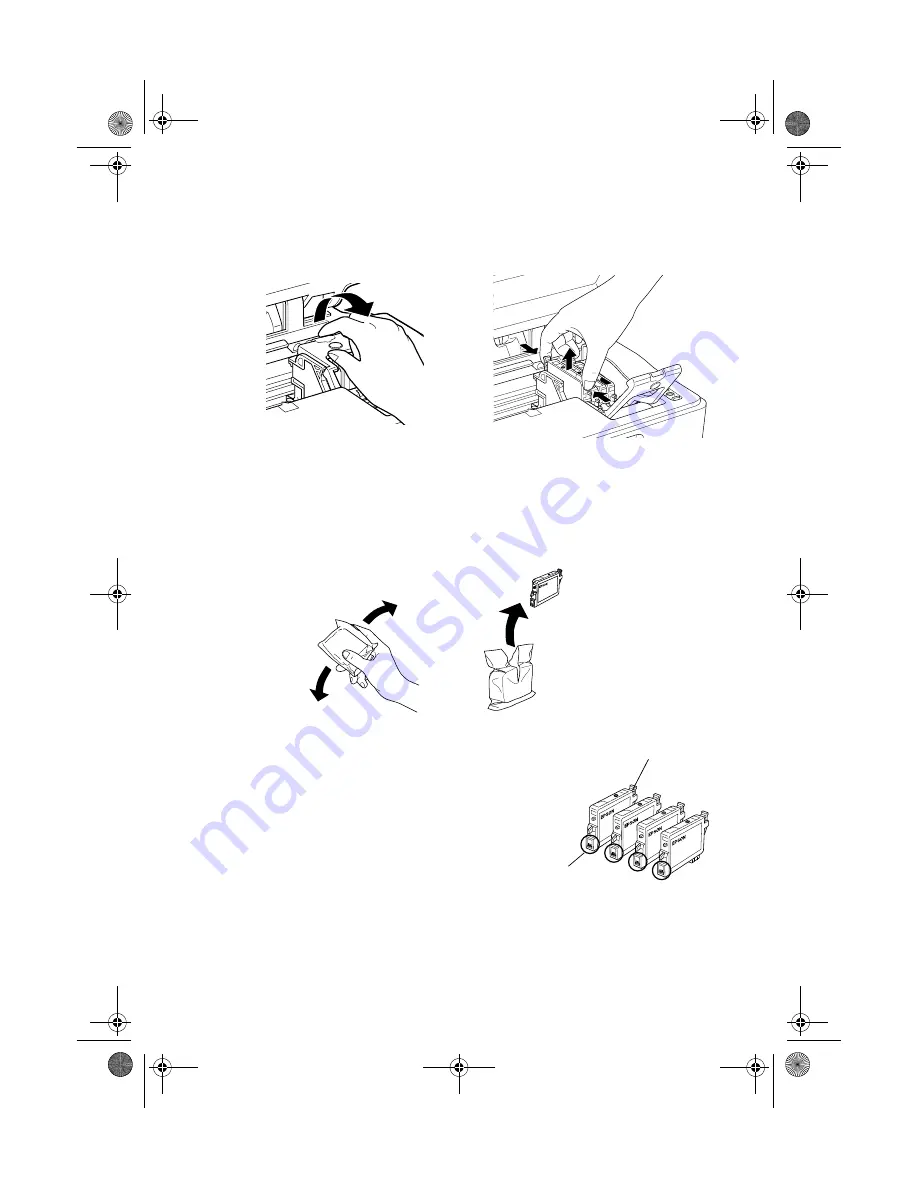
5. Open the cartridge cover and squeeze the tab at the back of the empty/low 

cartridge and lift it straight out. Dispose of it carefully. Do not take the used 
cartridge apart or try to refill it.

Warning: 

If ink gets on your hands, wash them thoroughly with soap and water. If ink gets 
into your eyes, flush them immediately with water. 

6. Before you open the new ink cartridge package, shake it four or five times. 

Then remove it from the package.

Caution: 

Do not remove or tear the label 
on the cartridge; otherwise, ink 
will leak.

Do not touch the green chip on 
the side of the cartridge. This 
can damage the ink cartridge.

Do not touch this part

Do not damage the tab

CX4600.book  Page 33  Friday, May 28, 2004  1:48 PM

Содержание Stylus CX4600

Страница 1: ...Quick Reference Basic Copying Printing and Scanning Maintaining Your CX4600 Solving Problems CPD 18250R1 4049976 01 XXX CX4600 book Page 1 Friday May 28 2004 1 48 PM ...

Страница 2: ...t to Select Photos 15 Printing All Photos or DPOF Photos 18 Printing From Your Computer 19 Printing in Windows 19 Printing With Macintosh OS X 22 Using Special Papers 25 Scanning a Photo or Document 26 Maintaining Your CX4600 29 Checking the Print Head Nozzles and Ink 29 Cleaning the Print Head 30 Replacing Ink Cartridges 31 Solving Problems 36 Error Indicators 36 Problems and Solutions 38 Where T...

Страница 3: ...ws or Macintosh computer such as improving the color and quality of your prints and scanned images or producing double sided documents For complete instructions on everything the CX4600 can do see the on screen CX4600 Reference Guide An icon for the manual was automatically placed on your desktop when you installed the software Please follow these guidelines as you read your CX4600 instructions Wa...

Страница 4: ... in your CX4600 See the Reference Guide for instructions on loading other types of media 1 Open the paper support and output tray then slide out the extensions 2 Flip the feeder guard forward 3 Slide the left edge guide to the left CX4600 book Page 4 Friday May 28 2004 1 48 PM ...

Страница 5: ...for the best results you ll want to use one of Epson s special ink jet papers designed for your printer For example your photos will look great printed on Epson DURABrite Ink Glossy Photo Paper See page 25 for more information 5 Slide the left edge guide against the left edge of the paper but not too tightly 6 Flip the feeder guard back Also make sure the paper thickness lever is set down to the m...

Страница 6: ...uter using the EPSON Smart Panel Copy Utility on page 10 Placing the Original on the Glass 1 Open the document cover and place your original face down on the glass in the upper left corner Move your original about 1 10 inch away from the top and left edges so all of it will be copied Move the original about 1 10 inch 2 5 mm away from the top and left edges to avoid cropping CX4600 book Page 6 Frid...

Страница 7: ...document you can remove the document cover Just open it and pull it straight up If you need to press the document flat while you copy or scan it do not press too hard and be careful not to move it Caution Do not use excessive force on the document cover and do not twist it diagonally You may damage the document cover When you are done replace the document cover by inserting the tabs back into the ...

Страница 8: ...opy window You can select up to 9 copies at a time this way To make more than 9 copies see page 10 5 Press the paper type button to select Plain Paper The light indicates which type is selected 6 Press the paper size button to select Letter 7 If you want your copies automatically reduced or enlarged to fit the loaded paper size press the Fit to Page button 8 To make a color copy press the x Start ...

Страница 9: ... Photo Paper 6 Press the paper size button to select 4 x6 7 If you want your photos printed without a white border press the Fit to Page button Otherwise they are printed with a 06 inch 1 5 mm margin 8 To make a color copy press the x Start Color button To make a black and white copy press the x Start B W button The On light flashes and after a moment the CX4600 starts printing If you need to stop...

Страница 10: ... Up Printing If you want to make a copy quickly and do not need high quality you can print a draft copy The print quality is reduced but the copy is printed faster Load plain letter size paper and select Plain Paper and Letter size on the control panel When you are ready to copy press and hold down the y Stop button then press the x Start Color button to copy in color or the x Start B W button to ...

Страница 11: ...rom here you can choose the size and number of copies you want to make and whether to print them in color or black and white You can also lighten or darken the copies or enhance the image quality or color For example you can use the Color Restoration feature as described on page 12 to bring faded photographs back to life Click here Click for more information Make sure EPSON Stylus CX4600 is select...

Страница 12: ...ce Type box You see this screen 2 Choose Photo and click OK You see this screen 3 Click the Color Restoration check box 4 Change any other copy settings as necessary 5 Click the Copy button on the screen to begin copying Choose Photo Click this box Start copying CX4600 book Page 12 Friday May 28 2004 1 48 PM ...

Страница 13: ...mage Formats below Inserting the Card on page 14 Printing an Index Sheet to Select Photos on page 15 Printing All Photos or DPOF Photos on page 18 For instructions on copying memory card files between your CX4600 and a computer or other device see the Reference Guide Compatible Cards and Image Formats You can use the following types of cards with your CX4600 Slot A Slot B Slot C Memory card light ...

Страница 14: ... Make sure the CX4600 is turned on Note When you are printing directly from a memory card it is best if the CX4600 is not connected to your computer or your computer should be turned off 2 Open the memory card door Media format DCF version 1 0 compliant File format JPEG DOS FAT FAT 12 or 16 one partition taken with a DCF version 1 0 compliant digital camera Image size Vertical 120 to 4600 pixels h...

Страница 15: ...is not flashing then pull the card straight out of its slot Note You can print only in color when printing directly from a memory card you cannot print in black and white Caution Do not remove the card or turn off the CX4600 while the memory card light is flashing you may lose data on the card Printing an Index Sheet to Select Photos You can print an index sheet which is like a photographer s cont...

Страница 16: ... button The On light flashes and the CX4600 starts printing the index sheet s This may take a few minutes For multiple index sheets the pages are printed from the last sheet to the first so the most recent images are printed first Now you can follow the instructions below to select which photos to print Selecting Photos on the Index Sheet 1 Once you have printed the index sheet use a dark pen or p...

Страница 17: ...ake sure the Print From Index Sheet light is on 6 Select Plain Paper or Photo Paper whichever you loaded If you select Plain Paper the photo s print with a white border If you select Photo Paper the photos print borderless to the edge of the paper 7 Select Letter or 4 x6 for the paper size 8 Press the x Start Color button to start printing Note If you need to stop printing press the y Stop button ...

Страница 18: ...Card button until the Print All DPOF light comes on Note If the memory card does not contain DPOF information one copy of all the photos on the card will be printed 4 Select Plain Paper or Photo Paper whichever you loaded If you select Photo Paper the photos print borderless to the edge of the paper 5 Select Letter or 4 x6 for the paper size 6 Press the x Start Color button to start printing Note ...

Страница 19: ...lso be sure to use the right paper and select the correct paper Type or Media setting in the printer driver See page 25 for more information Follow the instructions in these sections Printing in Windows below Printing With Macintosh OS X on page 22 Using Special Papers on page 25 Printing in Windows 1 Load paper see page 4 2 Open the photo or document in your application program 3 Open the File me...

Страница 20: ...c print settings Make sure you choose the correct paper Type setting for the paper you are using See page 25 for details Note For more information about print settings click the or Help button Select the type of document you re printing choose Photo or Best Photo for pictures Select your document Orientation Select your paper Size Select your paper Type Click here for more options Click here for b...

Страница 21: ...save your settings then click OK or Print to start printing This window appears and shows the progress of your print job Select a color management method To choose No Color Adjustment click ICM first Click here to select Photo RPM for the best print quality on certain paper types Select Print Options as necessary Select Paper Quality Options as necessary Click here if you want to see this Advanced...

Страница 22: ... your application 3 Select Page Setup from the File menu Make the following settings For Borderless printing choose the Sheet Feeder Borderless option in the Paper Size list for your paper size Letter 8 x 10 or 4 x 6 4 Click OK to close the Page Setup window 5 Select Print from the File menu You see a window like this one Select Stylus CX4600 Select your Paper Size Select your document or image or...

Страница 23: ...age range Layout Select page layout options Output Options Save your print job as a PDF file Expansion Reduce or enlarge the image size for borderless printing ColorSync or Color Management Select ColorSync or adjust the color controls change the gamma setting or turn off color adjustments in the printer software Summary View a list of all your selections Select your Media Type see page 25 Select ...

Страница 24: ...k the CX4600 icon when it appears in the dock on the bottom of your desktop If you re using OS X 10 2 x click the Print Center icon instead then double click Stylus CX4600 in the Printer List window You see a screen like this 11 When you re finished close the CX4600 window or Print Center Select Photo RPM for the best print quality on certain paper types Cancel printing Resume printing Pause print...

Страница 25: ...hes S041257 Epson Double Sided Matte Paper Letter 8 5 11 inches S041568 Epson Premium Semigloss Photo Paper Letter 8 5 11 inches S041331 Epson Photo Quality Self Adhesive Sheets A4 8 3 11 7 inches S041106 Epson Glossy Photo Greeting Card Kit Letter 8 5 11 inches S041606 Epson Photo Quality Ink Jet Paper Letter 8 5 11 inches S041062 A4 8 3 11 7 inches S041061 Legal 8 3 14 inches S041067 Epson Photo...

Страница 26: ...me Mode provides a simple screen giving you automatic image adjustments previewing and cropping capability and preset configurations for various types of scans Includes Color Restoration Professional Mode lets you manually configure advanced image settings including Color Restoration You can scan from any TWAIN compliant application such as Adobe Photoshop using EPSON Scan Or you can start EPSON S...

Страница 27: ...scanning directly from your desktop do one of the following In Windows select Start All Programs or Programs EPSON Scan EPSON Scan On a Macintosh double click EPSON Scan in the Applications folder If you see the File Save Settings window choose the location where you want to save your scanned file and type a name for it in the Prefix box Select a file format in the Image Format box Then click OK T...

Страница 28: ...ional mode scroll down to the bottom of the screen and click the Color Restoration check box In Home mode you need to Preview the photo first step 5 above then select Image Adjustments and click the Color Restoration check box 7 Click the Scan button If you scanned from an application like Photoshop your scanned image opens in your application window If you opened EPSON Scan from the Start button ...

Страница 29: ...teps below to check the print head nozzles and remaining ink levels using the control panel 1 Turn off the CX4600 2 Load letter size paper in the sheet feeder 3 Press the B ink and P On buttons together and hold them down for about 5 seconds The CX4600 turns on and prints a test pattern It also shows the percentage of ink left in each cartridge If the pattern does not look good try cleaning the pr...

Страница 30: ...s until the On light starts flashing The CX4600 runs a head cleaning cycle and the On light flashes Caution Never turn off the CX4600 while head cleaning is in progress You may damage it 3 When the On light stops flashing run a nozzle check as described on page 29 to verify that the print head is clean 4 If there are still gaps or the test patterns are faint run another cleaning cycle and check th...

Страница 31: ...ealer referral Use these part numbers when you order or purchase new ones Caution Leave the empty cartridge installed until you have obtained a replacement or the ink remaining in the print head nozzles may dry out To ensure good results use genuine Epson ink cartridges and do not refill them Other products may cause damage to your CX4600 not covered by Epson s warranty 1 Make sure the CX4600 is o...

Страница 32: ... or more seconds it tells the printer to start cleaning the print head Caution Do not move the print head by hand this may damage the CX4600 Always press the B ink button to move it 4 Press the B ink button again If more than one cartridge is empty or low the next cartridge moves to the _ ink out mark If all of the empty or low ink cartridges have been identified the print head moves to the ink ca...

Страница 33: ... thoroughly with soap and water If ink gets into your eyes flush them immediately with water 6 Before you open the new ink cartridge package shake it four or five times Then remove it from the package Caution Do not remove or tear the label on the cartridge otherwise ink will leak Do not touch the green chip on the side of the cartridge This can damage the ink cartridge Do not touch this part Do n...

Страница 34: ...o the cartridge holder and push it down until it clicks into place 8 Replace any other cartridges that need to be replaced 9 Close the ink cartridge cover and press it until it clicks into place 10 Close the scanner CX4600 book Page 34 Friday May 28 2004 1 48 PM ...

Страница 35: ...ht stops flashing and remains on and the B ink light goes out Caution Never turn off the CX4600 while the On light is flashing or you ll waste ink Note If the B ink light stays on not flashing the ink cartridge may not be installed correctly Press the B ink button again and reinstall the ink cartridge until it clicks into place CX4600 book Page 35 Friday May 28 2004 1 48 PM ...

Страница 36: ...Help on page 40 Error Indicators Light status LED message Cause Solution Error On On Flashing No paper is loaded in the sheet feeder Load paper in the sheet feeder Then press x Start Color to continue or y Stop to cancel See page 4 Multiple pages have been fed into the sheet feeder Remove and reload the paper Then press x Start Color to continue or y Stop to cancel See page 4 Error Flashing Paper ...

Страница 37: ... sheet does not match the photos on the memory card Remove the memory card and insert the card used to print the index sheet see page 14 or place the correct index sheet on the glass Then press x Start Color to continue or y Stop to cancel Error Flashing fast H The paper thickness lever is set to the position If you have set the lever to the position because you are printing envelope s press x Sta...

Страница 38: ...slide the left edge guide against the paper but not too tightly Make sure the paper is not in front of the feeder guard Do not load too many sheets at once up to 20 sheets of photo paper and 100 sheets of plain paper See the Reference Guide for more information If paper is jammed the red m Error light flashes Follow these steps to clear the jam 1 Press the x Start Color button to eject the jammed ...

Страница 39: ...ridges see page 31 Set the paper thickness lever to the m position for most paper types If you are printing on envelopes set the lever to the position If you notice light or dark bands across your printouts or they are too faint you may need to clean the print head This unclogs the nozzles so they can deliver ink properly Run a nozzle check as described on page 29 to see if the print head needs cl...

Страница 40: ...U S sales only In Canada please call 800 463 7766 for dealer referral Other Software Technical Support Service Access World Wide Web From the Internet you can reach Epson Support at http support epson com At this site you can download drivers and other files look at product documentation access troubleshooting information and receive technical advice through e mail Automated Telephone Services A v...

Страница 41: ... in the wrong orientation may damage both devices connected by the cable Do not let the power cord become damaged or frayed If you use an extension cord with the CX4600 make sure the total ampere rating of the devices plugged into the extension cord does not exceed the cord s ampere rating Also make sure the total ampere rating of all devices plugged into the wall outlet does not exceed the wall o...

Страница 42: ... recycling Do not put it in the trash Ink Cartridge Safety Instructions Keep ink cartridges out of the reach of children and do not drink the ink Be careful when you handle used ink cartridges there may be ink remaining around the ink supply port If ink gets on your skin wash it off with soap and water If it gets in your eyes flush them immediately with water Leave the ink cartridges installed Rem...

Страница 43: ...ct ENERGY STAR Compliance As an ENERGY STAR Partner Epson has determined that this product meets the ENERGY STAR guidelines for energy efficiency The EPA ENERGY STAR office equipment program is a voluntary partnership with the computer and office equipment industry to promote the introduction of energy efficient personal computers monitors printers fax machines and copiers in an effort to reduce a...

Страница 44: ... device If this equipment has more than one interface connector do not leave cables connected to unused interfaces Changes or modifications not expressly approved by the manufacturer could void the user s authority to operate the equipment For Canadian Users This Class B digital apparatus complies with Canadian ICES 003 Cet appareil numérique de la classe B est conforme à la norme NMB 003 du Canad...

Страница 45: ...hnician will provide telephone diagnostic service to determine whether the printer requires service If service is needed Epson will at its option exchange or repair the printer without charge for parts or labor If Epson authorizes an exchange for the defective unit Epson will ship a replacement printer to you freight prepaid so long as you use an address in Canada or the U S excluding Puerto Rico ...

Страница 46: ...produced you will be held responsible for the costs incurred THE WARRANTY AND REMEDY PROVIDED ABOVE ARE EXCLUSIVE AND IN LIEU OF ALL OTHER EXPRESS OR IMPLIED WARRANTIES INCLUDING BUT NOT LIMITED TO THE IMPLIED WARRANTIES OF MERCHANTABILITY NON INFRINGEMENT OR FITNESS FOR A PARTICULAR PURPOSE SOME LAWS DO NOT ALLOW THE EXCLUSION OF IMPLIED WARRANTIES IF THESE LAWS APPLY THEN ALL EXPRESS AND IMPLIED...

Страница 47: ...rising from the use of any options or any consumable products other than those designated as Original Epson Products or Epson Approved Products by Seiko Epson Corporation Responsible Use of Copyrighted Materials Digital cameras scanners and ink jet printers like conventional photocopiers and cameras can be misused by improper copying or printing of copyrighted material While some countries laws pe...

Страница 48: ...Printed in XXXXXX XX XX XX CX4600 book Page 48 Friday May 28 2004 1 48 PM ...

Отзывы: