background image

6

6

|

Setting Up the SpectroProofer

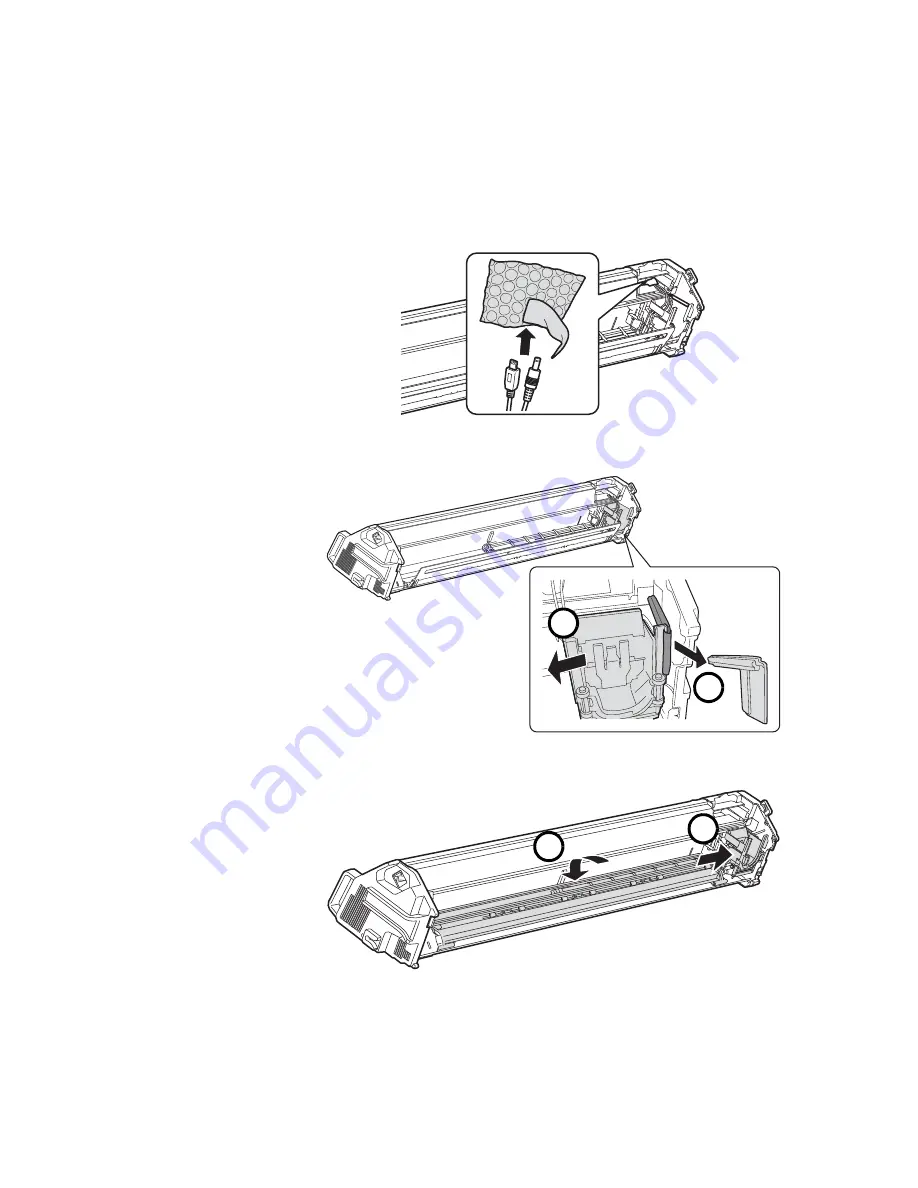
4. Remove the packing material from the cables on the carriage.

5. Slide the carriage to the left and then remove its plastic retainer.

6. Slide the carriage back to the right, then lower the paper presser.

Note: 

Save the retainer along 
with other packing 
materials.

2

1

2

1

Содержание Spectroproofer

Страница 1: ...Setup and Maintenance ...

Страница 2: ...he SpectroProofer 8 Connecting the Cables 12 Aligning the SpectroProofer 16 Maintenance and Problem Solving 17 Removing the SpectroProofer 17 Cleaning the SpectroProofer 19 Error Messages 23 Recertification 25 Where To Get Help 25 Specifications 26 Notices 28 Important Safety Instructions 28 FCC Compliance Statement 28 Warranty 29 ...

Страница 3: ...nd product information Be careful when handling the spectrophotometer calibration tile and backing plates If they become scratched or soiled your color measurements may be affected Note that the spectrophotometer and tile come as a numbered set they have been calibrated to work together If you purchase two or more products be sure you use the same numbered pieces together Introduction Note The ILS...

Страница 4: ...ake sure you have all the parts shown below Setting Up the SpectroProofer Warning The 44 SpectroProofer is heavy Two people are required to lift it Caution Be sure to check the box and packaging material thoroughly for any missing items pieces may have shifted during shipment SpectroProofer main unit Backing plates 24 kit Backing plates 44 kit Mounting rails bolts and hex wrench Spectrophotometer ...

Страница 5: ...per presser shown below Raise the paper presser and remove its packing material 3 Remove any packing tape from the carriage Note The 44 model is shown These instructions also apply to the 24 model Save the original box and packing materials in case you need to ship the equipment Caution Check for packing material all around and under the paper presser ...

Страница 6: ...cking material from the cables on the carriage 5 Slide the carriage to the left and then remove its plastic retainer 6 Slide the carriage back to the right then lower the paper presser Note Save the retainer along with other packing materials 2 1 2 1 ...

Страница 7: ...r presser to lock it in place 8 Insert the spectrophotometer into the carriage so it clicks into place and then insert the two alignment pins Caution Make sure the alignment pins are flush with the carriage otherwise the SpectroProofer may not work properly Alignment pins ...

Страница 8: ... firmware installed Follow the instructions for updating the firmware in your Setup Guide 1 Turn off the printer and unplug it from the AC outlet 2 Remove the cover plate from the printer as shown Warning Make sure the SpectroProofer and printer are unplugged from the AC outlet before connecting the spectrophotometer cables Be careful not to dislodge the spectrophotometer when connecting the cable...

Страница 9: ...at the top of the plate with the slots on the printer and then release the plate so it rests flush against the printer The backing plate adheres magnetically it is attached correctly if it doesn t move when you try to slide it Note The backing plates provide a uniformly opaque surface under the paper Use the white backing plate for most papers Use the black backing plate if your paper has low opac...

Страница 10: ... its left Make sure the plates hook together as shown Ensure that both plates rest flush against the printer and don t move when you try to slide them 5 Insert the calibration tile into the holder Rotate the cover on the back of the holder Drop in the tile with its white surface facedown Replace the cover Caution Do not touch the white surface of the tile ...

Страница 11: ... against the printer until it clicks into place The two tabs on the left side of the holder should rest on top of the backing plate 7 Install the SpectroProofer in the printer by sliding it onto the mounting rails Caution Make sure the holder is attached correctly otherwise the spectrophotometer will jam Warning The SpectroProofer is heavy Two people are required to lift it ...

Страница 12: ...B B end of the included SpectroProofer USB cable into the square port marked with the printer symbol If you ve also installed the optional Auto Take up Reel plug its USB cable into the flat port marked with the take up reel symbol 44 model only Warning Make sure the printer and the SpectroProofer are unplugged from the AC outlet before connecting the SpectroProofer cables Auto Take up Reel Spectro...

Страница 13: ...shown Then close the cover 4 Attach two cable hooks to the right leg of the printer stand Place the cable s in the hooks as shown and snap the hooks closed Warning Make sure the cables are routed properly Improper routing of the cables can restrict the spectrophotometer movement and cause errors 2 1 ...

Страница 14: ...ng Up the SpectroProofer 5 Plug the USB A end of the SpectroProofer s USB cable into the option port on the back of the printer 6 Plug the included power cord into the socket on the left side of the SpectroProofer ...

Страница 15: ...e printer stand Place the power cord in the hook and snap the hook closed 8 Plug the power cord into a grounded electrical outlet and then plug the printer back into its AC outlet Make sure the SpectroProofer s green status light comes on 2 1 Status light SpectroProofer power cord Printer power cord ...

Страница 16: ...sures an adjustment pattern This process takes about one minute to complete 5 When the alignment is complete confirm that the control panel displays the correct backing color and a successful calibration status If not repeat the installation steps to make sure that the spectrophotometer is correctly connected to its cables and properly seated flat in its holder Your SpectroProofer is now properly ...

Страница 17: ... may be caused by dust or other contamination This chapter also tells you how to respond to error messages and how to contact Epson for help Removing the SpectroProofer If you need to remove the SpectroProofer for cleaning follow these steps 1 Turn off the printer and unplug the power cord 2 Unplug the power cord from the left side of the SpectroProofer Maintenance and Problem Solving ...

Страница 18: ...on a flat surface to avoid damaging the lens 6 Unplug the cables from the spectrophotometer Note The 24 model has only one cable The 44 model may have a second cable connected to the port for the optional take up reel Warning The 44 SpectroProofer is heavy Two people are required to lift it Caution Be careful not to scratch the spectrophotometer lens when handling the unit or setting it down ...

Страница 19: ...an the SpectroProofer if you notice unusual color readings Check the following parts and clean them if necessary backing plates calibration tile spectrophotometer lens paper presser 1 Follow the instructions on page 17 to turn off the printer remove the SpectroProofer from the printer and remove the spectrophotometer from the carriage ...

Страница 20: ...to clean the spectrophotometer lens 3 Remove the tile holder from the printer 4 Remove the calibration tile from the holder Caution Do not touch the lens directly or you could scratch its coating Use only compressed air designed for cleaning optics other kinds can leave behind a contaminating residue ...

Страница 21: ...rom the surface of the calibration tile and backing plate s If necessary dampen the cloth with water to clean the surface Then use another cloth to wipe it dry 7 If you noticed that ink is transferring to the front surface of your paper you may need to clean the paper presser Slide the carriage to the right then raise the paper presser 2 1 ...

Страница 22: ...Problem Solving 8 Clean the paper presser using a soft lint free cloth dampened with a mild detergent Then use another cloth to wipe it dry 9 Lower the paper presser then slide the carriage against it to lock it in place 2 1 ...

Страница 23: ...ophotometer is not connected correctly Reconnect the cables and select No to turn off the printer Wait a moment then turn on the printer again If you do not want to use the SpectroProofer select Yes ILS30EP Error See manual and reconnect ILS30EP to SpectroProofer Mounter Turn printer off and on again The SpectroProofer is not installed correctly Turn off the printer and make sure the SpectroProofe...

Страница 24: ... not installed correctly The environmental conditions are not correct Turn the printer off then remove the SpectroProofer Check for any loose or obstructing packing materials Make sure the backing plate and the white tile holder are attached correctly Reinstall the SpectroProofer and turn the printer back on Make sure your operating environment meets the specifications see page 26 If the error app...

Страница 25: ...sibility to return the used spectrophotometer and its associated calibration tile back to Epson This exchange program is offered at the customer s expense and can be initiated by contacting Epson Customer Support at 562 276 1305 Where To Get Help Epson provides technical support and information on the installation configuration and operation of professional printing products through the Epson Pref...

Страница 26: ...20 to 26 C Humidity 35 to 65 Weight without spectrophotometer 44 SpectroProofer Approx 29 8 lb 13 5 Kg 24 SpectroProofer Approx 19 8 lb 9 0 Kg Dimensions 44 SpectroProofer 60 0 W 7 8 D 10 6 H in 1295 W 199 D 270 H mm 24 SpectroProofer 31 0 W 7 8 D 10 6 H in 787 W 199 D 270 H mm Spectrophotometer Product model X Rite ILS30EP Measurement geometry condition 0 45 ANSI ISO 5 4 Measurement aperture 3 55...

Страница 27: ...ut for ILS30EP 5 5 V 1 0 A Rated frequency range 50 to 60 Hz Input frequency range 49 5 to 60 5 Hz Rated current 44 SpectroProofer 24 SpectroProofer 0 3 A 100 V 0 25 A 100 V Power consumption 44 SpectroProofer 24 SpectroProofer Approx 10 5 W Approx 5 0 W in Ready Mode Approx 3 5 W in Sleep Mode Approx 8 5 W Approx 5 0 W in Ready Mode Approx 3 5 W in Sleep Mode Standards and approvals Safety UL6095...

Страница 28: ...e normally or exhibits a distinct change in performance The product is heavy and unwieldy Have two people unpack or carry the product FCC Compliance Statement For United States Users This equipment has been tested and found to comply with the limits for a Class B digital device pursuant to Part 15 of the FCC Rules These limits are designed to provide reasonable protection against harmful interfere...

Страница 29: ...meter Your product is designed to provide consistent high quality output in the color inkjet printing environment To ensure your complete satisfaction with its performance Epson is pleased to include the Epson PreferredSM Limited Warranty described in this document This Limited Warranty includes priority toll free technical phone support and other services as noted under the Limited Warranty for C...

Страница 30: ... property of Epson The replacement unit and parts may be new or remanufactured to Epson standards Please see below for highlights of the service program offered C On Site Response If Epson determines that a warrantied hardware defect requires repair and you are within Epson s on site service territory an Epson Authorized Servicer will be contacted to make the repair at your facility Epson will usu...

Страница 31: ...DF rollers i Any cosmetic damage or wear to product casings or covers j Any color change or fading of printed media garments or reimbursement of materials or services required for reprinting k Any product or parts purchased as used refurbished or reconditioned l Any damage caused by using improper packaging materials or improper packaging and shipping when returning a product for repair or replace...

Страница 32: ... Pre Arbitration Steps and Notice Before submitting a claim for arbitration you agree to try for sixty 60 days to resolve any dispute informally by contacting us at customer inquires ea epson com Please include your name address and contact information the facts giving rise to the dispute and the relief requested You agree to act in good faith to resolve the dispute but if you and Epson do not rea...

Страница 33: ...ther Rights You May Have This warranty gives you specific legal rights and you may also have other rights which vary from jurisdiction to jurisdiction Some jurisdictions do not allow limitations on how long an implied warranty lasts or allow the exclusion or limitation of incidental or consequential damages so the above limitations or exclusions may not apply to you 2 Warranties in Canada In Canad...

Страница 34: ... used herein are for identification purposes only and may be trademarks of their respective owners Epson disclaims any and all rights in those marks This information is subject to change without notice Legal Notices Neither Seiko Epson Corporation nor its affiliates shall be liable to the purchaser of this product or third parties for damages losses costs or expenses incurred by purchaser or third...

Страница 35: ......

Страница 36: ......

Отзывы: