background image

5

Before you can print, you need to load paper and 
insert your memory card in PictureMate. 

Load Paper

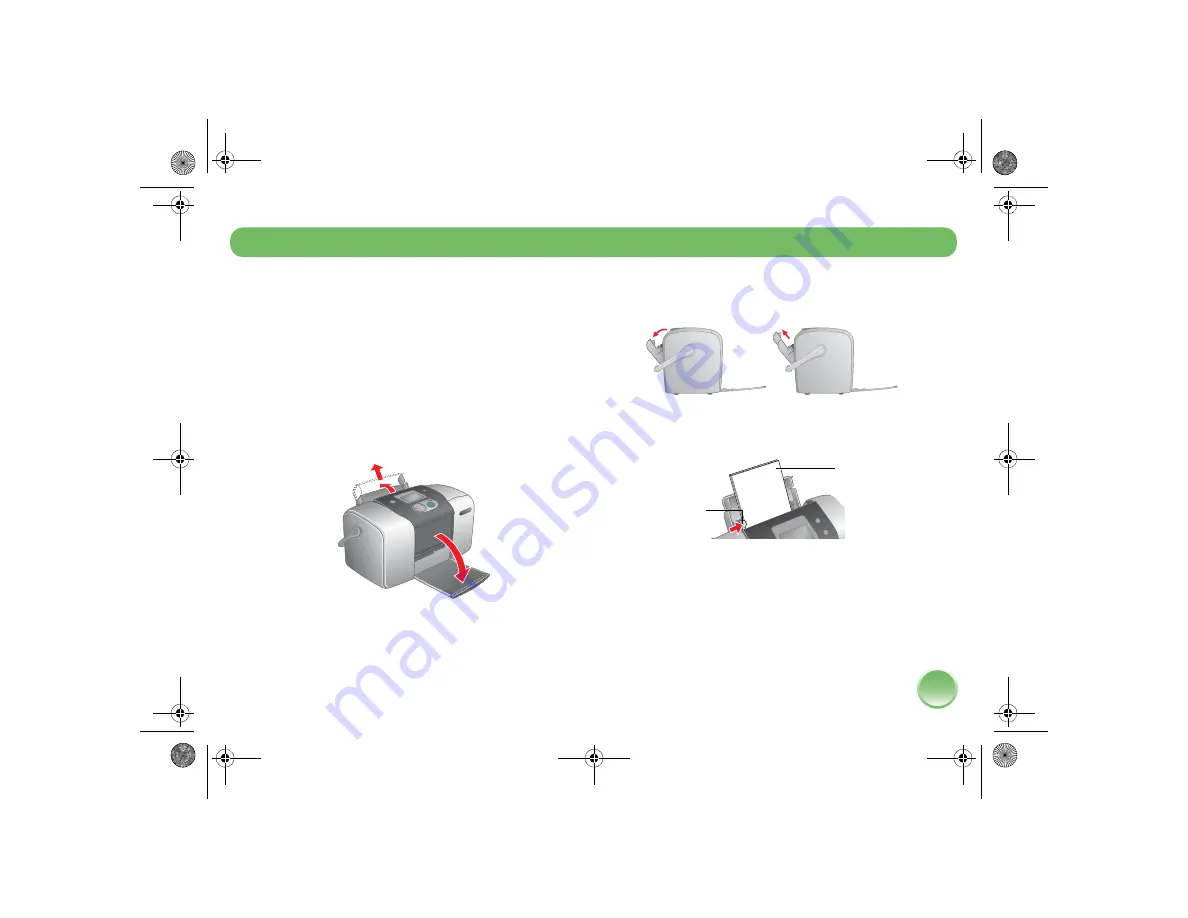
Follow these steps to load PictureMate Photo Paper:

Caution: 

Don’t load plain paper; this may damage PictureMate. 

1

Move the handle to the back and down. Then 
open the paper support and output tray.

Note: 

Keep the handle all the way down when printing 

to allow paper to feed through. 

2

Slide the top part of the paper support up gently 
until it clicks into place. 

3

Place your paper against the right edge, with the 
glossy side up. 

Note: 

Make sure paper is glossy side up to prevent 

smearing. You can load up to 20 sheets at a time.

4

Slide the left edge guide against the paper. Make 
sure it is snug, but not so tight that paper can’t 
move. 

Prepare to Print and Use the Wizard

Edge guide

Load glossy 
side up

PictureMateR.book  Page 5  Tuesday, May 17, 2005  10:17 AM

Содержание PictureMate Express Edition - Compact Photo Printer

Страница 1: ...Snap Print Enjoy CPD 19731 Printed in XXXXXX XX XX XX XXX Using PictureMate Without a Computer ...

Страница 2: ...hotos 19 Save Your Photos to a Computer or an External Device 26 Print From a Computer or an External Device 29 Replace Ink and Paper 34 Take Your PictureMate With You 40 Set PictureMate Preferences 41 Printer Care and Troubleshooting 45 Notices 54 Index 63 PictureMateR book Page 1 Tuesday May 17 2005 10 17 AM ...

Страница 3: ...Since you had negatives you could take them back later if you wanted reprints The digital process is simple too and it gives you complete control Just follow the basic steps shown on the right 1 Review and Delete After you finish taking your photos review them on your digital camera s screen Delete the photos you don t want to print or keep 2 Print Insert your camera s memory card in PictureMate c...

Страница 4: ... the camera to PictureMate and control printing right from your camera See page 31 If you have a Bluetooth enabled PDA cell phone or computer you can send photos wirelessly to PictureMate for printing You just need the optional Epson Bluetooth Photo Print Adapter See page 32 Note PictureMate also supports P I M PRINT Image MatchingTM and Exif Print image enhancement standards that are built into m...

Страница 5: ...tridge take care of PictureMate and troubleshoot problems To use PictureMate with your Macintosh or Windows PC see Using PictureMate With a Computer It explains how to install the software and connect to your computer The on screen User s Guide on the CD provides comprehensive information and instructions for using PictureMate Where to Get Ink and Paper See the inside back cover for information on...

Страница 6: ...way down when printing to allow paper to feed through 2 Slide the top part of the paper support up gently until it clicks into place 3 Place your paper against the right edge with the glossy side up Note Make sure paper is glossy side up to prevent smearing You can load up to 20 sheets at a time 4 Slide the left edge guide against the paper Make sure it is snug but not so tight that paper can t mo...

Страница 7: ... all the way Insert just one card at a time When it is in the card light comes on 4 Close the memory card door Card light MicrodriveTM CompactFlash Type I II Sony Memory Stick Memory Stick DuoTM Memory Stick PROTM Memory Stick PRO DuoTM MagicGateTM Memory Stick MagicGate Memory Stick DuoTM SDTM Secure Digital miniSDTM card MMCTM MultiMediaCardTM xD Picture CardTM SmartMediaTM Top Middle Bottom Req...

Страница 8: ...fers a simple way to print 4 6 inch photos First print a proof sheet showing thumbnail images for all the photos on your card Then choose the photos you want to print by selecting the photo numbers from the proof sheet When you insert the memory card you see the PictureMate Wizard with this message Note If you don t see the PictureMate Wizard remove and re insert your card If it still does not app...

Страница 9: ...ew photos since the last time you printed one as the photo numbering may have changed Your proof sheet includes up to 20 photos per sheet so it might require several sheets of paper depending on the number of photos on your card Choose and Print Photos With the Wizard After you print a proof sheet or cancel it you see this screen You can choose the Print All option to print all of the photos on yo...

Страница 10: ...you see the Main Menu described on page 11 Tip To start the PictureMate Wizard again remove and re insert your card Some Photos 1 Press OK 2 Press or to highlight the number of the photo you want to print from the proof sheet then press OK to choose it Tip Hold down or to scroll quickly Note If you press OK too many times you will deselect the photo 3 Press or to choose the number of copies to pri...

Страница 11: ...n press Print again to start printing Note If Print Confirmation is off you will not see the screen above and only need to press Print once to start printing If you print more than 20 photos you ll need to load more paper when you see the message Try loading paper again Load more paper up to 20 sheets and press OK to continue printing If you need to cancel printing press Cancel When printing is co...

Страница 12: ...Additionally through the More Options menu you can crop your photos print in black and white or sepia or add the time or date See page 19 Tip You can print a proof sheet of any photos you choose from your card select several photos or a range and then choose the Proof Sheet Layout View the Main Menu If you don t see the Main Menu on the screen press Cancel twice The Main Menu appears You also see ...

Страница 13: ... press OK 3 Go to page 16 to select the number of copies All Photos print all the photos on your card This is the default setting on the Main Menu and lets you print borderless 4 x 6 inch photos One Photo print just one photo Several select several photos by number and choose one or more copies for each Range choose a sequence of photos on your card for example photos 7 through 12 Camera selected ...

Страница 14: ... to highlight the photo you want to print then press OK 4 Go to page 16 to select the number of copies Several Photos 1 Press or to highlight Select Photo then press OK 2 Press or to highlight Several then press OK 3 Press or to highlight the photo number then press OK PictureMateR book Page 13 Tuesday May 17 2005 10 17 AM ...

Страница 15: ...pies press OK twice and change the number as described in step 4 6 If you want to choose a layout press Back and go to page 17 If you don t need to choose a layout go to page 18 to confirm your selections and print your photos Range of Photos Follow the steps below to choose a range or sequence of consecutive photos from your camera s memory card for example photos 7 through 12 Selecting a range i...

Страница 16: ...ich photos and how many copies you want to print See your camera s manual to choose photos for printing with DPOF then insert your memory card in PictureMate PictureMate automatically reads your pre selected photos Print With DPOF If you have chosen photos in your camera DPOF appears as the Select Photo option The photos that you chose for printing are automatically selected including the number o...

Страница 17: ...ght DPOF then press OK Note DPOF appears only if you chose images for printing while the memory card was in your camera Set the Number of Copies You can print from 1 to 100 copies of your selected photos Keep in mind that if you are printing all photos or a range of photos the number of copies applies to every photo Note If you are printing Several photos you already chose the number of copies for...

Страница 18: ...ction Otherwise go to page 18 to confirm your selections and print Choose a Layout 1 On the Main Menu press or to choose Layout then press OK 2 Press or to highlight the layout setting you want for your photo s then press OK You have four choices 3 Continue with the next section to confirm your selections and print Borderless Proof Sheet 20 per sheet Border Wallet 2 per sheet PictureMateR book Pag...

Страница 19: ...o check more photos If the list is correct press Print again to print your photo s To make changes press Cancel to go back Note If Print Confirmation is off you won t see the screen shown on the left after pressing Print See page 41 for details If you print more than 20 photos you will need to reload paper while printing Load a maximum of 20 sheets When you see the message Try loading paper again ...

Страница 20: ...hite or Sepia You can print your photo in black and white or in a sepia tone without changing the original photo Note A sepia print has a brownish tone for an old fashioned photo look 1 Select the photo s See page 12 2 On the Main Menu press or to highlight More Options then press OK Do More With Your Photos Print photos in black and white or a sepia tone Crop and print only part of a photo Correc...

Страница 21: ...t is correct press Print again to print your photo s To make changes press Cancel to go back Note The Print Confirmation screen does not confirm your choice for Color Effects Crop Your Photo You can print just part of a photo cropping out the area that you don t want You can choose only one photo to crop at a time Follow the steps below to print a template of cropping areas and choose an area to c...

Страница 22: ...mplate Your photo prints with a preview of the cropping options Tip The cropping areas are the same for each portrait or landscape oriented photo You can print one template for each photo orientation to use as a reference for all your photos 5 Choose the number for the area you want to print Crop numbers PictureMateR book Page 21 Tuesday May 17 2005 10 17 AM ...

Страница 23: ...eed to change any other settings press Print 10 Check your selections on the Print Confirmation screen and press Print again Note See page 25 for more information about the Print Confirmation screen Automatically Fix Photos PictureMate can automatically enhance or fix the appearance of your prints 1 Select the photo s See page 12 2 On the Main Menu press or to highlight More Options then press OK ...

Страница 24: ... or Exif Print data default setting for files with no P I M or Exif Print data 5 Press OK Note This setting remains in effect until you press Cancel for 3 seconds or turn PictureMate off 6 If you don t need to change any other settings press Print 7 Check your selections on the Print Confirmation screen and press Print again Note See page 25 for more information about the Print Confirmation screen...

Страница 25: ...highlight Time Stamp then press OK 7 Press or to choose one of the settings None default turns off the time stamp 12 hour 03 00 for 3 pm 24 hour 15 00 for 3 pm 8 Press OK Note These settings remain in effect until you press Cancel for 3 seconds or turn PictureMate off 9 If you don t need to change any other settings press Print 10 Check your selections on the Print Confirmation screen and press Pr...

Страница 26: ...n t appear on the Print Confirmation screen If Print Confirmation is off you won t see the screen above after pressing Print See page 41 for details If the list is correct press Print again to print your photo s To make changes press Cancel to go back If you print more than 20 photos you will need to reload paper while printing Load a maximum of 20 sheets When you see the message Try loading paper...

Страница 27: ... on screen User s Guide for instructions on saving your photos Save Photos to an External Device Connect an external storage device directly to PictureMate and save your photo files to one of these CD R RW drive CD R media only Iomega Zip disk 100 250 or 750MB Flash memory thumb drive Note Epson cannot guarantee the compatibility of any drives If you re not sure about a drive check www mypicturema...

Страница 28: ...ing a memory card in PictureMate you may see an error message Eject the CD R from the drive to clear the error insert your memory card then re insert the CD R 5 Press the Save Photo button on PictureMate to begin saving your photos 6 When you see this message press OK Note If you see the message Not enough memory on backup media press Cancel and insert a new CD R or Zip disk or connect a flash mem...

Страница 29: ...your photos are saved you see this message 8 Press OK You can save photos multiple times to the same disk or drive until it is full Each time you save photos on the same disk or drive they are saved in a new folder The first folder is named 001 the second folder is named 002 etc If you save on a CD R PictureMate names the CD R Photo PictureMateR book Page 28 Tuesday May 17 2005 10 17 AM ...

Страница 30: ...an save your photos directly to your computer from the memory card See Copying Photos to and From Your Computer in the on screen User s Guide for details Printing From an External Device PictureMate can print stored photos From an external storage device such as a CD Zip disk or flash memory thumb drive see below From a PictBridge or USB DP enabled digital camera see page 31 From a Bluetooth enabl...

Страница 31: ...m the card not from an external drive 3 If PictureMate is connected to a computer disconnect it or turn off the computer 4 Connect your CD or Zip drive s USB cable or plug your flash memory drive into the EXT IF port on the back of PictureMate as shown on the right 5 For a CD or Zip drive insert a CD or Zip disk with photos into the drive If you used PictureMate to save photos on the same disk or ...

Страница 32: ...ou can connect your PictBridge or USB DP enabled digital camera to the back of PictureMate and use the camera to control printing Check your camera manual to see if it supports the PictBridge standard or USB Direct Print 1 Make sure PictureMate is on 2 Make sure there are no memory cards in PictureMate s memory card slots The card light should be off Note If a memory card is inserted the printer w...

Страница 33: ...gy Also make sure your photos meet the requirements listed on page 3 1 Make sure PictureMate is on but not printing Caution Do not connect the Bluetooth Photo Print Adapter while PictureMate is printing this may cause PictureMate to malfunction 2 Fold up the top of the Bluetooth Photo Print Adapter 3 Plug the adapter into the EXT IF port on the back of PictureMate The Bluetooth Photo Print Adapter...

Страница 34: ...eps to choose a photo file discover PictureMate and send the photo For cell phones PDAs or cameras see your product s manual for instructions on setting up Bluetooth file sharing and sending files Printing starts automatically Note For more information on PictureMate s Bluetooth features see the on screen User s Guide Disconnecting the Adapter Make sure PictureMate isn t printing then pull the ada...

Страница 35: ...ctureMate Buy a PictureMate Print Pack The PictureMate Print Pack has everything you need to print in one box 100 sheets of PictureMate Photo Paper and a new PictureMate Photo Cartridge You can buy a Print Pack wherever PictureMate is sold or from retailers that sell genuine Epson printer supplies Note If you are out of PictureMate Photo Paper but do not see the Replace cartridge message you can s...

Страница 36: ... all the steps in one session Caution Before you replace the cartridge read the Photo Cartridge Safety Instructions on page 56 1 Flip the handle up 2 Open the cartridge door on the back of PictureMate 3 Move the lever to the Release position by sliding it in the direction shown This releases the cartridge PictureMateR book Page 35 Tuesday May 17 2005 10 17 AM ...

Страница 37: ...er If discomfort or vision problems continue after flushing see a doctor immediately Insert the New Photo Cartridge 1 Shake the cartridge four or five times while it is still in its package Then unwrap the cartridge Caution Don t touch the green circuit board Install the photo cartridge immediately after you remove it from its package If you leave a cartridge unpacked for a long time before using ...

Страница 38: ...t remove the cartridge and reinsert it so it is straight 4 Move the lever right to the Lock position If it does not lock in place the cartridge is crooked remove it and try again See step 3 Caution If the cartridge is not inserted correctly ink may leak out 5 Close the cartridge door Make sure it snaps shut Correct Wrong PictureMateR book Page 37 Tuesday May 17 2005 10 17 AM ...

Страница 39: ...vel You can check the approximate ink level in your photo cartridge at any time 1 On the Main Menu press or to highlight More Options then press OK 2 Press or to highlight Maintenance then press OK 3 Press or to highlight Cartridge Status then press OK You see a screen showing the approximate ink level in your photo cartridge PictureMateR book Page 38 Tuesday May 17 2005 10 17 AM ...

Страница 40: ...To avoid scratches or smudging do not rub the printed side of the photo If you stack photos do not stack them with the printed sides touching Display Your Prints Let prints sit for 24 hours before framing To ensure prints will last as long as possible display them under glass in frames or in photo albums Keep prints out of direct sunlight to prevent fading Store Unused Paper Return unused paper to...

Страница 41: ...e it against PictureMate Then close the output tray 5 Disconnect the power cord and any connected USB cable from the back of PictureMate 6 Pack PictureMate along with its power cable and adapter in the box that PictureMate came in or in the optional Carrying Case Caution Make sure the photo cartridge is installed before transporting Don t place PictureMate on its side or upside down or ink may lea...

Страница 42: ...When Print Confirmation is On and you press Print you see a screen that lets you confirm your selected photos the number of copies and layout Then you press Print again to start printing When Print Confirmation is Off and you press Print PictureMate does not display this screen before printing 1 On the Main Menu press or to highlight More Options then press OK 2 Press or to highlight Print Confirm...

Страница 43: ...zard off and print directly from the Main Menu all the time or you can turn it back on If you don t see the Main Menu press Cancel twice Tip If you usually print all the photos on your memory card turn off the PictureMate Wizard Then whenever you insert your memory card you can press Print to get one borderless 4 6 inch print of each photo on the card 1 On the Main Menu press or to highlight More ...

Страница 44: ...the LCD Screen Contrast If the LCD screen is difficult to read you can adjust the contrast 1 On the Main Menu press or to highlight More Options then press OK 2 Press or to highlight Maintenance then press OK 3 Press or to highlight LCD Contrast then press OK 4 When you see this message press OK to continue 5 Press or to adjust the contrast then press OK PictureMateR book Page 43 Tuesday May 17 20...

Страница 45: ...t settings to the original factory default settings Press and hold Cancel for 3 seconds You see this screen Press OK to reset all the print settings Note This will also reset the defaults for other print settings you have changed such as the date or time stamp or crop settings PictureMateR book Page 44 Tuesday May 17 2005 10 17 AM ...

Страница 46: ...1 Miscellaneous Printout Problems on page 52 Where to Get Help on page 53 Clean the Print Head If your print quality is not as good as it used to be if your photos are light or faint or you are missing colors in your prints your print head nozzles may be clogged Follow these steps to clean the print head 1 On the Main Menu press or to highlight More Options then press OK 2 Press or to highlight Ma...

Страница 47: ...ng if you want to print a nozzle check pattern 6 To make sure the nozzles are clean load a sheet of photo paper then press OK to print the nozzle check If you don t want to print a nozzle check press Cancel to go back to the Main Menu 7 Check the pattern to see if there are any gaps in the lines 8 If there are gaps press OK to clean the print head again If there are no gaps press Cancel to go back...

Страница 48: ...heet of photo paper See page 5 2 On the Main Menu press or to highlight More Options then press OK 3 Press or to highlight Maintenance then press OK 4 Press or to highlight Align Print Head then press OK 5 Press Print when you see the next message 6 Look at the printed squares to determine which one in each set is the most even with the lightest lines You may need to use a magnifying glass Picture...

Страница 49: ...rrectly See page 36 Load or remove and reload paper in the paper support and press the OK button to clear this message The printer resumes printing See page 5 for loading instructions Carefully pull out the jammed paper then reload paper and try printing again Do not reload paper that is wrinkled See page 51 if your paper jams frequently The cartridge door is not closed completely Close the cartri...

Страница 50: ... the print head see page 45 PictureMate won t work properly if it s tilted or at an angle Place it on a flat stable surface that extends beyond the printer base in all directions Make sure paper is not jammed and is loaded correctly so it can feed into PictureMate Make sure the handle is not resting on the paper See page 5 for paper loading instructions Use a compatible memory card containing supp...

Страница 51: ...blems You see banding light lines in your prints The print head nozzles may need cleaning See page 45 Make sure the glossy side of the paper is face up The photo cartridge may need replacing To replace the cartridge See page 34 The print head may need aligning See page 47 Your printout is blurry or smeared Use PictureMate Photo Paper to ensure proper saturation absorption of ink and quality Make s...

Страница 52: ...or is wrinkled If it s wrinkled when it ejects the paper may be damp Paper doesn t feed correctly or jams in the printer Make sure the paper support is pulled all the way up and out and is not leaning on the handle The handle should be all the way down in back of PictureMate Make sure the handle is not resting on the paper See page 5 If paper doesn t feed remove it from the paper support reload it...

Страница 53: ... may want to select Border as the Layout setting This prevents the automatic enlargement of your photo to eliminate the borders which may be causing part of your image to be cut off The wrong photo is printed The photo numbering on the proof sheet may not match the numbering in your camera First print a proof sheet to identify your photos by number If you deleted photos or took new ones make sure ...

Страница 54: ...tureMate Photo Paper and a PictureMate Photo Cartridge You can also purchase a PictureMate carrying case and other PictureMate accessories from an authorized Epson dealer To find the nearest dealer please call 800 GO EPSON 800 463 7766 To purchase online visit www epsonstore com U S sales only In Canada please call 800 463 7766 for dealer referral Service Access World Wide Web From the Internet yo...

Страница 55: ... are communicating when the memory card light is flashing The methods for using memory cards vary according to card type Be sure to refer to the documentation packaged with your memory card for details Use only memory cards compatible with the printer Place the printer on a flat stable surface that extends beyond the base of the printer in all directions The printer will not operate properly if it...

Страница 56: ... computer system away from potential sources of electromagnetic interference such as loudspeakers or the base units of cordless telephones Do not use a damaged or frayed power cord or AC adapter If you use an extension cord with the printer make sure that the total ampere rating of the devices plugged into the extension cord does not exceed the cord s ampere rating Also make sure that the total am...

Страница 57: ...d print quality For best results use up the photo cartridge within six months of installing it After bringing a photo cartridge inside from a cold storage site allow it to warm up at room temperature for at least three hours before using it Store photo cartridges in a cool dark place Store each photo cartridge so that the bottom of its packaging faces down Do not touch the green IC chip on the bot...

Страница 58: ...rranty repair instructions and return authorization An Epson service technician will provide telephone diagnostic service to determine whether the printer requires service If service is needed Epson will at its option exchange or repair the printer without charge for parts or labor If Epson authorizes an exchange for the defective unit Epson will ship a replacement printer to you freight prepaid s...

Страница 59: ...er than by an Epson Authorized Servicer If a claimed defect cannot be identified or reproduced you will be held responsible for the costs incurred THE WARRANTY AND REMEDY PROVIDED ABOVE ARE EXCLUSIVE AND IN LIEU OF ALL OTHER EXPRESS OR IMPLIED WARRANTIES INCLUDING BUT NOT LIMITED TO THE IMPLIED WARRANTIES OF MERCHANTABILITY NON INFRINGEMENT OR FITNESS FOR A PARTICULAR PURPOSE SOME LAWS DO NOT ALLO...

Страница 60: ...other papers may result in poor color reproduction print quality problems or more fading PictureMate Print Pack Satisfaction Guarantee If you are dissatisfied because you receive fewer prints than the number of sheets of paper included in your PictureMate Print Pack you can return the remaining sheets of PictureMate Photo Paper with the dated sales receipt and UPC code from the PictureMate Print P...

Страница 61: ...e levels which exceed the limits established by the FCC for this equipment It is the responsibility of the user to obtain and use a shielded equipment interface cable with this device If this equipment has more than one interface connector do not leave cables connected to unused interfaces Changes or modifications not expressly approved by the manufacturer could void the user s authority to operat...

Страница 62: ...mechanical photocopying recording or otherwise without the prior written permission of Seiko Epson Corporation The information contained herein is designed only for use with this Epson product Epson is not responsible for any use of this information as applied to other printers Neither Seiko Epson Corporation nor its affiliates shall be liable to the purchaser of this product or third parties for ...

Страница 63: ...rademarks and PRINT Image Matching the PRINT Image Matching logo and Exceed Your Vision are trademarks of Seiko Epson Corporation Epson Store SoundAdvice and Epson Connection are service marks of Epson America Inc SD is a trademark Memory Stick Memory Stick Duo Memory Stick PRO and Memory Stick PRO Duo are trademarks of Sony Corporation xD Picture Card is a trademark of Fuji Photo Film Co Ltd Gene...

Страница 64: ...h connecting adapter 32 disconnecting adapter 33 Photo Print Adapter 3 29 32 to 33 printing 29 32 to 33 Blurry prints 50 Borderless photos 17 to 18 Borders 17 to 18 52 C Camera choosing photos from 15 to 18 printing from 31 selected photos DPOF 12 15 to 18 Cancel printing 10 18 Cancel settings 44 Card light 6 Card memory 6 Care of PictureMate 45 to 48 Carrying PictureMate 40 Cartridge status 38 to...

Страница 65: ...tion print 10 18 20 25 41 Contact sheet 7 to 8 17 Contrast on LCD screen 43 Copies 9 14 16 to 17 18 Copying photos 26 to 28 Crop photo 20 to 22 template 20 to 21 D Date stamp 23 to 24 Default settings 44 Device external 26 to 33 Displaying prints 39 DOC Declaration of Conformity 60 DPOF Digital Print Order Format 3 12 15 to 18 Drive external 26 to 31 Duplicates 9 14 16 to 17 E Edge guide 5 Energy ...

Страница 66: ... I Image formats 3 quality 22 to 23 50 to 51 Incorrect colors 51 Index sheet 7 to 8 17 Ink see Photo cartridge J Jams paper 48 51 JPEG 3 L Layout 17 to 18 52 LCD screen contrast 43 messages 48 to 49 safety instructions 57 Light lines 50 Loading paper 5 M Macintosh Bluetooth printing 33 using with PictureMate 4 Main Menu printing from 11 to 25 Maintenance 34 to 39 45 to 48 Manuals 4 PictureMateR bo...

Страница 67: ...ultiMediaCard 6 More Options 19 Multiple copies 9 14 16 to 17 N Noise PictureMate 49 Nozzle check 46 Nozzles cleaning 45 to 46 O On button 6 One photo option 13 Options print 16 to 17 19 to 25 Output tray 5 P Packing PictureMate 40 Paper buying 34 feeding problems 51 to 52 jam 48 51 loading 5 storing 39 support 5 tray 5 PDA printing from 32 to 33 PictureMateR book Page 66 Tuesday May 17 2005 10 17...

Страница 68: ...ing 35 to 36 replacing 34 to 39 safety instructions 56 status 39 PictBridge 3 8 29 31 PictureMate messages 48 to 49 Print Pack 34 53 59 Wizard 7 to 10 42 PIM PRINT Image Matching 3 23 Power cable 40 Preferences setting 41 to 44 Preview of crop 20 to 21 Print confirmation 10 18 20 25 41 Print head aligning 47 to 48 cleaning 45 to 46 PIM PRINT Image Matching 3 23 Print options 16 to 17 19 to 25 Prin...

Страница 69: ...fety instructions 54 to 57 Save Photo button 26 to 28 Saving photo files 26 to 28 Screen 43 48 to 49 57 SD Secure Digital card 6 Select photos 7 to 10 12 to 18 Sepia 19 to 20 Sequence of photos 14 to 15 Settings PictureMate 41 to 44 Setup problems 49 Several photos selecting 13 to 15 18 Single photo 13 SmartMedia card 6 Smears 50 Some photos selecting 9 to 10 13 to 14 SoundAdvice 53 Stamp date and...

Страница 70: ...Troubleshooting 45 to 52 Turning on printer 6 U USB cable 30 to 31 40 USB DP USB Direct Print 3 8 29 31 User s Guide 4 W Wallet size photos 17 to 18 Warranty 57 to 58 Where to get help 53 Windows Bluetooth printing 33 using with PictureMate 4 Wizard 7 to 10 42 to 43 X xD Picture Card 6 Z Zip disk printing from 29 to 31 saving files to 26 to 28 PictureMateR book Page 69 Tuesday May 17 2005 10 17 AM...

Страница 71: ...70 PictureMateR book Page 70 Tuesday May 17 2005 10 17 AM ...

Страница 72: ...rything you need to print in one box 100 sheets of PictureMate Photo Paper and a PictureMate Photo Cartridge You can also purchase these accessories for PictureMate The PictureMate Carrying Case just the right size for your PictureMate power cable and an extra Print Pack The Bluetooth Photo Print Adapter part C12C824142 for printing wirelessly from your Bluetooth enabled cell phone PDA or computer...

Страница 73: ...rything you need to print in one box 100 sheets of PictureMate Photo Paper and a PictureMate Photo Cartridge You can also purchase these accessories for PictureMate The PictureMate Carrying Case just the right size for your PictureMate power cable and an extra Print Pack The Bluetooth Photo Print Adapter part C12C824142 for printing wirelessly from your Bluetooth enabled cell phone PDA or computer...

Страница 74: ...Snap Print Enjoy CPD 19731 Printed in XXXXXX XX XX XX XXX Using PictureMate Without a Computer ...

Отзывы: