background image

16

Basic Photo Printing

Basic Photo Printing

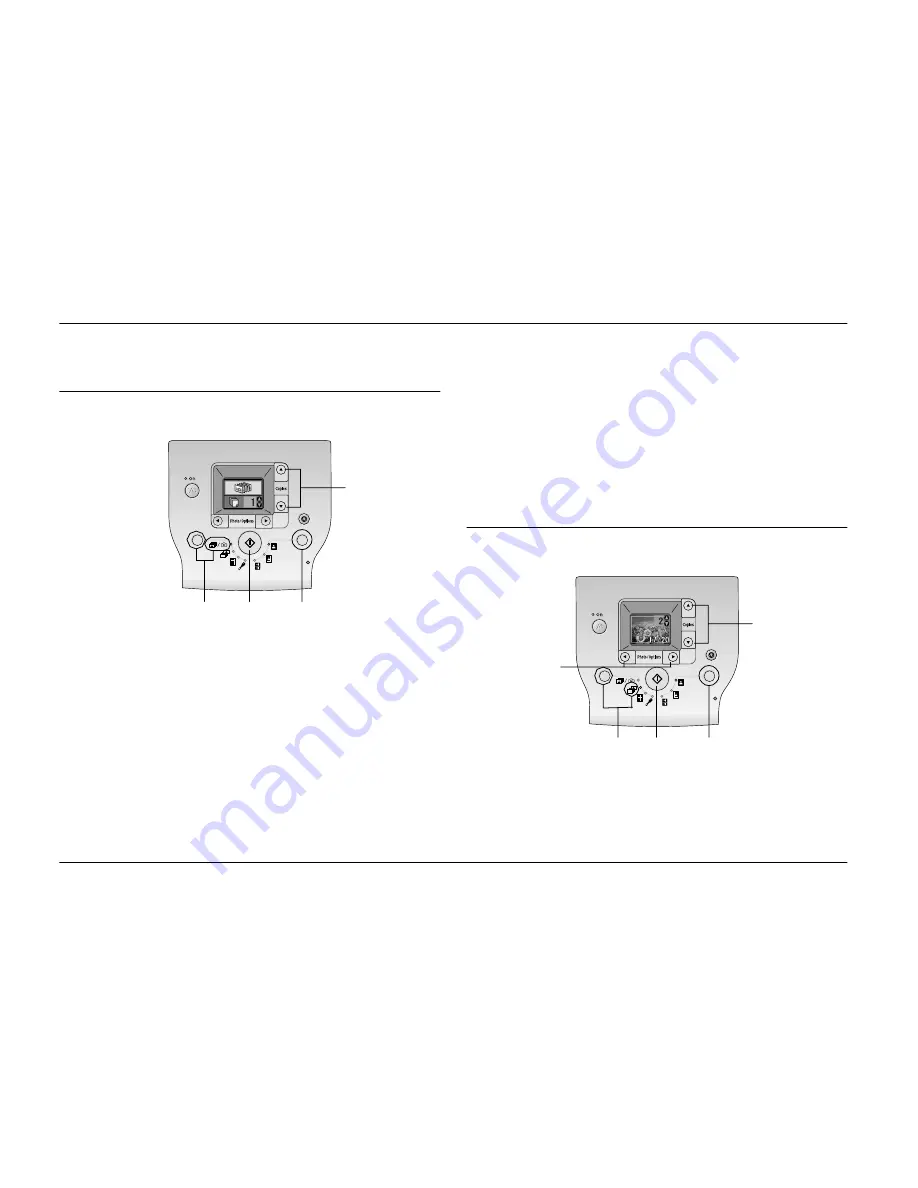
Printing All Photos

1.

Press the Mode button to select 

f

/

e

.

2.

Press the 

u

 or 

d

 button to select the number of 

copies.

3.

Press the Layout button to select the layout.

4.

Press the 

x

 Start button to start printing.

Note:

If there is DPOF information on the memory card and 

f

/

e


is selected, PictureMate goes to DPOF print mode. See 
“Printing Camera-Selected DPOF Photos” on page 17 for 
details. To print all of the photos on the memory card, press 
the 

y

 Cancel button and follow the steps above.

Printing Selected Photos

1.

Press the Mode button to select 

j

.

4

2

3

1

6

3

5

2

1

Содержание PictureMate 100

Страница 1: ... light Start button Mode button Photo Options button On button Power light Layout button Print all the photos print photos pre selected in your digital camera when DPOF information is stored on the memory card or print directly from a digital camera Print selected photos Print an index of all the photos Display setup and maintenance options Print without margins Print with margins Print 2 per shee...

Страница 2: ...ii Printer Parts Paper support Handle Output tray Memorycard slot cover EXT IF USB port USB port for computer Battery cover Power cable Cartridge compartment cover ...

Страница 3: ...g Selected Photos 16 Printing an Index 17 Printing Camera Selected DPOF Photos 17 Printing Options Printing Photos in Black and White or Sepia 18 Fixing Your Photos 18 Adding the Date or Time 19 Resetting the printing options 21 Saving Your Photos to an External Device Backup Printing From an External Device Printing From an External Drive 24 Printing From a PictBridge Enabled Camera 25 Printing F...

Страница 4: ...s 43 Printer Power Problems 43 Print and Noise Problems 44 Photo Quality Problems 45 Problems With Paper Feeding 46 Miscellaneous Printout Problems 47 Contacting Customer Support Regional Customer Services 48 Technical Support Web Site 48 Options and Consumable Products Options 49 Consumable Products 49 Using the Optional Battery 50 Printer Specifications Index Panel Icon List ...

Страница 5: ...ectromagnetic interferencethat occurs from the use of any interface cables other than those designated as Epson Approved Products by Seiko Epson Corporation EPSON is a registered trademark and PictureMate is a trademark of Seiko Epson Corporation PRINT Image Matching and the PRINT Image Matching logo are trademarks of Seiko Epson Corporation Copyright 2001 Seiko Epson Corporation All rights reserv...

Страница 6: ...vi ...

Страница 7: ... not tilt it stand it on its side or turn it upside down Otherwise ink may leak from the cartridge Leave enough space in front of the printer for the paper to be fully ejected Avoid places subject to rapid changes in temperature and humidity Also keepthe printer and the AC adapter away from direct sunlight strong light water or heat sources Do not leave the printer in a place subject to high tempe...

Страница 8: ... devices unless specified Use only the type of power source indicated on the AC adapter s label and always supply power directlyfrom astandarddomesticelectrical outlet with the AC power cord that meets the relevant local safety standards Avoid using outlets on the same circuit as photocopiers or air control systems that regularly switch on and off Avoid using electrical outlets controlled by wall ...

Страница 9: ...he operating instructions Do not use with wet hands Ifyou plan to use theAC adapter in Germany the building installation must be protected by a10 or 16 amp circuit breaker to provide adequate short circuit protection and over current protection for this printer For United Kingdom Singapore and Hong Kong users Replace fuses only with fuses of the correct size and rating Safety requirements Mains pl...

Страница 10: ...when using the printer If you use the printer in places where the use of electronic devices is limited such as in airplanes or hospitals follow all instructions in those places Do not insert objects through the slots in the printer Take care nottospill liquid on the printer and the AC adapter Do not put your hand inside the printer or touch the photo cartridge during printing Always turn the print...

Страница 11: ...oto Print Adapter s documentation for the safety instructions When using the optional battery If battery acid gets into your eyes or on your skin immediately rinse the affected area thoroughly with water and seek medical treatment If a battery is swallowed seek medical treatment immediately Use only an Epson Li ion battery model EU 112 for this printer according to the directions in the user docum...

Страница 12: ...ints or short circuit components Preventthebatteryfrom coming into contactwith metal objects that could short circuit it such as coins or keys Do not solder wires or terminals directly to the battery Do not touch battery terminals Keep the battery away from open flame if they leak or smell strange If overheating discoloration or deformation occur remove the battery from the printer and do not use ...

Страница 13: ... tear the label on the cartridge this can cause leakage Do not use a photo cartridge beyond the date printed on the cartridge carton otherwise it may result in reduced print quality For best results use up the photo cartridge within six months of installing it Do not dismantle photo cartridges or try to refill them This could damage the print head After bringing a photo cartridge inside from a col...

Страница 14: ...nd office equipment industry to promote the introduction of energy efficient personal computers monitors printers fax machines copiers scanners and multifunction devices in an effort to reduce air pollution caused by power generation Their standards and logos are uniform among participating nations Warnings Cautions and Notes w Warnings must be followed carefully to avoid bodily injury c Cautions ...

Страница 15: ...and come back later for your photos and negatives Since you had negatives you could take them back later if you wanted reprints The digital process is simple too and it gives you complete control Just follow these basic steps 1 Review and Delete After you finish taking your photos review them on your digital camera s screen Delete the photos you don t want to print or keep 2 Print Insert your came...

Страница 16: ...card into PictureMate it knowswhich photos youchose See Printing Camera Selected DPOF Photos on page 17 If you have a PictBridge or USB DP USB Direct Print enabled camera you can connect the camera to PictureMate and control printing right from your camera See Printing From a PictBridge Enabled Camera on page 25 If you have a Bluetooth enabled PDA mobile phone or computer you can send photos wirel...

Страница 17: ...he first 999photos on your memory card Where to Find Information Unpacking and setting up See your Start Here to unpack set up and use your PictureMate Printing and changing settings Basic Operation Guide this book explains how to print photos directly from your camera s memory card It also covers how to print from other devices replace the PictureMate Photo Cartridge take care of PictureMate and ...

Страница 18: ...oading Paper Follow these steps to load PictureMate Photo Paper c Caution Do not load plain paper this may damage PictureMate 1 Move the handle to the back and down Then open the paper support and output tray Note Keep the handle all the way down when printing to allow paper to feed through output tray handle paper support ...

Страница 19: ...ns When storing printouts Do not touch the printed side or stack your printouts until the ink is dry To avoid scratching the image be sure not to rub the printed side of the paper If the printed side is rubbed too strongly ink may come off the paper Do not stack printouts with the image sides touching Do not stack printouts and conventional film photographs with the image sides touching If you sta...

Страница 20: ...for 24 hours before framing Inserting Your Memory Card 1 Press the d On button to turn on PictureMate 2 Open the memory card cover 3 Insert the memory card into the correct slot as shown in the illustration Microdrive CompactFlash Type I II Sony Memory Stick Memory Stick Duo Memory Stick PRO Memory Stick PRO Duo MagicGate Memory Stick MagicGate Memory Stick Duo SD Secure Digital miniSD card MMC Mu...

Страница 21: ...over Now you can choose photos and layouts for printing from the LCD panel See Basic Photo Printing on page 16 Removing Your Memory Card When you are ready to remove a memory card make sure the memory card light is not flashing then pull the card straight out of the slot c Caution Do not remove a card while the memory card light is flashing you may lose photos on your card Memory card light ...

Страница 22: ...the layout 4 Press the x Start button to start printing Note IfthereisDPOF informationonthememorycardandf e is selected PictureMate goes to DPOF print mode See Printing Camera Selected DPOF Photos on page 17 for details To print all of the photos on the memory card press the y Cancel button and follow the steps above Printing Selected Photos 1 Press the Mode button to select j 4 2 3 1 6 3 5 2 1 ...

Страница 23: ...tos If your camera supports DPOF Digital Print Order Format you can use it to pre select which photos and how manycopies youwanttoprint See your camera s manualto choose photos forprinting with DPOF then insert your memory card in PictureMate PictureMate automatically reads your pre selected photos 1 Load paper and a memory card that contains DPOFdata The screen below appears on the LCD panel 2 Pr...

Страница 24: ...Effect then press the x Start button 3 Press the u or d button to select color black and white or sepia these are indicated by the color of the icon then press the x Start button 4 See Basic Photo Printing on page 16 and print using the mode you want Fixing Your Photos PictureMate lets youcorrectthe color and improve the image quality of your photos without using a computer If your camera supports...

Страница 25: ... then press the x Start button PhotoEnhance Use this if a print does not look good for example this may correct images that are too dark too bright or backlit OFF Prints photos as they are or bypasses P I M data P I M PictureMate chooses this setting automatically if it detects P I M information saved in your camera s digital files This information helps ensure an accurate image reproduction 4 See...

Страница 26: ...ate stamp yyyy mm dd 2005 09 01 mmm dd yyyy Sep 01 2005 dd mmm yyyy 01 Sep 2005 4 To print the time press the lor rbutton to select Time Stamp then press the x Start button 5 Press theu ord button toselectone ofthe options then press the x Start button None default turns off the time stamp 12 hour system 03 00 for 3 pm 24 hour system 15 00 for 3 pm 6 See Basic Photo Printing on page 16 and print u...

Страница 27: ...he printing options You can reset the printing options to the original default settings 1 Press the Mode button to select q 2 Press the y Cancelbutton The three lights nextto the layout icons flash and the printing options are reset ...

Страница 28: ...thumb drive Note Epson cannot guarantee the compatibility of any drives 1 Make sure PictureMate is on 2 Insert your memory card into PictureMate 3 If you are using a CD R RW drive or Zip drive plug it into an electrical outlet if required 4 Connect the drive to PictureMate Fora CD R RW MOorZip drive connect its USB cable to the EXT IF port on the back of PictureMate Then insert a CD R DVD R MO or ...

Страница 29: ...on to start backup 8 When you see the screen below press the x Start button to finish c Caution Do not remove the drive or memory card while the photos are being saved or you may lose photos on your card or drive If you need to stop the backup press the y Cancel button You can save photos multiple times to the same disk or drive until it is full Each time you save photos on the same disk or drive ...

Страница 30: ...memory card You can also printphotos from a CD thatyou get from a photo processing lab Images should be in JPEG file format Some CDs may not work 1 Make sure PictureMate is on 2 Make sure there are no memory cards in PictureMate s memory card slots The memory card light should be off Note If a memory card is inserted the printer will read photos from the card not from an external drive 3 If Pictur...

Страница 31: ... from a memory card to perform printing See Basic Photo Printing on page 16 Printing From a PictBridge Enabled Camera You can connect your PictBridge or USB DP enabled digital camera to the back of PictureMate and use the camera to control printing See your digital camera s documentation to see if it supports the PictBridge standard or USB DP 1 Make sure PictureMate is on 2 Make sure there are no ...

Страница 32: ...ra settings generally take precedence over the print settings of PictureMate See your digital camera s documentation for information on more detailed settings 6 Print from the digital camera Printing From a Bluetooth Device About the Bluetooth Photo Print Adapter The optional Bluetooth Photo Print Adapter is a wireless communication module used to print from digital cameras and other devices with ...

Страница 33: ...gnetic interference software operating system reception sensitivity and antenna performance Available Profile Basic Printing Profile BPP Basic Imaging Profile BIP Hardcopy Cable Replacement Profile HCRP Object Push Profile OPP Connecting and Disconnecting the Bluetooth Photo Print Adapter Connecting 1 Insertthe Adapterconnectorintothe EXT IFport as shown below c Caution Do not connect this product...

Страница 34: ...duct by pulling on its upper section Doing so may damage the product Bluetooth Settings Use the LCD panel on the printer to make settings for Bluetooth wireless communication See Making settings on page 29 Outline of settings Setting Choices Description BluetoothDevice Name printer name number Default 1 If multiple printers enabled with Bluetooth are in the same communication range distinguish the...

Страница 35: ...as discovered the printer in Public mode once it will subsequently be able to communicate with and print from it in Private mode Pairing This mode requires that the four digit Passkey be entered into a device before it can communicate with and print from the printer Bluetooth Encryption ON OFF Default OFF Select ON to encrypt communication Encryption requires that the four digit Passkey be entered...

Страница 36: ...ode button to select q 2 Press the l or r button to select Passkey then press the x Start button 3 Press the uor d button to select a number for the digit then press the l or r button to change the digit 4 Select numbers for the other digits in the same manner then press the x Start button to activate the Passkey Printing 1 Make sure the Bluetooth Photo Print Adapter is connected to PictureMate an...

Страница 37: ...tooth wireless capable devices For more information refer to your device s documentation For more information about printing from Bluetooth wireless capable mobile phones digital still cameras digital video cameras PDAs mobile PCs and other Bluetooth wireless capable device refer to the documentation for both the device and the printer ...

Страница 38: ...con in the upper left corner of the LCD screen You can checkthe approximate inklevel in yourphoto cartridge at any time 1 Press the Mode button to select q 2 Press the lor rbutton toselectCheckInk Levels then press the x Start button 3 You see a screen showing the approximate ink level in your photo cartridge Press the x Start button to close the screen Ink low ...

Страница 39: ...f photo cartridgesnotmanufacturedbyEpson Leave the old cartridge installed in the printer until you have obtained a replacement otherwise ink remaining in the print head nozzles may dry out Do not refill photo cartridges The printer calculates the amount of ink remaining using an IC chip on the photo cartridge Even if the cartridge is refilled the amount of ink remaining will not be recalculated b...

Страница 40: ...s See Checking the Photo Cartridge Status Ink Level on page 32 2 Check that the screen below is displayed on the LCD panel This screen is not displayed if there is some ink left 3 Close the paper support 4 Move the handle to the upright position 5 Open the cartridge compartment cover on the back of PictureMate ...

Страница 41: ...lacement photo cartridge from its package c Caution Do not touch the green IC chip on the bottom of the cartridge This can damage the photo cartridge If you remove the photo cartridge for later use be sureto protect the ink supply ports from dirt and dust store it in the same environment as the printer Note that there is a valve in the ink supply ports making covers or plugs unnecessary but care i...

Страница 42: ...dge are even If either side of the cartridge sticks out push the side of the cartridge until it clicks 9 Set the lever to the Lock position by sliding it in the direction shown 10 Close the cartridge compartment cover Note If you cannot close the cartridge compartment cover the photo cartridge isnotinstalled correctly Go backto the Step 6 and eject the photo cartridge Then install the photo cartri...

Страница 43: ...our car or other location whereitcan gettoo hot 1 If PictureMate is on turn it off 2 Wait until the LCD screen goes blank then unplug the power cord from the electrical outlet 3 Remove paperfrom the papersupportand output tray 4 Push down the top of the paper supportand close itagainst PictureMate Then close the outputtray 5 Disconnect the power cord and any connected USB cable from the back of Pi...

Страница 44: ...thephotocartridgeisinstalledbefore transporting Don t place PictureMate on its side or upside down or ink may leak Note If your prints don t look as good after PictureMate has been moved tryaligning the printhead See Aligning the Print Head on page 41 ...

Страница 45: ... l or r button to select Check Ink Nozzles 5 Press the x Start button to print the nozzle check pattern 6 The nozzle check pattern is printed out See the following illustration The printer will print a nozzle check pattern Below are sample printouts The above sample may be shown in black and white but the actual test prints in color Black Cyan Magenta and Yellow If the nozzle check page does not p...

Страница 46: ...atthe print head needs to be cleaned This saves ink If a message on the LCD screen tells you that the cartridge is empty or low on ink you cannot clean the print head You must first replace the photo cartridge 1 Make sure that PictureMate is turned on and no warnings or errors are displayed on the LCD panel 2 Press the Mode button to select q 3 Press the l or r button to select Clean Print Head 4 ...

Страница 47: ...ayed on the LCD panel 2 Load asheet ofphoto paper See Loading Paper on page 12 3 Press the Mode button to select q 4 Press the l or r button to selectAlign Print Head 5 Press the x Start button to print the alignment pattern 6 The following alignment sheet is printed 7 Look at the alignment pattern in each set and find the patch which is most evenly printed with no noticeable streaks or lines 8 Pr...

Страница 48: ...paper support is dirty wipe it with a soft clean cloth dampened with mild detergent Keep the output tray closed to prevent water from getting inside c Caution Never use alcohol or thinner to clean the printer as these chemicals can damage the components as well as the case Be careful not to get water on the printer mechanism or electronic components Do not use a hard or abrasive brush Do not spray...

Страница 49: ...y not be installed all the way into the compartment See Charging the battery on page 51 for instructions on charging the battery See Installing the battery on page 50 for instructions on installing the battery LCD panel came on and then went out The printer s voltage may not match the outlet rating Turn off the printer and unplug it immediately Then check the printer labels c Caution If the voltag...

Страница 50: ...head nozzles are not clogged To clean the print head see Cleaning the Print Head on page 40 PictureMate won t work properly if it s tilted or at an angle Place it on a flat stable surface that extends beyond the printer base in all directions Make sure paper is not jammed and is loaded correctly so it can feed into PictureMate Make sure the handle is not resting on the paper See Loading Paper on p...

Страница 51: ...red Use the PictureMate PhotoPaper toensure proper saturation absorption of ink and quality Make sure you load paper with the glossy side face up Make sure your paper isn t damp or curled or loaded face down the glossy side should be face up If it s damp or curled load a new stack of paper Your printout is faint or has gaps in the image The print head may need aligning see Aligning the Print Head ...

Страница 52: ...support is pulled up all the way out and is not leaning on the handle The handle should be all the way down in back of PictureMate Make sure the handle is not resting on the paper See Loading Paper on page 12 If paper doesn t feed remove it from the paper support reload itagainst the rightedge then slide the left edge guide against the paper but not too tightly If multiple pages feed at once remov...

Страница 53: ... the edge guide against the paper If the subject of your photo is very close to the edge of the image you may want to select Border as the Layoutsetting This prevents theautomatic enlargement of your photo to eliminate the borders whichmaybe causingpartofyourimage to be cut off The wrong photo is printed Ifyourcamera supports DPOF you can pre select photos so PictureMate will print only the ones y...

Страница 54: ...software version Click About Version Info or similar button in the product software Brand and model of your computer Your computer operating system name and version Names and versions of the software applications you normally use with your product Note Formoreinformationon ContactingCustomerSupport see the Online User sGuideincludedin thesoftwareCD ROM Technical Support Web Site Go to http www eps...

Страница 55: ...roduct number which varies by location For details on using the optional battery see Using the Optional Battery on page 50 Consumable Products The following photo cartridge and Epson special paper are available for PictureMate Note The availability of special paper varies by location Please check your local EPSON customer support website where to buy or visit your local dealer See Contacting Custo...

Страница 56: ...a computer to your memory card confirm that there isenoughpower in thebattery If the battery runs out saving is canceled and corrupted data may remain on the memory card For safety instructions for the battery see When using the optional battery on page 5 Installing the battery Follow the steps below to install the battery 1 Make sure that PictureMate is turned off 2 Unplug the AC adapter from the...

Страница 57: ...f 2 Open the battery cover 3 Move down the battery latch and pull out it 4 Close the battery cover Charging the battery After installing the battery charge the battery using the AC adapter 1 Make sure that the battery is installed 2 Connect the power cord and AC adapter then plug in PictureMate When PictureMate is off the power light blinks during charging When the battery is fully charged the pow...

Страница 58: ...er of sheets varies depending on thememory card data size and other conditions Auto Power Off When the battery is used to power PictureMate PictureMatewillautomaticallyturn offto save battery power if it is idle for about 15 minutes Note When a memory card is inserted and PictureMate is connected to a computer it will not turn off automatically Icon Status Sufficient battery power When the icon is...

Страница 59: ... mm 10 0 inches Depth 305 mm 12 0 inches Height 167 mm 6 6 inches Printable area Border printing 3 mm margin for all sides of paper Borderless printing 0 mm margin Paper tray capacity 20 sheets Weight 2 7 kg 6 0 lb without battery and photo cartridge AC adapter operated Optional battery operated Input DC 20 V 1 6 A DC14 4 V 1 4 A Model A361H Input AC100 240 V 50 60 Hz 0 8 0 4 A 42 W Output DC 20 V...

Страница 60: ...sing AC adapter Continuous printing Approx 11 0 W Approx 11 5 W Approx 30 W Approx 30 W Sleep mode Approx 4 0 W Approx 4 5 W Approx 22 W Approx 23 W Stand by mode Approx 0 7 W Approx 1 0 W Approx 22 W Approx 23 W Input current using AC adapter Continuous printing 0 3 A 0 2 A 0 7 A 0 4 A Temperature Operation 10 to 35 C 50 to 95 F Storage 20 to 60 C 4 to 140 F 1 month at 40 C 104 F 120 hours at 60 ...

Страница 61: ...tions version 1 0 SD MMC card slot Compatible with SD Memory Card Specifications PART1 Physical Layer Specification Version 1 0 Compatible with MultiMediaCard Standard xD Picture Card Slot Compatible with xD Picture Card Card Specification Version 1 20 Type M Compatible memory cards CompactFlash SmartMedia Memory Stick Memory Stick PRO Memory Stick Duo Memory Stick PRO Duo MagicGate Memory Stick M...

Страница 62: ...k Cyan Magenta and Yellow Cartridge life Within 6 months of opening the package at 25 C 77 F Temperature Storage 20 to 40 C 4 to 104 F 1 month at 40 C 104 F Freezing 11 C 12 2 F Connectivity Universal Serial Bus Specifications Revision 1 1 Bit rate 12 Mbps Full speed device Connector type USB Series A Data Encoding NRZI Recommended cable length Less than 1 8 meters EMC EMC Directive 89 336 EEC EN ...

Страница 63: ...nter 42 print head 39 Clogged nozzles 39 Color effect 18 problems 46 Consumables 49 Copying photos 22 D Date Stamp 20 Device external 24 to 26 DPOF Digital Print Order Format 17 E Edge guide 13 Error messages 59 External device printing from 24 to 25 saving files 22 F Faint images 45 File formats 11 Fix photo 18 Flash memory drive printing from 24 to 25 saving files 22 Folder 24 to 25 G Gaps in im...

Страница 64: ...fety instructions 7 PhotoEnhance 19 PictBridge 10 25 PictureMate PicturePack 49 PIM PRINT Image Matching 11 18 Power cable 37 Problems memory card 44 missing colors 46 paper feeding 46 paper jam 46 print quality 45 to 46 Q Quality 45 to 46 R Removing memory card 15 photo cartridge 33 Resolution 11 S Saving photo files 22 SD Secure Digital card 14 sepia 18 Setup problems 44 SmartMedia card 14 Smear...

Страница 65: ...med Clear paper jam then press the x Start button See Problems With Paper Feeding on page 46 Not enough ink to perform the head cleaning Replace the photo cartridge with a new one See Replacing the Photo Cartridge on page 33 Bluetooth module error Disconnect the Adapter then reconnect to the printer See Connecting and Disconnecting the Bluetooth Photo Print Adapter on page 27 External device is no...

Страница 66: ... See Replacing the Photo Cartridge on page 33 Display Meaning Photo cartridge cannot be recognized Reinstall the photo cartridge The genuine EPSON photo cartridge T573 is recommended for replacement The battery is empty Connect the AC adapter The battery temperatureis abnormal Turn the power off then wait until the battery temperature decreases The battery is defective Replace the battery with a n...

Страница 67: ...oto data on the memory card Remove the memory card then checkthe data on thememory card See Supported Photo Formats on page 11 Display Meaning Memory card error Remove the memory card then insert a compatible memory card See Inserting Your Memory Card on page 14 Cannot recognize the external device Check connection Error in the data The print results may not be perfect Check the data The data is n...

Страница 68: ...heimageis toocomplex toprintwith Bluetooth Check the data Display Meaning Ink is low Display Meaning No memory card Display Meaning PictBridge Camera connected USB Direct Print Camera connected PC connected AC adapter not connected Connect the AC adapter to install the first photo cartridge Display Meaning ...

Страница 69: ...ge 17 Display Meaning Check ink levels Press the x Start button to enter this mode See Checking the Photo CartridgeStatus InkLevel onpage 32 Clean print head Press the x Start button to enter this mode See Cleaning the Print Head on page 40 Check ink nozzles Press the x Start button to enter this mode See Checking the Print Head Nozzles on page 39 Align Print Head Press the x Start button to enter...

Страница 70: ...ixing Your Photos on page 18 Date stamp Press the x Start button to enter this mode See Adding the Date or Time on page 19 Time stamp Press the x Start button to enter this mode See Adding the Date or Time on page 19 Backup Press the x Start button to enter this mode See Saving Your Photos to an External Device Backup on page 22 Display Meaning Select folder Press the x Start button to enter this ...

Отзывы: