background image

Untitled Document

Custom Templates - Using a Custom Template


Display Settings - Configuring
Edge Fades
Editing Your Font Colors
Fonts - Accessing your System Fonts


Image Adjustments
Importing an Image
Interactive Multimedia Tutorial
Mirror Image
Murals - Creating


(Novelty Pro 8 and Mural 8 only)


Paragraphs - Creating
Printing Murals


(Novelty Pro 8 and Mural 8 only)

Printing a Mural Label Guide


(Novelty Pro 8 and Mural 8 only)

Printing Options


Print Preview
Print Preview for Murals


(Novelty Pro 8 and Mural 8 only)

Printing Preparation for Murals


(Novelty Pro 8 and Mural 8 only)


Product Information
Product Print Counters 
Program Options


Report Printing
Saving Images


Scanner - Configuring your Scanner Settings
Scanner - Selecting your Scanner


Scanning an Image


Selecting a Printer


Selecting a Product
Selecting a Product Category


Supported File Types
Technical Support
Using 4-Digit Saved Images
Using a Saved Product
Using CD images 

|

Using Floppy Disk images


Using Saved Images

Introduction

Thank you for choosing CTP software products for Windows™. 

Novelty 8

Mural 8

, and 

Novelty Pro 8 

are simple 

and intuitive design tools developed to size, shape, and print images for custom photo gift production. 

Novelty 8

Mural 8

, and 

Novelty Pro 8

 are the only software products developed specifically for the dye-sublimation and heat 

transfer, custom photo product industry. The simple point-and-click interface of 

Novelty 8

Mural 8

, and 

Novelty Pro 

8

 allows users to quickly and easily design and print transfers for hundreds of popular sublimatable products. The 

real power of our software lies in its ability to combine images with complex templates in such a simple and quick 
fashion. 

Novelty 8

Mural 8

, and 

Novelty Pro 8

 support color correction (

Powerdriver Pro

™ and 

Windows ICC

 color 

profiles). Please call our customer support department at 

1-800-532-6505

 or 

303-485-8003

 if you have any 

questions, concerns, or suggestions. Thank you.

file:///C|/Program%20Files/CTP,%20Inc/Novelty%20Pro%208%20Demo/V8Manual.htm (2 of 39)7/19/2004 11:09:31 AM

Содержание Mural 8

Страница 1: ...es Adjusting Images with Templates Color Correction for Powerdriver Pro Users Color Correction for Windows Color Profile Users Combining Different Images on One Sheet Configuring your system for Optimal Performance Cropping Images Overview Cropping an Image Cropping an Image for Murals Novelty Pro 8 and Mural 8 only Custom Murals Creating Novelty Pro 8 and Mural 8 only Custom Product Creating Cust...

Страница 2: ...ct Using CD images Using Floppy Disk images Using Saved Images Introduction Thank you for choosing CTP software products for Windows Novelty 8 Mural 8 and Novelty Pro 8 are simple and intuitive design tools developed to size shape and print images for custom photo gift production Novelty 8 Mural 8 and Novelty Pro 8 are the only software products developed specifically for the dye sublimation and h...

Страница 3: ...WAIN compatible scanner Since Novelty 8 Mural 8 and Novelty Pro 8 are graphics oriented programs it is vital to understand that low end or older PCs are not ideal for graphics production and can cause system crashes and instability Please carefully read through this manual and use the following Minimum Requirements in order to insure that the software functions properly and provides you maximum pr...

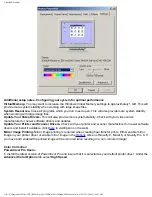
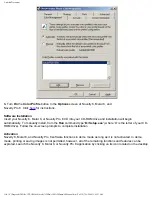
Страница 4: ... for instructions This is required in order for Novelty 8 Mural 8 and Novelty Pro 8 software to see the scanner Within Novelty 8 Mural 8 and Novelty Pro 8 you must also select the scanner you would like to use Click here to jump to scanner selection instructions Configuring your display settings Novelty 8 Mural 8 and Novelty Pro 8 support multiple monitor resolutions Right click anywhere on your d...

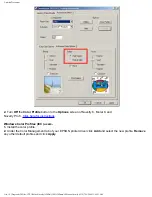
Страница 5: ... Scanner Drivers Check with your printer and scanner manufacturer for newer software drivers and install if available Clickhere to visit Epson on the web Mirror Image Printing Mirror image printing is required when creating heat transfer prints Either enable mirror image in your printer driver or enable mirror image in the Options screen of Novelty 8 Mural 8 or Novelty Pro 8 If you have both enabl...

Страница 6: ...for instructions Windows Color Profiles ICC users 1 Install the color profile 2 Under the Color Management tab of your EPSON printer driver click Add and select the new profile Remove any other default profiles and click Apply file C Program 20Files CTP 20Inc Novelty 20Pro 208 20Demo V8Manual htm 6 of 39 7 19 2004 11 09 31 AM ...

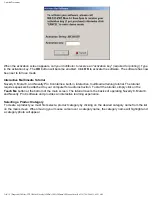
Страница 7: ... where D is the letter of your CD ROM drive Follow the on screen prompts to complete installation Activation Novelty 8 Mural 8 and Novelty Pro 8 software functions in demo mode as long as it is not activated In demo mode printing or saving images is not permitted however all of the remaining functions and features can be explored Launch the Novelty 8 Mural 8 or Novelty Pro 8 application by clickin...

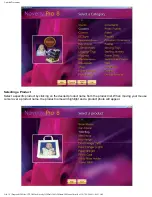
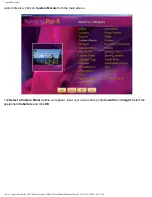
Страница 8: ...your computer for audio instruction To start the tutorial simply click on the Teach Me button at the bottom of the main screen The tutorial covers the basics of operating Novelty 8 Mural 8 and Novelty Pro 8 software and provides an interactive learning experience Selecting a Product Category To create a product you must first select a product category by clicking on the desired category name from ...

Страница 9: ...icking on the desired product name from the product list When moving your mouse cursor over a product name the product name will highlight and a product photo will appear file C Program 20Files CTP 20Inc Novelty 20Pro 208 20Demo V8Manual htm 9 of 39 7 19 2004 11 09 31 AM ...

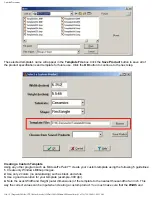
Страница 10: ...for future use If the product does not require using a custom template click OK to proceed Using a Custom Template Novelty 8 Mural 8 and Novelty Pro 8 allow you to utilize custom templates If the custom product requires using a custom template click the Browse button next to Template File to locate and select the desired template The Open dialogue box will appear Click on the template s name and c...

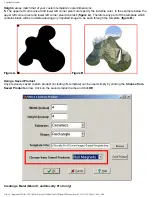
Страница 11: ...r custom template using the following 5 guidelines 1 Create only Windows Bitmap images 2 Use only 2 colors no anti aliasing such as black and white 3 Use a good resolution for your template example 300 dpi 4 Note the exact Width and Height outer dimensions of the template to the nearest thousandth of an inch This way the correct values can be input when creating a custom product You must make sure...

Страница 12: ...art off the template which contains black will be invisible allowing any imported image to be seen through the template figure B Figure A Figure B Using a Saved Product Any previously saved custom product including it s template can be used simply by clicking the Choose from Saved Products arrow Click on the saved product name and click OK Creating a Mural Mural 8 and Novelty Pro 8 only file C Pro...

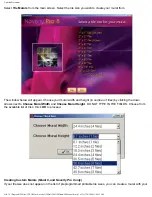
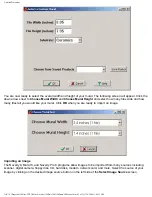
Страница 13: ...n arrows next to Choose Mural Width and Choose Mural Height DO NOT TYPE IN THE FIELDS Choose from the available list of tiles Click OK to proceed Creating Custom Murals Mural 8 and Novelty Pro 8 only If your tile size does not appear on the list of preprogrammed printable tile sizes you can create a mural with your file C Program 20Files CTP 20Inc Novelty 20Pro 208 20Demo V8Manual htm 13 of 39 7 1...

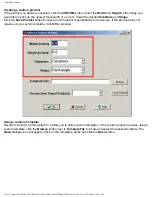
Страница 14: ...m the main screen The Select a Custom Mural window will appear Input your custom tile s printable width and height Select the appropriate Substrate and click OK file C Program 20Files CTP 20Inc Novelty 20Pro 208 20Demo V8Manual htm 14 of 39 7 19 2004 11 09 31 AM ...

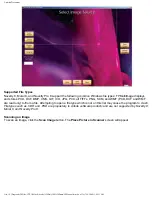
Страница 15: ...Click OK when you are ready to import an image Importing an Image The Novelty 8 Mural 8 and Novelty Pro 8 programs allow images to be imported from many sources including scanner digital camera floppy disk CD hard disk modem network card and more Select the source of your image by clicking on the desired image source button on the left side of the Select Image Source screen file C Program 20Files ...

Страница 16: ... from a file Attempting to open a file type which is not on this list may cause the program to crash File types such as CDR and PSD are proprietary to Adode software products and are not supported by Novelty 8 Mural 8 and Novelty Pro 8 Scanning an Image To scan an image click the Scan Image button The Place Picture in Scanner screen will appear file C Program 20Files CTP 20Inc Novelty 20Pro 208 20...

Страница 17: ...age button to launch your scanner s software When scanning is complete the image will appear on screen as seen below Click Next to proceed file C Program 20Files CTP 20Inc Novelty 20Pro 208 20Demo V8Manual htm 17 of 39 7 19 2004 11 09 31 AM ...

Страница 18: ...lick on the desired image name and click Open Using CD Images Click the CD ROM button to access an image from a CD The Open an Image File dialogue box will appear using your CD ROM drive as the default location Click on the desired image name and click Open Using 4 Digit Saved Images Novelty 8 Mural 8 and Novelty Pro 8 software includes a quick access method for importing images Any 4 digit TIFF f...

Страница 19: ...just name the image a 4 digit number and choose TIF as the file type example 1234 tif The image is now ready for fast 4 digit access Cropping Images Overview Remember the real power of Novelty 8 Mural 8 and Novelty Pro 8 software lies in its ability to combine images with complex templates in such a simple and quick fashion in its ability to size and shape any image to match the product being desi...

Страница 20: ...e the cropping window Click the Rotate button to rotate the crop window in 90 degree increments To reduce or enlarge your crop window simply click either the Zoom In or Zoom Out buttons Click the Next button when you have selected the desired print area If the full image is desired for your print click the Don t Crop Image button on the left side of the screen and click Next to continue The Crop Y...

Страница 21: ... Arrows and Zoom In or Zoom Out buttons Or click anywhere on the image to redraw new grout lines Adjusting the grout lines will not change the size of your finished mural this step only allows you to specify what part of the image you would like to include in your mural Click Next when the desired mural layout is achieved Adjusting Images with Templates Any product which has a template will allow ...

Страница 22: ...order Rotates the Template or Border in 90 degree increments counterclockwise Click Next when you are ready to Proceed Print Preview The Print Preview screen displays the image exactly how it will appear when printed This screen also gives users access to additional program options and features file C Program 20Files CTP 20Inc Novelty 20Pro 208 20Demo V8Manual htm 22 of 39 7 19 2004 11 09 31 AM ...

Страница 23: ...al 8 and Novelty Pro 8 only When creating a mural the Print Preview screen will display how your finished mural will appear Click Next to continue file C Program 20Files CTP 20Inc Novelty 20Pro 208 20Demo V8Manual htm 23 of 39 7 19 2004 11 09 31 AM ...

Страница 24: ...lick Select All if you would like to print all the tiles in the mural The selected tiles label will highlight in red Click the Reset button to deselect tiles 2 Click the Print button to print the selected tiles When printing the program will automatically fit as many selected tiles as possible onto each printed sheet thereby maximizing your heat transfer paper usage 3 Click on Print Guide to print...

Страница 25: ...is displayed Click the Print button to print the image as it appears on screen Selecting a Printer The Select Printer button allows you to change your default printer as well as change paper sizes and printer settings file C Program 20Files CTP 20Inc Novelty 20Pro 208 20Demo V8Manual htm 25 of 39 7 19 2004 11 09 31 AM ...

Страница 26: ... the image Re clicking the Edge Fade button will increase the amount of edge fading Click Undo Edge Fade at the bottom of the screen to restore your image back to its original state Adding Text to Images file C Program 20Files CTP 20Inc Novelty 20Pro 208 20Demo V8Manual htm 26 of 39 7 19 2004 11 09 31 AM ...

Страница 27: ... over the image and auto fit within the width of your image Creating Paragraphs Novelty 8 Mural 8 and Novelty Pro 8 have new text features which allow you to create paragraphs instead of single lines of text at a time When the first line of text is typed just press the Enter key on your keyboard to begin typing the second line of text and so on Accessing your System Fonts To access all of the font...

Страница 28: ...d Novelty Pro 8 program Moving Text Click and drag the text over your image to position it as desired or use the arrow keys located in the upper right corner of the screen Bold Italic Underline Check the box next to each of these features to implement Remove Text Click to remove any text which has not been applied Apply Text This feature merges the text with the current image This allows additiona...

Страница 29: ... or add to the list of font colors open the file TextColor txt located in your program folder The first three values of each line are the font color s RGB value Each value must be delimited by a space The fourth value is the color s identifying label within the program The color label or fourth value should always be the next consecutive available For example there are currently 48 colors in the T...

Страница 30: ... be sized using the Enlarge and Reduce image buttons Click and drag the image to position it as desired When finished adjusting your added image click Next to return to the Print Preview screen Multiple images can be added to a layout file C Program 20Files CTP 20Inc Novelty 20Pro 208 20Demo V8Manual htm 30 of 39 7 19 2004 11 09 31 AM ...

Страница 31: ... decrease the blue in your image Sharpness Click the Up or Down arrows to increase or decrease the sharpness of your image Black White Click the Black White button to remove color entirely from your image Reset Restores your image back to its original state When you are finished making adjustments to your image click Next to return to the Print Preview screen Printing Options The Print Options scr...

Страница 32: ...p and down arrows to change the number of Images per Sheet Novelty 8 Mural 8 and Novelty Pro 8 will automatically calculate the maximum number of images which can fit on any given paper size You may use the Select Printer button to change your paper size on the fly file C Program 20Files CTP 20Inc Novelty 20Pro 208 20Demo V8Manual htm 32 of 39 7 19 2004 11 09 31 AM ...

Страница 33: ...ntrols the amount of horizontal space between tiled images This can be adjusted to the nearest thousandth of an inch Vertical Spacing The Vertical Spacing controls the amount of vertical space between tiled images This can be adjusted to the nearest thousandth of an inch Combining Different Images on One Sheet Novelty 8 Mural 8 and Novelty Pro 8 allows you to combine different images on one sheet ...

Страница 34: ...File dialogue box will appear Select the desired saved image and click Open The new image will replace the old one Program Options From the main screen of Novelty 8 Mural 8 and Novelty Pro 8 click on the Options button to view product information print counters or to modify the program options file C Program 20Files CTP 20Inc Novelty 20Pro 208 20Demo V8Manual htm 34 of 39 7 19 2004 11 09 31 AM ...

Страница 35: ...nitoring features which provide very useful information These print counters can be used to monitor the following ink tank performance daily weekly monthly production specific product production For example To monitor the performance of an ink tank click the Reset Print Counter button when you install the ink tank When the ink tank goes empty check the resetable counter to find out how many prints...

Страница 36: ...important information for acquiring technical support Reset Counters Click to clear the resetable counter in the Product Information Box Register Click to activate or deactivate your Novelty 8 Mural 8 and Novelty Pro 8 software Product Print Counters The Product Print Counters button of the Options screen gives users the ability to view specific print count information on every product type printe...

Страница 37: ...Color Profile Button If ON the Color Profile button of the Options screen will print using the installed and selected Windows ICC color profile associated with your Epson printer Turn OFF for PowerdriverPro users Troubleshooting Problem Cause Solution click on link for instructions Nothing prints on the paper The image to be printed is too large for the paper size 1 Increase your paper size using ...

Страница 38: ...phics files your PC is older 1 Make sure your system meets the Minimum System Requirements 2 Configure your system for optimal performance When trying to open an image file the program crashes You are trying to open an un supported file type 1 Click here to view the list of supported file types Scan Failed message when trying to scan Scanner is not being detected 1 Make sure your scanner is turned...

Страница 39: ... sublimation ink type Contacting CTP Technical Support Hours 8am 5pm Monday Friday MST Phone 303 619 0071 Fax 303 485 8032 E mail dan noveltycentral com Web www noveltycentral com Address CTP Imaging Solutions 8105 W I 25 Frontage Rd Suite 2 Frederick CO 80516 file C Program 20Files CTP 20Inc Novelty 20Pro 208 20Demo V8Manual htm 39 of 39 7 19 2004 11 09 31 AM ...

Отзывы: