background image

Playing Movies

33

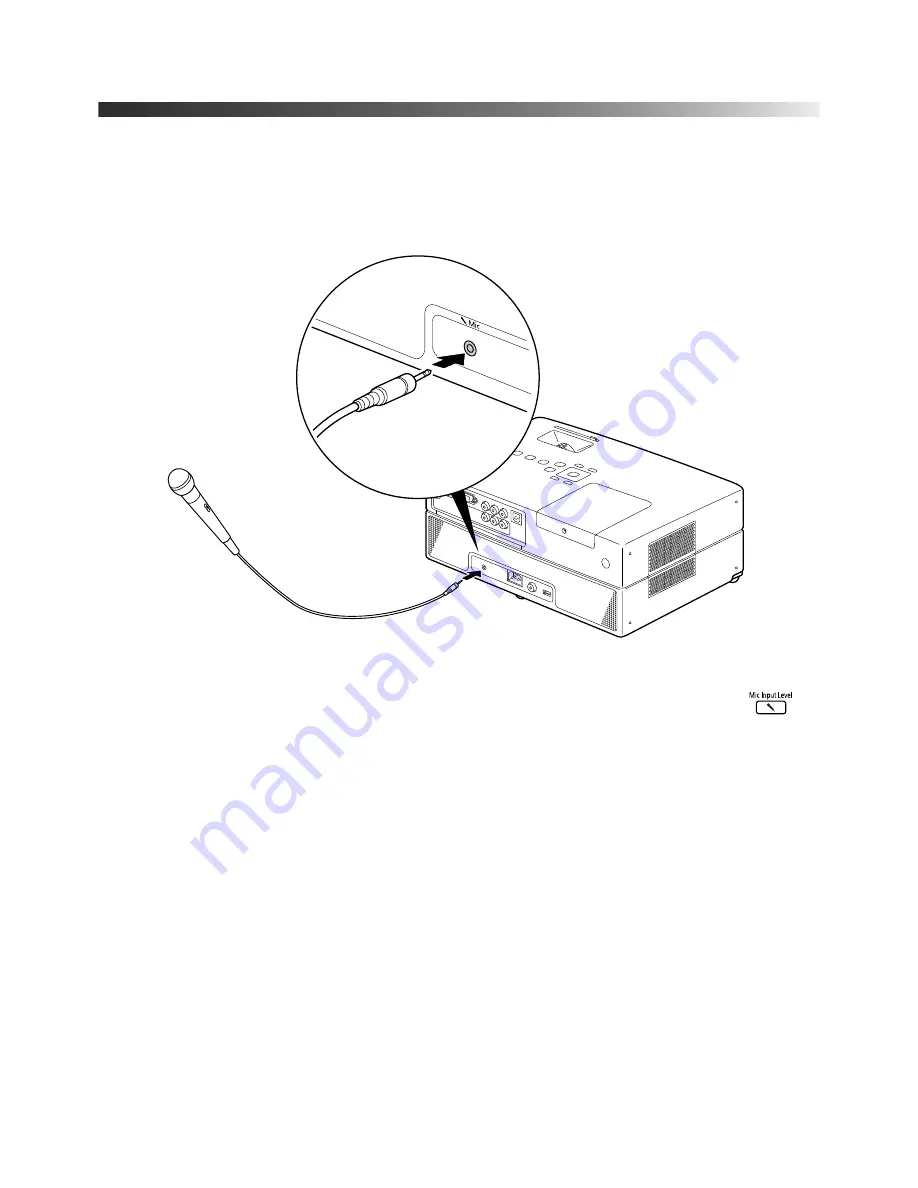
Connecting a Microphone

Connect a microphone as shown below:

You can adjust the volume using the projector’s volume controls on the control panel or 
remote control. If the microphone level is too low, you can adjust it by pressing the 


button on the remote control or through the Option menu (see page 51).

Содержание MOVIEMATE 62

Страница 1: ...Epson MovieMate 62 User s Guide ...

Страница 2: ...ponsible Use This unit is equipped with Macrovision copy protection The intellectual property rights to the patent of this copy protection technology are owned by the Macrovision Company of America and others When employing this technology a license is required from the Macrovision Company The Macrovision Company does not authorize the use of this technology except for a limited range of intended ...

Страница 3: ...sing a Location 18 Setting Up Epson MovieMate 21 Turning the Projector Off 22 Playing Movies 23 Wall and Projection Screen Recommendations 23 Viewing on a Wall 23 Viewing on a Projection Screen 23 Starting a DVD 25 Adjusting the Picture 26 Adjusting the Sound 27 Controlling Playback 28 Pausing 28 Searching Fast Forward or Reverse 29 Playing in Slow Motion 29 Skipping 29 Zooming In or Out 29 Using ...

Страница 4: ...re with Epson MovieMate 41 Playing Music and Videos and Viewing Photos 41 Playing Music CDs 41 Playing MP3 WMA Music or Videos 42 Viewing JPEG Photos 43 Using Advanced Playback Controls 44 Repeating a Chapter Title Track or File 44 Changing the Play Sequence Program Play 45 Selecting Language Subtitles and Camera Angles 46 Using the Playback Information Screen 46 Customizing Epson MovieMate 47 Loc...

Страница 5: ...ter 55 Replacing the Lamp 57 Resetting the Lamp Timer 59 Storing Epson MovieMate 60 Transporting Epson MovieMate 61 Problem Solving 62 What To Do When the Lights Flash 62 Solving Epson MovieMate Operation Problems 64 Solving Picture and Sound Problems 65 Problems with External Video Equipment 67 Where To Get Help 69 Internet Support 69 Speak to a Support Representative 69 Purchase Supplies and Acc...

Страница 6: ...olor Light Output brightness enough for viewing in daylight Microphone input HDMI interface for connecting high end video equipment DVD player with Dolby Digital and DTS Built in speakers with DTS digital surround sound Long life bulb providing up to 5000 hours of use Automatic digital keystone correction Extra Care Home Service Registration and Warranty Your Epson MovieMate comes with a warranty ...

Страница 7: ...ur Epson MovieMate and start using it This book contains information on using all the features of Epson MovieMate troubleshooting tips and specifications Please follow these guidelines as you read through the manual Warnings Must be followed carefully to avoid bodily injury Cautions Must be observed to avoid damage to your equipment Notes Contain important information about your equipment Tips Con...

Страница 8: ...8 Welcome If you need more help you can use the Epson PrivateLine Support service Call 800 637 7661 and enter the PIN on the PrivateLine support card that came with Epson MovieMate ...

Страница 9: ...one jack Lens cover slide Adjustable foot Adjustable foot Foot adjustment lever Foot adjustment lever Security slot Audio inputs Video port Component video ports Power inlet Remote control receiver Computer port Air exhaust vent Back View Digital coaxial audio out port USB port Speaker Speaker HDMI port Mic input port Disc indicator light Storage feet ...

Страница 10: ...ol volume Turn Epson MovieMate on or off Top View Return to previous menu Temperature warning light Power status light Ambientlight sensor Lamp cover Select menu settings Control panel Access Setup menu DVD settings Access DVD menu chapter selection etc Access Visual Setup menu projector settings ...

Страница 11: ...back Fix image shape if Epson MovieMate is tilted Note The remote control buttons can glow in the dark Expose the remote control to light for several minutes before using it in the dark Turn Epson MovieMate on or off Project from external equipment Adjust picture for different lighting Pause movie and turn on light ...

Страница 12: ...moisture Do not move the unit during playback Do not touch the projection lens with bare hands Use a damp cloth for cleaning Do not use liquid or aerosol cleaners Do not use solvents such as alcohol thinner or benzine Unplug the projector from the wall outlet before cleaning Do not use the projector in places where flammable gases or explosive gases may be present in the atmosphere Do not use the ...

Страница 13: ... broken glass are inhaled or get into the eyes or mouth or if any other ill effects are noticed immediately seek medical advice Do not disassemble or damage the lamp or subject it to any impacts Use the type of power source indicated on the projector If you re not sure of the power available consult the power company If you use the projector in a country other than where you purchased it use the c...

Страница 14: ...d seek medical attention immediately Replace the batteries as soon as they run out Do not expose batteries to heat or flame and do not put them in water Dispose of used batteries according to local regulations Remove the batteries if you won t be using the projector for an extended period Insert batteries so that the polarities are correct and do not mix new and old batteries Do not use batteries ...

Страница 15: ...burn in contact Epson as described on page 69 Do not turn the volume too high especially when using headphones Listening to high volume sounds over an extended period can damage your hearing Sudden high volume can also damage the speakers WARNING The cords included with this product contain chemicals including lead known to the State of California to cause birth defects or other reproductive harm ...

Страница 16: ...16 Welcome ...

Страница 17: ...g Up Follow these instructions to unpack your projector choose a location and set up your projector Unpacking Make sure you have all the parts shown here Epson MovieMate 62 Remote control and 2 AA Batteries CD with User s Guide Power cord Padded bag ...

Страница 18: ...mounted screen or simply project on a flat white wall The following pictures show three different setups To project onto a wall choose a flat white wall with a smooth surface When you find a suitable wall for projection you may want to consider coating the area with projection paint to enhance the image quality For details see Wall and Projection Screen Recommendations on page 23 Front Floor Back ...

Страница 19: ...ge 26 for instructions The farther you place the projector from the screen or wall the larger the image will be The following tables list the distances required for various image sizes measured diagonally Note that the zoom adjustment also affects image size Wide screen aspect ratio 16 9 Image size diagonal Projection distance 30 in 2 9 to 4 ft 0 89 to 1 2 meters 50 in 4 9 to 6 7 ft 1 5 to 2 meter...

Страница 20: ...in 6 to 8 2 ft 1 8 to 2 5 meters 60 in 7 2 to 9 8 ft 2 2 to 3 0 meters 70 in 8 5 to 11 5 ft 2 6 to 3 5 meters 80 in 9 7 to 13 1 ft 3 0 to 4 0 meters 100 in 12 1 to 16 4 ft 3 7 to 5 0 meters 150 in 18 3 to 24 7 ft 5 6 to 7 5 meters 200 in 24 4 ft 7 4 m Wide screen aspect ratio 16 10 Image size diagonal Projection distance 21 in 2 2 to 3 ft 0 66 to 0 91 meter 30 in 3 1 to 4 3 ft 0 96 to 1 3 meters 5...

Страница 21: ...reen Make sure you read all the instructions to avoid damaging the screen 2 Put the batteries in the remote control Note Use only AA size alkaline or manganese dry batteries 3 Reattach the battery cover 4 Expose the remote control to bright light for several minutes before using it in the dark The buttons will glow in the dark briefly ...

Страница 22: ...age 23 If you would like to connect other equipment to the projector see Using Epson MovieMate with Other Equipment on page 34 Turning the Projector Off 1 If there is a disc inside the projector eject it 2 Press the button on the projector or the on the remote control The projector will beep twice when it is finished powering off Warning Do not disconnect the power cable before the projector beeps...

Страница 23: ... environment Viewing on a Projection Screen If you don t have a suitable wall in your home or want a professional quality viewing experience you can use a projection screen These screens have optical coatings with special reflective properties that enhance brightness contrast and sharpness as well as providing a frame around the image Projection screens are available in many shapes sizes mounting ...

Страница 24: ...ight by absorbing the room light and preserving the darker blacks If you have a dedicated home theater room with dark walls ceiling floor and furniture a gray screen may not provide better contrast than a white screen However if you usually project images in a typical living room or family room with some reflected light a gray screen will provide better contrast and a truer viewing experience Scre...

Страница 25: ... In a home theater room with darkened surroundings and controlled lighting a screen surface with less than 1 0 gain is best For rooms where you cannot control the light or will always have ambient light you may want to select a screen surface with more than 1 0 gain to compensate for the additional brightness Starting a DVD Insert your DVD into the slot Warning Close the lens cover before insertin...

Страница 26: ...e foot adjustment levers and tilt the projector up If the image is horizontally tilted you can turn the feet to level it Your projector automatically detects the vertical tilt and corrects the image shape If you find that the image is not rectangular however use the Keystone buttons on the remote control or the Keystone setting in the Signal menu see page 52 to adjust the image shape ...

Страница 27: ...e or reduce the aspect ratio of the picture press the button on the remote control to select Normal Full or Zoom if available for the video source you re using Adjusting the Sound To adjust the volume use the or Volume buttons on the control panel or remote control You can also press the button on the remote control to temporarily turn off the sound ...

Страница 28: ...o track To pause a movie or a music CD or MP3 player track press on the remote control or on the control panel To resume press on the remote control or on the control panel To pause a movie and display the Epson logo press on the remote control or control panel To resume press on the remote control or on the control panel To pause a movie and light up the screen or wall temporarily so you can see ...

Страница 29: ...ress repeatedly to advance the video frame by frame 3 Press or to move forward or backward in slow motion Each time you press the button the speed decreases 4 Press to return to normal play Skipping To skip to the next chapter or track press on the remote control To return to the start of the current chapter or track press on the remote control Zooming In or Out Press to zoom in the image Make sur...

Страница 30: ...ant to use the numeric buttons you need to set the toggle switch on the remote control to the Num position After you set the toggle switch you can simply press the numeric button for the numbers 1 through 9 To enter the number 10 press then To enter the number 15 press then To enter the number 20 press then After entering your number you may need to press the button Temporarily Stopping Audio To t...

Страница 31: ...e Use for playing fast motion games in a bright room option available only when connected to external equipment Note Fan speed varies depending on the selected color mode This is normal Adjusting the Sound and Audio Modes You can switch between stereo sound and virtual surround sound and select from several audio modes depending on the type of movie or music you re playing 1 To display the sound m...

Страница 32: ...projector s volume controls on the control panel or remote control Warning Make sure the volume is not set too high especially when you first plug in the headphones Listening to high volume sounds over an extended period can damage your hearing Sudden high volume can also damage your hearing or your headphones Do not look into the lens and do not allow children or pets to look into the lens The br...

Страница 33: ...hone as shown below You can adjust the volume using the projector s volume controls on the control panel or remote control If the microphone level is too low you can adjust it by pressing the button on the remote control or through the Option menu see page 51 ...

Страница 34: ...r Warning Close the lens cover before connecting disconnecting your device The bright light may affect your vision Additionally you may leave fingerprints on the lens which can affect projection quality When the picture appears do not look into the lens and do not allow children or pets to look into the lens Viewing Video from External Devices You can connect to external video devices that have HD...

Страница 35: ...le or satellite TV receiver HD DVR Blu ray Disc player or HD camcorder Composite Video Connection L R Video Audio White Red Yellow For connecting a VCR or DVD player cable or satellite TV receiver or DVR game console camcorder iPod digital camera or other device with a video output port ...

Страница 36: ...HDMI If you used the component video connection select Component Otherwise select Video 5 Turn on the power to the connected video equipment then start playing the video or game 6 Normally your projector selects the correct aspect ratio automatically If you need to change the aspect press the button on the remote control and select Normal Full or Zoom if available for the video source you re using...

Страница 37: ...card You can view photos play music or play videos The projector supports the following types of files on USB devices MP3 WMA JPEG MPEG 1 2 4 Connect the drive or other device to the USB port as shown below When you re finished make sure you press before removing the device from the USB slot For instructions on playing MP3 WMA JPEG or MPEG 1 2 4 files see page 41 ...

Страница 38: ...xternal equipment or may be purchased from an electronics store 1 Make sure the equipment is turned off then connect the cable as shown 2 Turn on your audio equipment and play your movie music or other presentation with sound from your projector 3 You may need to change the Digital Output setting in the Audio Setup Page Select Stream if you are connecting a DTS Dolby Digital Decoder or PCM if you ...

Страница 39: ...electronics store Caution Before connecting make sure all equipment is turned off 1 Connect the computer or laptop as shown 2 Connect the power cords and plug in all the equipment 3 Open the lens cover and press the button on the projector or the button on the remote control 4 Press the button on the projector or the button on the remote control 5 When you see the menu use the down arrow or up arr...

Страница 40: ...on both the laptop display and an external display you may need to disable the laptop display to view movies on the projector See your laptop documentation for instructions 8 Normally the projector selects the correct aspect ratio automatically If you need to change the aspect press the button on the remote control and select Normal Full or Zoom if available After your image appears you may find t...

Страница 41: ...d MPEG 1 2 4 files You can also view JPEG photos on discs or USB devices Playing Music CDs To play a music CD simply insert it in the slot You can use most of the playback features including pause resume fast forward reverse and skip to the next or previous track See page 28 for instructions You can also select a specific track by using the numeric buttons as described on page 30 To use the numeri...

Страница 42: ...or folders 1 Press or to select a folder or file To go to the next or previous page press or 2 Press or to begin playing the selected track or file When a file is finished playing the next file in the sequence will start automatically To turn off the lamp when playing music files close the lens cover When you play MP3 or WMA files scrolling through the list of songs will pause the music until you ...

Страница 43: ... press or To stop the slideshow and display a thumbnail screen press To display the next or previous page of thumbnails press or To display the list of the files and folders press If your disc or USB device includes both music files and JPEG photos you can play a slideshow with music 1 To display the list of files press 2 Select the music file you want and press to start playing it 3 Select the JP...

Страница 44: ...an also repeat a track on a music CD or an MP3 WMA or JPEG file 1 To repeat a chapter title or track press make sure the toggle switch on the remote control is set to the Func position You see an icon on the screen indicating the selected repeat option 2 Press again to cycle through the options for repeating On a video DVD you can repeat a chapter or title or select random play Shuffle On an audio...

Страница 45: ... control to the Num position 3 Use the numeric buttons to set the program order up to 99 chapters titles or tracks Press or to move the cursor If a disc has more than 10 chapters or tracks press or to display the next or previous page Or select Next or Prev on the screen and press To delete a track or chapter you have entered select it and press To close the program screen select Exit on the scree...

Страница 46: ...information screen as described below For a list of language codes see page 80 Using the Playback Information Screen You can check the current playback status and change settings while you are playing a DVD or CD 1 Press make sure the toggle switch on the remote control is set to the Func position You see an information screen like the following below the projected image 2 Press or to select the i...

Страница 47: ... Setup Page 3 Press until you see the Others Setup Page 4 Press to highlight Disc Lock then press to change the setting 5 Press to select Lock then press 6 Press to highlight Password then press to change it 7 Press to select Change 8 Set the toggle switch on the remote control to the Num position then enter 6 digits using the numeric buttons The first time you set a password you need to enter 000...

Страница 48: ...ing down the button on the control panel for at least 5 seconds Warning Do not allow young children or pets to look into the projector lens when the projector is turned on The lens projects bright light that may affect their vision 1 Press on the remote control You see the Visual Setup menu 2 Press to highlight Option then press to select it 3 Press until you see Child Lock 4 Press or to select On...

Страница 49: ...s playing You can select from 10 to 150 minutes After you set the sleep timer you can see the time remaining by pressing Note Sleep timer settings are not saved after you turn the projector off Changing Language Settings You can use the Language Setup Page to change the default language for DVDs that allow you to make this selection 1 Press the button on the remote control You see the Language Set...

Страница 50: ...makes the image more blue Low makes it more red Auto Iris Adjusts the light intensity based on the brightness of the displayed image 4 Press or to increase decrease or change the setting 5 Press to exit the menu Using the Others Setup Page The Others Setup Page lets you select various settings including screensaver and MP3 WMA JPEG file navigation You can also return all settings to their defaults...

Страница 51: ...external equipment with a DTS Dolby Digital Decoder or DVDs recorded in Dolby Digital 1 Press the button on the remote control You see the Language Setup Page 2 Press to display the Audio Setup Page 3 Press to highlight Digital Output or Night Mode then press to select it You can select the following settings Digital Output Change to Stream if you have connected a DTS Dolby Digital Decoder to the ...

Страница 52: ...the option you want to set You can adjust the following items Keystone Adjust this setting to correct the shape of the image if the projector has been tilted upward Auto Keystone Select On to have the projector automatically adjust the shape of the image when the projector has been tilted upward or downward Zoom Select Wide to enlarge the image or Tele to reduce it Power Consumption Select ECO if ...

Страница 53: ... reset the timer after you install a new lamp You can also view video signal information and error codes for any problems that occur 1 Press on the remote control You see the Visual Setup menu 2 Press to highlight Info then press to display the lamp usage and other information Note If the lamp has been used less than 10 hours 0H is displayed 3 To reset the lamp timer after replacing the lamp press...

Страница 54: ...tructions in this section to clean the lens and case clean and replace the air filter replace the lamp and store or transport the projector Protecting Epson MovieMate The projector is designed for use virtually anywhere at home However the projector and its accessories should not be exposed to water smoke direct heat or sunlight or left outside for long periods of time As with other electronic equ...

Страница 55: ... see the following message The projector is overheating Make sure nothing is blocking the air vents and clean or replace the air filter Dust clogs prevent proper ventilation which can cause overheating and damage the projector 1 Press the button on the control panel or the button on the remote control to turn the projector off When you hear a short beep disconnect the power cable 2 Use a small vac...

Страница 56: ...ring for Your Epson MovieMate 3 If you need to clean or replace the filter lift up the handle press up on the tab and lift off the cover 4 Remove the old filter and install the new filter 5 Replace the cover ...

Страница 57: ...you start projecting Caution If you continue to use the lamp after you see the replacement indicators the lamp is more likely to break You can purchase a new lamp part V13H010L56 from an Epson authorized reseller To find the nearest reseller call 800 GO EPSON 800 463 7766 Or you can purchase online at www epsonstore com U S sales or www epson ca Canadian sales Be sure to read the safety instructio...

Страница 58: ...t Then slide out the lamp cover and lift up to remove it 4 Loosen the two silver screws holding the lamp in place You can t remove these screws 5 Grasp the lamp handle as shown and pull the lamp straight out Note The lamp s in this product contain mercury Please consult your state and local regulations regarding disposal or recycling Do not put in the trash ...

Страница 59: ...over slide it into position then tighten the screw The projector won t work if the lamp cover is loose 8 After replacing the lamp you need to reset the lamp timer as described in the next section Resetting the Lamp Timer 1 Connect the power cable and press the button on the projector or the button on the remote control to turn the projector on 2 Press on the projector on the remote control You see...

Страница 60: ...ector Make sure the temperature and humidity of the storage area are within the recommended range for the projector 14 to 140 F 10 to 60 C and 20 to 80 relative humidity without condensation Make sure all discs are ejected Close the lens cover and retract the feet Remove the batteries from the remote control Place the projector in its padded bag You can stand it on end for convenient storage Packa...

Страница 61: ...plenty of cushioning around the projector Be sure the carrier is capable of transporting fragile equipment and is aware that the projector is fragile If you move the projector from a cold environment into a warm room condensation moisture may form internally or on the lens surface To avoid damage that might be caused by condensation wait approximately an hour before using the projector If condensa...

Страница 62: ...light is orange The projector is in sleep mode Press the button on the projector or the button on the remote control to turn it on The light is flashing green The projector is warming up Wait for the picture to appear This can take a few minutes The light is flashing orange The projector is cooling down Wait until the light stops flashing before you unplug the projector The light is green The proj...

Страница 63: ...on to turn the lamp back on If the status doesn t change wait a few minutes then unplug the projector and contact Epson See page 69 The light is red and the warning light is flashing red The lamp may be incorrectly installed the lamp cover may be loose or the lamp may be broken Turn off the power wait a few minutes or wait 1 hour if you ve been using the projector and check the lamp See page 59 If...

Страница 64: ...See page 48 The projector turns itself off after a period of time The power turns off automatically when the projector is idle for more than 30 minutes Press the button on the projector or the button on the remote control to turn on the projector For instructions on changing the Sleep setting see page 49 No picture appears on the screen Make sure the projector is turned on the light is green and n...

Страница 65: ...it might not work with the projector Epson does not support any third party remote controls Solving Picture and Sound Problems The picture is blurry or out of focus Adjust the focus using the focus ring See page 26 for instructions There may be dirt on the lens Clean the lens as described on page 54 Make sure the lens is not fogged by condensation If you ve just moved the projector from a cold env...

Страница 66: ...ou ve tilted the projector to raise or lower the image causing it to become keystoned Use the or buttons on the remote control or the Signal menu see page 52 to correct the problem The picture is taller on the left or right side The projector is set at an angle to the screen Face it squarely toward the screen There is no sound or the sound is not loud enough Try pressing the Volume button on the p...

Страница 67: ... See page 33 Increase the Mic Input Level See page 33 The projector is compatible with dynamic microphones Make sure you are not using a plug in power microphone Subtitles do not appear The DVD might not include subtitles Make sure the subtitle language is not set to OFF see page 46 You can t change the language on a DVD The DVD might not include multiple languages Problems with External Video Equ...

Страница 68: ...mputer s image signal to external output may not work Turn the computer and the projector off and then back on again You see the message Signal not supported Press the button on the remote control and check the Video Signal setting see page 52 The picture is cut off too large or too small Press the button on the remote control and select the appropriate aspect ratio Press the button on the remote ...

Страница 69: ...y dialing one of these numbers U S 562 276 4394 6 AM to 6 PM Pacific Time Monday through Friday Canada 905 709 3839 6 AM to 6 PM Pacific Time Monday through Friday Days and hours of support are subject to change without notice Toll or long distance charges may apply Before you call please have the following information ready Product name Epson MovieMate 62 Product serial number located on the bott...

Страница 70: ...onent video connection 34 Composite video connection 34 Computer connection 39 to 40 Contrast ratio 74 Control panel projector 10 D Dark image 66 Digital audio recorder connecting 38 Digital camera connecting 34 to 36 Distance projection 19 74 Documentation 7 DVDs menus 30 playing 23 to 32 DVR connecting 34 to 36 E Electrical specifications 75 Environmental specifications 76 Epson accessories 7 69...

Страница 71: ... 53 59 to 60 Language 46 49 80 Laptop connection 39 to 40 Lens cleaning 54 Lights projector 62 to 63 Location projector 18 to 20 Lock security 7 Locking Power button 48 Looping 44 M Maintenance 54 to 60 Menus 30 Microphone connecting 33 Movies pausing 28 playing 23 to 32 searching 29 MP3 42 50 78 Music playing 41 to 43 Muting 30 N No Signal message 67 O Optional accessories 7 Overheating 20 55 63 ...

Страница 72: ... 53 59 to 60 Resolution 74 S Safety approvals 76 Satellite receiver connecting 34 to 36 Screen distance 19 74 Screen projection 23 to 25 Screen saver setting 50 Searching 29 Shuttle control 29 Signal not supported message 68 Size image 19 74 Skipping chapters or tracks 29 Sleep mode 49 62 64 Slow motion 29 Sound adjusting 27 31 51 problems 66 to 67 Sources switching 36 39 68 Speakers projector 74 ...

Страница 73: ...Index 73 Vents 9 Video camera connecting 34 to 36 Video compatible formats 76 to 78 Volume adjusting 27 W Wall projection 23 to 25 Warranty 6 to 7 WMA 42 50 78 Z Zooming 26 29 ...

Страница 74: ...n Image size 30 to 300 inches 0 89 to 9 1 meters Projection distance 2 2 to 29 9 feet 0 66 to 9 1 meters Speakers Stereo speakers 10 W 2 Zoom ratio 1 1 35 Aspect ratio Native 16 9 4 3 resize DVD Unit Audio MTK Surround Dolby Digital DTS Digital Surround Media DVD Video DVD R RW DVD R DL DVD R RW DVD R DL CD R RW DVD VR without CPRM Audio CD MP3 CD DVD WMA CD DVD JPEG Dual Disk WMV CD DVD See page ...

Страница 75: ...ng upon mode selected environmental conditions and usage Turn off this product when not in use to prolong the life of the projector Dimensions Height 5 inches 127 mm excluding feet Width 13 2 inches 335 mm Depth 9 41 inches 239 mm Weight 9 3 lb 4 2 kg Electrical Rated voltage 100 to 240 VAC Rated frequency 50 60 Hz Power consumption Operating 100 to 120 VAC 310 W Power Consumption Normal 100 to 12...

Страница 76: ...osite video Signal Resolution Normal aspect mode Full aspect mode Zoom aspect mode TV NTSC 720 x 480 720 x 360 720 x 540 4 3 960 x 540 16 9 960 x 540 16 9 TV PAL SECAM 720 x 576 720 x 432 720 x 540 4 3 960 x 540 16 9 960 x 540 16 9 Component video Signal Resolution Normal aspect mode Full aspect mode Zoom aspect mode SDTV 480i 60Hz 720 x 480 720 x 360 720 x 540 4 3 960 x 540 16 9 960 x 540 16 9 SD...

Страница 77: ...0 x 540 SDTV 480p 720 x 480 720 x 360 720 x 540 960 x 540 960 x 540 SDTV 576p 720 x 576 720 x 432 720 x 540 960 x 540 960 x 540 SVGA60 800 x 600 720 x 540 960 x 540 960 x 540 XGA60 1024 x 768 720 x 540 960 x 540 960 x 540 HDTV 720p 1280 x 720 960 x 540 WXGA60 1280 x 800 864 x 540 960 x 540 960 x 540 SXGA2_60 1280 x 960 720 x 540 960 x 540 960 x 540 SXGA3_60 1280 x 1024 675 x 540 960 x 540 960 x 54...

Страница 78: ... MPEG up to 5 57 mbps for USB devices up to 5 6 mbps for CDs up to 19 mbps for DVDs Computer image Signal Resolution Normal aspect mode Full aspect mode Zoom aspect mode VGA 60 72 75 85 iMac 640 x 480 640 x 360 720 x 540 960 x 540 960 x 540 SVGA56 60 72 75 85 iMac 800 x 600 800 x 450 720 x 540 960 x 540 960 x 540 XGA60 70 75 85 iMac 1024 x 768 1024 x 576 720 x 540 960 x 540 960 x 540 SXGA1_70 75 1...

Страница 79: ...jector can play multi session recorded discs Multiple bit rate files and WAV files are not supported The projector supports baseline JPEG files created by a digital camera and conforming to the DCF Design rule for Camera File system standard Motion JPEG files are not supported Certain digital camera functions such as automatic rotation may not be supported These specifications are subject to chang...

Страница 80: ...arian 6671 Ivrit 7269 Norwegian Nynorsk 7878 Tigrinya 8473 Burmese 7789 Japanese 7465 Occitan Provencal 7967 Tonga Tonga Island 8479 Castellano Español 6983 Javanese 7486 Old Bulgarian Old Slavonic 6785 Tsonga 8483 Catalán 6765 Kalaallisut 7576 Oriya 7982 Tswana 8478 Chamorro 6772 Kannada 7578 Oromo 7977 Türkçe 8482 Chechen 6769 Kashmiri 7583 Ossetian Ossetic 7983 Turkmen 8475 Chewa Chichewa Nyanj...

Страница 81: ...ght on the projector turns orange Connect the projector Choose from the following connections Turn on your equipment Computer Monitor Port Connect a computer using a VGA cable optional NOTE If you re playing a OVO see Playa OVO instead 1 Turn on your computer or video source 2 Plug in the projector The C power light on the projector turns orange If you are using a notebook switch it to external di...

Страница 82: ... For more information about using the projector install the User s Guide from your projector CD Telephone Support Services To use the Epson PrivateLine Support service call 800 637 7661 and enter the PIN on the Epson PrivateLine Support card included with your projector This service is available 6 AM to 6 PM Pacific Time Monday through Friday for the duration of your warranty period You may also s...

Страница 83: ......

Страница 84: ...he duration of your warranty Save this PrivateLine card Conservez cette carte PrivateLine Vous avez besoin d aide Cette carte VOU5 permet d obtenir rapidement des services d assistance technique Gardez Ia toujours a portee de main Composezle 800 637 7661 puis entrez Ie numero d identification personnel Epson qui figure au dos de la carte PrivateLine Vous obtiendrez en priorite des services de sout...

Страница 85: ... ...

Страница 86: ...ead we ll ship you a replacement projector anywhere in the United States or Canada Pu rto Rico and U S Possessions excluded When the replacement projector arrives simply return the original projector to us within five days using the pre paid airway bill and packaging we provide and you re ready to go Note In most cases the replacement projector is an Epson refurbished unit If it is important to re...

Страница 87: ... cover third party options and accessories and is limited to the terms and conditions stated in your Limited Warranty The Home Service Program does not vary the terms and conditions of the basic warranty except as expressly stated in this brochure Some types of repairs may not be eligible for home services Days and hours of support are subject to change without notice You must have enough availabl...

Страница 88: ...ed warranty statement that the product if purchased new and operated in the United States Canada or Puerto Rico will be free from defects in workmanship and materials for a period of twO 2 years from the date of original purchase This limited warranty applies only to the projector and not to the projector lamp which carries a limited warranty period of ninety 90 days from the date of original purc...

Страница 89: ... PURPOSE SOME LAWS DO NOT ALLOW THE EXCLUSION OF IMPLIED WARRANTIES IF THESE LAWS APPLY THEN ALL EXPRESS AND IMPLIED WARRANTIES ARE LIMITED TO THE WARRANTY PERIOD IDENTIFIED ABOVE UNLESS STATED HEREIN ANY STATEMENTS OR REPRESENTATIONS MADE BY ANY OTHER PERSON OR FIRM ARE VOID IN THE EVENT THE REMEDIES ABOVE FAIL EPSON S ENTIRE LIABILITY SHALL BE LIMITED TO A REFUND OF THE PRICE PAID FOR THE EPSON ...

Страница 90: ...neuf et utilise seulement au Canada aux Etats Unis ou aPorto Rico sera exempt de defaut de fabrication et de vice de materiau pendant une duree de deux 2 ans acompter de la date d achat d origine Cette garantie limitee s applique seulement au projecteur et non ala lampe du projecteur la garantie limitee sur la lampe du projecteur est de quatre vingt dix 90 jours apartir de la date d achat d origin...

Страница 91: ...SION DES GARANTIES IMPLICITES SI CES LOIS S APPLIQUENT AVOUS TOUTES LES GARANTIES EXPRESSES OU IMPLICITES SE LIMITENT A LA PERIODE DE GARANTIE DEFINIE CI DESSUS SAUF DISPOSITIONS CONTRAlRES TOUTE DECLARATION OU GARANTIE FAITE PAR UNE AUTRE PERSONNE OU SOCIETE EST NULLE EN CAS D ECHEC DU RECOURS CI DESSUS LA SEULE RESPONSABILITE D EPSON SERA LIMITEE A UN REMBOURSEMENT DU PRIX PAYE POUR LE PRODUIT E...

Отзывы: