3. Be sure to set any switches and jumpers on the card. See the
interface card's manual for details. Make sure that you set
jumper JG to on, or the card will not work properly.
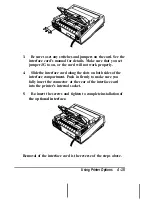
4. Slide the interface card along the slots on both sides of the
interface compartment. Push in firmly to make sure you
fully insert the connector at the rear of the interface card
into the printer's internal socket.
5. Re-insert the screws and tighten to complete installation of
the optional interface.
Removal of the interface card is the reverse of the steps above.
Using Printer Options
4-15
Содержание LQ-1070+
Страница 50: ...7 Pullthepaperupuntiltheperfkatbnbetweenthefirstand sand pages is even with the top of the prlnWs r bun ...
Страница 55: ...Note ...
Страница 58: ......
Страница 61: ... Using the Printer 3 3 I ...
Страница 65: ...on OI on af 011 14 otl an on on ...
Страница 66: ...llhchmmm at Ott 11 7hchao96 on on ntlsst ctimdesaibesthefun msaftheDIpstitCheB ...
Страница 89: ...To load paper using the high capacity cut sheet k r foUow thestepsbebw 4 ...
Страница 99: ......
Страница 104: ...Chapter 6 Troubleshooting I Powersupply 6 2 Printing 6 2 Paper Handling 6 7 ...
Страница 123: ...r ...
Страница 124: ...Q 0 a d Technical Specifications 7 11 ...
Страница 128: ...7 Item Defoultcubd8m Top of form podion curent papec pcdnon hPlenqth lhecwentMPmMchsetthg Lefl andfl lt maglm carded ...
Страница 143: ...axE8OA8COEF 0 1 2 3 4 t 7 a a A c E F ...


