background image

Power Consumption (with USB Con-
nection)

Standalone copying: Approx. 12.0 W
(ISO/IEC24712)

Ready mode: Approx. 4.0 W

Sleep mode: Approx. 1.6 W

Power off: Approx. 0.3 W

Standalone copying: Approx. 12.0 W
(ISO/IEC24712)

Ready mode: Approx. 4.0 W

Sleep mode: Approx. 1.6 W

Power off: Approx. 0.3 W

Note:

Check the label on the printer for its voltage.

For users in Belgium, power consumption when copying may vary.

Check 

http://www.epson.be

 for the latest specifications.

Environmental Specifications

Operation

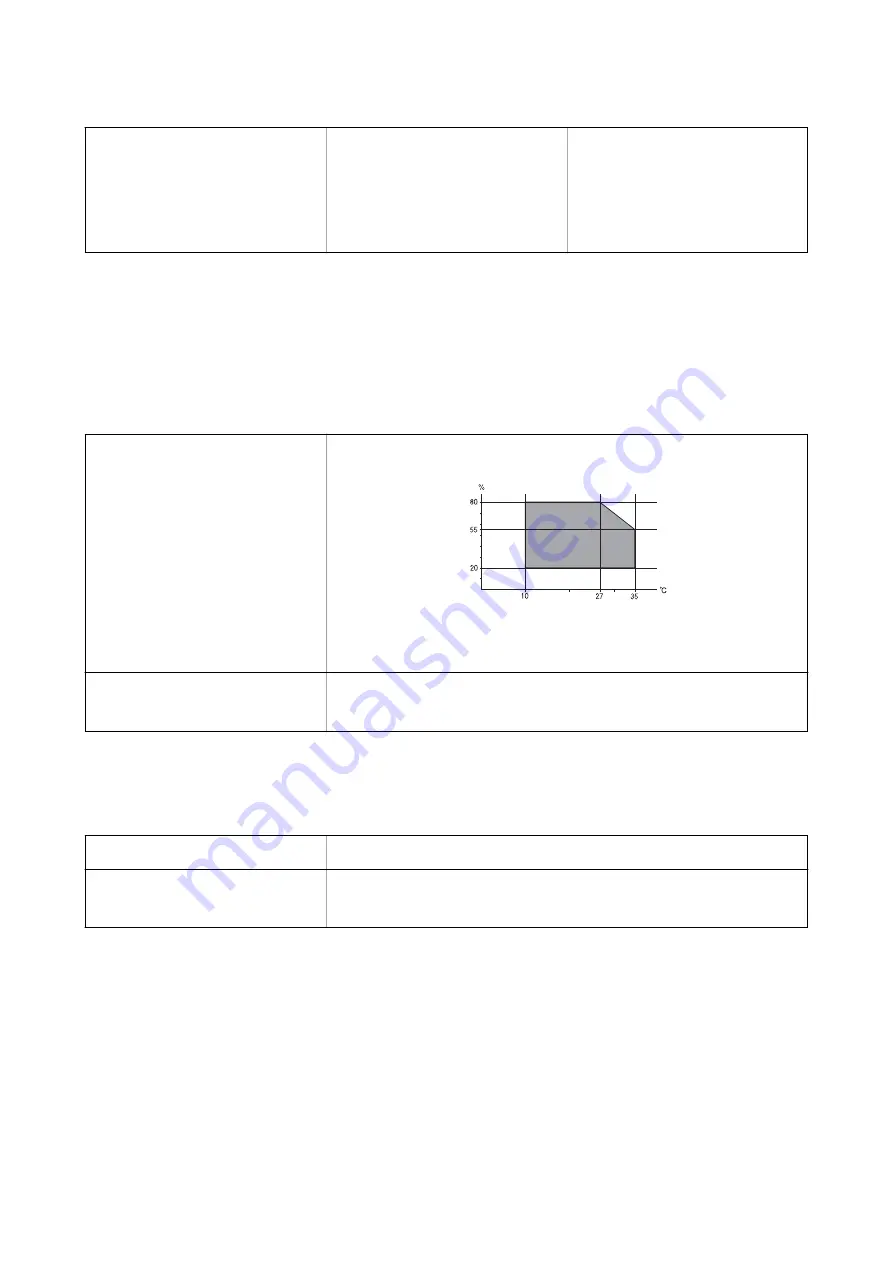
Use the printer within the range shown in the following graph.

Temperature: 10 to 35°C (50 to 95°F)

Humidity: 20 to 80% RH (without condensation)

Storage

Temperature: -20 to 40°C (-4 to 104°F)

*

Humidity: 5 to 85% RH (without condensation)

*

You can store for one month at 40°C (104°F).

Environmental Specifications for Ink Cartridges

Storage Temperature

-30 to 40 °C (-22 to 104 °F)

*

Freezing Temperature

-16 °C (3.2 °F)

Ink thaws and is usable after approximately 3 hours at 25 °C (77 °F).

*

You can store for one month at 40 °C (104 °F).

System Requirements

Windows 10 (32-bit, 64-bit)/Windows 8.1 (32-bit, 64-bit)/Windows 8 (32-bit, 64-bit)/Windows 7 (32-bit, 64-
bit)/Windows Vista (32-bit, 64-bit)/Windows XP SP3 or later (32-bit)/Windows XP Professional x64 Edition SP2
or later

Mac OS X v10.11.x/Mac OS X v10.10.x/Mac OS X v10.9.x/Mac OS X v10.8.x/Mac OS X v10.7.x/Mac OS X
v10.6.8

User's Guide

Appendix

127

Содержание L3050 Series

Страница 1: ...User s Guide NPD5447 00 EN ...

Страница 2: ...urred by the purchaser or third parties as a result of accident misuse or abuse of this product or unauthorized modifications repairs or alterations to this product or excluding the U S failure to strictly comply with Seiko Epson Corporation s operating and maintenance instructions Seiko Epson Corporation and its affiliates shall not be liable for any damages or problems arising from the use of an...

Страница 3: ...IND EXPRESS IMPLIED OR OTHERWISE INCLUDING WITHOUT LIMITATION ANY WARRANTY OF MERCHANTABILITY OR FITNESS FOR A PARTICULAR PURPOSE IN NO EVENT SHALL SAM LEFFLER OR SILICON GRAPHICS BE LIABLE FOR ANY SPECIAL INCIDENTAL INDIRECT OR CONSEQUENTIAL DAMAGES OF ANY KIND OR ANY DAMAGES WHATSOEVER RESULTING FROM LOSS OF USE DATA OR PROFITS WHETHER OR NOT ADVISED OF THE POSSIBILITY OF DAMAGE AND ON ANY THEOR...

Страница 4: ...l Panel 27 Loading Paper Paper Handling Precautions 28 Available Paper and Capacities 29 List of Paper Types 30 Loading Paper in the Rear Paper Feed 30 Placing Originals on the Scanner Glass Placing Multiple Photos for Scanning 35 Printing Printing from a Computer 36 Printing Basics Windows 36 Printing Basics Mac OS X 37 Printing on 2 Sides for Windows only 40 Printing Several Pages on One Sheet 4...

Страница 5: ...ager 93 Epson Easy Photo Print 94 E Web Print for Windows Only 94 Easy Photo Scan 95 EPSON Software Updater 95 Uninstalling Applications 96 Uninstalling Applications Windows 96 Uninstalling Applications Mac OS X 97 Installing Applications 97 Updating Applications and Firmware 98 Solving Problems Checking the Printer Status 99 Checking the Error Indicators on the Printer 99 Checking the Printer Sta...

Страница 6: ...n Appear when Scanning from the Scanner Glass 118 The Image Quality Is Rough 118 Offset Appears in the Background of Images 118 Text is Blurred 118 Moiré Patterns Web Like Shadows Appear 119 Cannot Scan the Correct Area on the Scanner Glass 119 Cannot Preview in Thumbnail 119 Text is Not Recognized Correctly when Saving as a Searchable PDF 120 Cannot Solve Problems in the Scanned Image 120 Other S...

Страница 7: ... the above manuals with the following methods Paper manual Visit the Epson Europe support website at http www epson eu Support or the Epson worldwide support website at http support epson net Digital manual Start EPSON Software Updater on your computer EPSON Software Updater checks for available updates of Epson software applications and the digital manuals and allows you to download the latest on...

Страница 8: ...owing operating systems Additionally Windows is used to refer to all versions Microsoft Windows 10 operating system Microsoft Windows 8 1 operating system Microsoft Windows 8 operating system Microsoft Windows 7 operating system Microsoft Windows Vista operating system Microsoft Windows XP operating system Microsoft Windows XP Professional x64 Edition operating system Mac OS X In this manual Mac O...

Страница 9: ...just controls that are not covered by the operating instructions Place the printer near a wall outlet where the plug can be easily unplugged Do not place or store the printer outdoors near excessive dirt or dust water heat sources or in locations subject to shocks vibrations high temperature or humidity Take care not to spill liquid on the printer and not to handle the printer with wet hands Keep ...

Страница 10: ...ct orientation of the connectors Each connector has only one correct orientation Inserting a connector in the wrong orientation may damage both devices connected by the cable Place the printer on a flat stable surface that extends beyond the base of the printer in all directions The printer will not operate properly if it is tilted at an angle When storing or transporting the printer avoid tilting...

Страница 11: ...ions from the authorized personnel representing the medical facilities and follow all posted warnings and directions on the medical equipment Radio waves from this printer may negatively affect the operation of automatically controlled devices such as automatic doors or fire alarms and could lead to accidents due to malfunction When using this printer near automatically controlled devices follow a...

Страница 12: ...per B Rear paper feed Loads paper C Paper support Supports loaded paper D Feeder guard Prevents foreign substance from entering the printer Usually keep this guard closed E Output tray Holds the ejected paper F Control panel Operates the printer A Scanner unit support Supports the scanner unit User s Guide Printer Basics 12 ...

Страница 13: ...over Blocks external light while scanning B Scanner glass Place the originals C Scanner unit Scans placed originals Open when replacing ink cartridges or removing jammed paper inside the printer A B A AC inlet Connects the power cord B USB port Connects a USB cable to connect with a computer User s Guide Printer Basics 13 ...

Страница 14: ...e using the printer on a network If you need more detailed network settings and connection status hold this button down for at least 10 seconds to print a network status sheet E Starts monochrome copying on A4 size plain paper To increase the number of copies by up to 20 copies press this button within one second intervals F Starts color copying on A4 size plain paper To increase the number of cop...

Страница 15: ...PS Turn the printer on while holding down the button to restore the default network settings When the network settings are restored the printer turns on and the network status lights flash orange and green Turn the printer on while holding down the y button to print the nozzle check pattern Related Information Checking the Error Indicators on the Printer on page 99 Making Wi Fi Settings by PIN Cod...

Страница 16: ...ne of the following methods Setting up from the website Access the following website and then enter the product name http epson sn Go to Setup and then click Download in the download and connect part Click or double click the downloaded file to run the installer Follow the on screen instructions Setting up using the software disc only for the models that come with a software disc and users with co...

Страница 17: ... Windows Select the connection type and then click Next Mac OS X Select the connection type User s Guide Network Settings 17 ...

Страница 18: ...t you want to use computer smart phone tablet and so on Related Information Making Wi Fi Settings by Push Button Setup on page 18 Making Wi Fi Settings by PIN Code Setup WPS on page 19 Making Wi Fi Settings by Push Button Setup You can automatically set up a Wi Fi network by pressing a button on the access point If the following conditions are met you can set up by using this method The access poi...

Страница 19: ...the printer and try again If it still does not work print a network connection report and check the solution Related Information Checking the Network Connection Status on page 20 When You Cannot Make Network Settings on page 106 Making Wi Fi Settings by PIN Code Setup WPS You can connect to an access point by using a PIN code that is printed on the network status sheet You can use this method to s...

Страница 20: ...a PIN code The printer is in a connection error status when the green light on the left is off and the orange light on the right is blinking After clearing the printer error by pressing the button on the control panel reboot the access point place it close to the printer and try again If it still does not work print a network connection report and check the solution Related Information Printing a ...

Страница 21: ...oad papers 2 Press the button The network connection report is printed Related Information Messages and Solutions on the Network Connection Report on page 21 Messages and Solutions on the Network Connection Report Check the messages and error codes on the network connection report and then follow the solutions User s Guide Network Settings 21 ...

Страница 22: ...heck the SSID and password in the documentation provided with the smart device If the Wi Fi connection is suddenly disconnected check the following If any of these are applicable reset the network settings using the installer You can run it from the following website http epson sn Setup Another smart device was added to the network using push button setup The Wi Fi network was set up using any met...

Страница 23: ...nual on the network settings screen Set the subnet mask to 255 255 255 0 E 11 Check the following The default gateway address is correct when you set the printer s TCP IP Setup to Manual The device that is set as the default gateway is turned on Set the correct default gateway address You can check the default gateway address from the Network Status part on the network connection report E 12 Check...

Страница 24: ...e SSID have been detected Confirm network name SSID The same SSID may be set on several access points Check the settings on the access points and change the SSID The Wi Fi environment needs to be improved Turn the wireless router off and then turn it on If the connection does not improve see the documentation for the wireless router After moving the printer closer to the access point and removing ...

Страница 25: ...to a Computer Using the installer and re set up in a different connection method Setting up from the website Access the following website and then enter the product name http epson sn Go to Setup and then click Download in the download and connect part Click or double click the downloaded file to run the installer Follow the on screen instructions Setting up using the software disc only for the mo...

Страница 26: ...Select Change or re set the connection method on the Select Software Installation screen and then click Next Mac OS X Select how you want to connect the printer to your computer User s Guide Network Settings 26 ...

Страница 27: ...eir defaults 1 Turn the printer off 2 While holding down the button press the button until the green light on the left and the orange light on the right flash alternately Restoration is complete when green light on the left and the orange light on the right are off User s Guide Network Settings 27 ...

Страница 28: ...p too thick too thin or paper that has stickers stuck to it Using these types of paper causes paper jams and smears on the printout Fan and align the edges of the envelopes before loading When the stacked envelopes are puffed up with air press them down to flatten them before loading Do not use envelopes that are curled or folded Using these envelopes causes paper jams and smears on the printout D...

Страница 29: ...mium Semigloss Photo Paper A4 10 15 cm 4 6 in 10 Epson Photo Paper Glossy A4 13 18 cm 5 7 in 10 15 cm 4 6 in 10 Epson Matte Paper Heavyweight A4 20 Epson Photo Quality Ink Jet Paper A4 40 For manual 2 sided printing you can load up to 15 sheets for paper with one side already printed Note The availability of paper varies by location For the latest information on paper available in your area contac...

Страница 30: ...Premium Semigloss Photo Paper 1 Epson Premium Semigloss Epson Photo Paper Glossy 1 Photo Paper Glossy Epson Matte Paper Heavyweight 1 Epson Matte Epson Photo Quality Ink Jet Paper 1 Epson Matte Plain paper 1 plain papers Envelope Envelope 1 These paper types are compatible with Exif Print and PRINT Image Matching when printed by the printer driver For more information see the documentation that ca...

Страница 31: ...de of the rear paper feed with the printable side facing up cImportant Do not load more than the maximum number of sheets specified for the paper For plain paper do not load above the line indicated by the triangle symbol on the edge guide Envelopes User s Guide Loading Paper 31 ...

Страница 32: ...printing over the holes 4 Slide the edge guide to the edge of the paper and then close the feeder guard 5 Slide out the output tray Note Return the remaining paper to its package If you leave it in the printer the paper may curl or the print quality may decline Related Information Paper Handling Precautions on page 28 User s Guide Loading Paper 32 ...

Страница 33: ... Available Paper and Capacities on page 29 User s Guide Loading Paper 33 ...

Страница 34: ...dust or stains on the scanner glass 3 Place the original face down and slide it to the corner mark Note A range of 1 5 mm from the edges of the scanner glass is not scanned 4 Close the cover gently 5 Remove the originals after scanning Note If you leave the originals on the scanner glass for a long time they may stick to the surface of the glass User s Guide Placing Originals on the Scanner Glass ...

Страница 35: ...e Photos for Scanning You can scan multiple photos at once in Photo Mode in Epson Scan 2 when you select Thumbnail from the list at the top of the preview window User s Guide Placing Originals on the Scanner Glass 35 ...

Страница 36: ...Select Print or Print Setup from the File menu 4 Select your printer 5 Select Preferences or Properties to access the printer driver window 6 Make the following settings Document Size Select the paper size you loaded in the printer Borderless Select to print with no margins around the image In borderless printing the print data is enlarged slightly more than the paper size so that no margins are p...

Страница 37: ...scape as the Orientation setting 7 Click OK to close the printer driver window 8 Click Print Related Information Available Paper and Capacities on page 29 Loading Paper in the Rear Paper Feed on page 30 Guide to Windows Printer Driver on page 88 List of Paper Types on page 30 Printing Basics Mac OS X Note Explanations in the section use TextEdit as an example Operations and screens differ dependin...

Страница 38: ...nt to use the registered settings Paper Size Select the paper size you loaded in the printer When printing with no margins select a borderless paper size Orientation Select the orientation you set in the application Note If the above setting menus are not displayed close the print window select Page Setup from the File menu and then make settings When printing on envelopes select landscape orienta...

Страница 39: ...paper you loaded Print Quality Select the print quality Selecting Fine provides higher quality printing but the printing speed may be slower Expansion Available when selecting a borderless paper size In borderless printing the print data is enlarged slightly more than the paper size so that no margins are printed around the edges of the paper Select the amount of enlargement Grayscale Select to pr...

Страница 40: ...ON Status Monitor 3 is disabled access the printer driver click Extended Settings on the Maintenance tab and then select Enable EPSON Status Monitor 3 2 sided printing may not be available when the printer is accessed over a network or is used as a shared printer 1 Load paper in the printer 2 Open the file you want to print 3 Access the printer driver window 4 Select Manual Long edge binding or Ma...

Страница 41: ...not available for borderless printing 1 Load paper in the printer 2 Open the file you want to print 3 Access the printer driver window 4 Select 2 Up or 4 Up as the Multi Page setting on the Main tab 5 Click Page Order make the appropriate settings and then click OK to close the window 6 Set the other items on the Main and More Options tabs as necessary and then click OK 7 Click Print Related Infor...

Страница 42: ...ar Paper Feed on page 30 Printing Basics Mac OS X on page 37 Printing to Fit the Paper Size You can print to fit the paper size you loaded in the printer Printing to Fit the Paper Size Windows Note This feature is not available for borderless printing 1 Load paper in the printer 2 Open the file you want to print 3 Access the printer driver window 4 Make the following settings on the More Options t...

Страница 43: ...e paper you set in the application as the Paper Size setting 5 Select Paper Handling from the pop up menu 6 Select Scale to fit paper size 7 Select the paper size you loaded in the printer as the Destination Paper Size setting 8 Set the other items as necessary 9 Click Print Related Information Loading Paper in the Rear Paper Feed on page 30 Printing Basics Mac OS X on page 37 Printing Multiple Fi...

Страница 44: ...t saved in Job Arranger Lite click Job Arranger Lite on the printer driver s Maintenance tab Next select Open from the File menu to select the file The extension of the saved files is ecl 8 Select the Layout and Edit menus in Job Arranger Lite to edit the Print Project as necessary See the help of Job Arranger Lite for details 9 Select Print from the File menu Related Information Loading Paper in ...

Страница 45: ...llows you to print a cutting guide 6 Set the other items on the Main and More Options tabs as necessary and then click OK 7 Click Print Related Information Loading Paper in the Rear Paper Feed on page 30 Printing Basics Windows on page 36 Making Posters Using Overlapping Alignment Marks Here is an example of how to make a poster when 2x2 Poster is selected and Overlapping Alignment Marks is select...

Страница 46: ... of Sheet 1 along the vertical blue line through the center of the top and bottom cross marks 2 Place the edge of Sheet 1 on top of Sheet 2 and align the cross marks then temporarily tape the two sheets together from the back User s Guide Printing 46 ...

Страница 47: ...along the vertical red line through the alignment markers this time the line to the left of the cross marks 4 Tape the sheets together from the back 5 Repeat steps 1 to 4 to tape Sheet 3 and Sheet 4 together User s Guide Printing 47 ...

Страница 48: ...e horizontal blue line through the center of the left and right side cross marks 7 Place the edge of Sheet 1 and Sheet 2 on top of Sheet 3 and Sheet 4 and align the cross marks and then temporarily tape them together from the back User s Guide Printing 48 ...

Страница 49: ...8 Cut the taped sheets in two along the horizontal red line through the alignment markers this time the line above the cross marks 9 Tape the sheets together from the back User s Guide Printing 49 ...

Страница 50: ...printing features available on the printer driver Related Information Windows Printer Driver on page 87 Mac OS X Printer Driver on page 90 Adding a Printing Preset to Print Easily If you create your own preset of frequently used print settings on the printer driver you can print easily by selecting the preset from the list User s Guide Printing 50 ...

Страница 51: ...om the File menu Select the printer from Format For select the paper size and then enter a percentage in Scale Close the window and then print following the basic printing instructions Adjusting the Print Color You can adjust the colors used in the print job PhotoEnhance produces sharper images and more vivid colors by automatically adjusting the contrast saturation and brightness of the original ...

Страница 52: ...uch as a user name and printing date as headers or footers Click Watermark Features in the More Options tab and then select Header Footer Click Settings and select necessary items from the drop down list Printing Photos Using Epson Easy Photo Print Epson Easy Photo Print lets you lay out and print photos easily on various types of paper See the application s help for details Note By printing on ge...

Страница 53: ...ork as your printer or remote print printing from a remote location over the Internet To use remote print register your printer in the Epson Connect service Related Information Epson Connect Service on page 85 Installing Epson iPrint You can install Epson iPrint on your smart device from the following URL or QR code http ipr to a Printing Using Epson iPrint Start Epson iPrint from your smart devic...

Страница 54: ...o print from the document menu using iPhone iPad and iPod touch running iOS start Epson iPrint after transferring the document you want to print using the file sharing function in iTunes Canceling Printing Note In Windows you cannot cancel a print job from the computer once it has been completely sent to the printer In this case cancel the print job by using the printer s control panel When printi...

Страница 55: ... Click Print Queue 4 Right click on the job you want to cancel and then select Cancel Related Information Windows Printer Driver on page 87 Canceling Printing Mac OS X 1 Click the printer icon in the Dock 2 Select the job you want to cancel 3 Cancel the job Mac OS X v10 8 x or later Click next to the progress meter Mac OS X v10 6 8 to v10 7 x Click Delete User s Guide Printing 55 ...

Страница 56: ...y different from the original Related Information Loading Paper in the Rear Paper Feed on page 30 Placing Originals on the Scanner Glass on page 34 Making Multiple Copies You can make multiple copies at a time You can specify up to 20 copies Margins with a width of 3 mm appear around the edges of the paper 1 Load the same number of sheets of A4 size paper as the number of copies you want to copy 2...

Страница 57: ...size and border of the scanned image will not be exactly the same as the original Related Information Placing Originals on the Scanner Glass on page 34 Epson Event Manager on page 93 Scanning from a Computer Scanning Using Epson Scan 2 You can scan by using the scanner driver Epson Scan 2 See the Epson Scan 2 help for an explanation of each setting item Related Information Epson Scan 2 Scanner Dri...

Страница 58: ...isplayed On the Advanced Settings tab you can make detailed image adjustment settings that are suitable for text documents such as the following Unsharp Mask You can enhance and sharpen the outlines of the image Descreening You can remove moiré patterns web like shadows that appear when scanning printed papers such as a magazine Text Enhancement You can make blurred letters in the original clear a...

Страница 59: ...the file name by selecting Settings from the list Folder Select the save folder for the scanned image from the list You can select another folder or create a new folder by selecting Select from the list 7 Click Scan Related Information Placing Originals on the Scanner Glass on page 34 Scanning Photos or Pictures Photo Mode Using Photo Mode in Epson Scan 2 you can scan originals with wide variety o...

Страница 60: ...om the Mode list 4 Make the following settings on the Main Settings tab Image Type Select the color for saving the scanned image Resolution Select the resolution Note The Document Source setting is fixed as Scanner Glass and the Document Type setting is fixed as Reflective Reflective means originals which are not transparent for example ordinary papers or photos You cannot change these settings Us...

Страница 61: ... images are displayed as thumbnails Note To preview the entire scanned area select Normal from the list at the top of the preview widow 6 Confirm the preview and make image adjustment settings on the Advanced Settings tab if necessary User s Guide Scanning 61 ...

Страница 62: ...apers such as a magazine Dust Removal You can remove dust on the scanned image Note The items may not be available depending on other settings you made Depending on the original the scanned image may not be adjusted correctly When multiple thumbnails are created you can adjust the image quality for each thumbnail Depending on the adjustment items you can adjust the quality of scanned images all to...

Страница 63: ...otos and documents from a smart device such as a smartphone or tablet that is connected to the same wireless network as your printer You can save the scanned data on a smart device or to Cloud services send it by email or print it Installing Epson iPrint You can install Epson iPrint on your smart device from the following URL or QR code http ipr to a Scanning Using Epson iPrint Start Epson iPrint ...

Страница 64: ...ou have selected the printer you do not need to select it again from the next time D Displays the scanning screen E Displays the screen where you can make scan settings such as resolution F Displays scanned images G Starts scanning H Displays the screen where you can save scanned data to a smart device or Cloud services I Displays the screen where you can send scanned data by email J Displays the ...

Страница 65: ...ers Scanners or Print Scan Print Fax and then select the printer 2 Click Options Supplies Utility Open Printer Utility 3 Click EPSON Status Monitor Ink Cartridge Codes Epson recommends the use of genuine Epson ink cartridges Epson cannot guarantee the quality or reliability of non genuine ink The use of non genuine ink may cause damage that is not covered by Epson s warranties and under certain ci...

Страница 66: ...ion on Epson s ink cartridge yields http www epson eu pageyield Related Information Technical Support Web Site on page 131 Ink Cartridge Handling Precautions Read the following instructions before replacing ink cartridges Handling precautions Store ink cartridges at normal room temperature and keep them away from direct sunlight Epson recommends using the ink cartridge before the date printed on t...

Страница 67: ...rom the package You must remove the yellow tape from the cartridge before installing it otherwise print quality may decline or you may not be able to print Do not remove or tear the label on the cartridge this can cause leakage Do not remove the transparent seal from the bottom of the cartridge otherwise the cartridge may become unusable Do not touch the sections shown in the illustration Doing so...

Страница 68: ...iciency only remove an ink cartridge when you are ready to replace it Ink cartridges with low ink status may not be used when reinserted To ensure you receive premium print quality and to help protect your print head a variable ink safety reserve remains in the cartridge when your printer indicates to replace the cartridge The yields quoted for you do not include this reserve Although the ink cart...

Страница 69: ...cancel and replace the originals 1 Open the scanner unit with the document cover closed 2 Operate the printer s buttons to move the ink cartridge holder Note Replace the cartridge that stops at the icon If there are more expended ink cartridges the cartridge moves to the icon every time you press the y button If the B light is on one or more ink cartridges are expended Press the y button The ink c...

Страница 70: ...ress the y button again The ink cartridge holder moves to the replacement position 4 When replacing the black ink cartridge gently shake the new black ink cartridge four or five times and then remove it from its package When replacing other color cartridges remove the new color cartridges from their package without shaking cImportant Do not shake cartridges after opening the package as they may le...

Страница 71: ...uch the sections shown in the illustration Doing so may prevent normal operation and printing 6 Squeeze the tab on the ink cartridge and pull it straight up If you cannot remove the ink cartridge pull it firmly User s Guide Replacing Ink Cartridges 71 ...

Страница 72: ...ter during ink charging Charging takes approximately two minutes If the ink charging is incomplete you may not be able to print Note If the B light does not turn off try removing and reinserting the ink cartridge Related Information Ink Cartridge Codes on page 65 Ink Cartridge Handling Precautions on page 66 Replacing Ink Cartridges When Ink Light is Off You can replace cartridges even if there is...

Страница 73: ...1 Open the scanner unit with the document cover closed 2 Hold down the y button until the ink cartridge holder starts moving The ink cartridge holder moves to the replacement position Note To cancel ink cartridge replacement keep the ink cartridges installed and turn off the printer User s Guide Replacing Ink Cartridges 73 ...

Страница 74: ... times and then remove it from its package When replacing other color cartridges remove the new color cartridges from their package without shaking cImportant Do not shake cartridges after opening the package as they may leak 4 Remove only the yellow tape User s Guide Replacing Ink Cartridges 74 ...

Страница 75: ...ing so may prevent normal operation and printing 5 Squeeze the tab on the ink cartridge and pull it straight up If you cannot remove the ink cartridge pull it firmly 6 Insert the new ink cartridge and then press it down firmly User s Guide Replacing Ink Cartridges 75 ...

Страница 76: ... cartridge Related Information Ink Cartridge Codes on page 65 Ink Cartridge Handling Precautions on page 66 Temporarily Printing with Black Ink When color ink is expended and black ink still remains when printing from a computer you can use the following settings to continue printing for a short time using only black ink Type of paper plain papers Envelope Color Grayscale Borderless Not selected E...

Страница 77: ...ct Enable EPSON Status Monitor 3 The available period varies depending on the usage conditions Temporarily Printing with Black Ink Windows 1 When the following window is displayed cancel printing Note If you cannot cancel printing from the computer cancel using the printer s control panel User s Guide Replacing Ink Cartridges 77 ...

Страница 78: ...n the Dock 2 Cancel the job Note If you cannot cancel printing from the computer cancel using the printer s control panel 3 Select System Preferences from the menu Printers Scanners or Print Scan Print Fax and then select the printer Click Options Supplies Options or Driver 4 Select On as the Permit temporary black printing setting 5 Access the print dialog 6 Select Print Settings from the pop up ...

Страница 79: ... driver click Extended Settings on the Maintenance tab and then select Enable EPSON Status Monitor 3 Composite black looks slightly different from pure black In addition the print speed is reduced To maintain the quality of the print head black ink is also consumed Options Description Yes Select to use a mixture of color inks to create black This window is displayed the next time you print a simil...

Страница 80: ... for at least six hours without printing and then run the nozzle check again and repeat the head cleaning if necessary We recommend to turn off the printer If print quality has still not improved contact Epson support To prevent the print head from drying out do not unplug the printer while the power is on Checking and Cleaning the Print Head Printer Buttons 1 Load A4 size plain paper in the print...

Страница 81: ...aintenance tab 4 Follow the on screen instructions Related Information Loading Paper in the Rear Paper Feed on page 30 Windows Printer Driver on page 87 Checking and Cleaning the Print Head Mac OS X 1 Load A4 size plain paper in the printer 2 Select System Preferences from the menu Printers Scanners or Print Scan Print Fax and then select the printer 3 Click Options Supplies Utility Open Printer U...

Страница 82: ... the printer 3 Click Options Supplies Utility Open Printer Utility 4 Click Print Head Alignment 5 Follow the on screen instructions Related Information Loading Paper in the Rear Paper Feed on page 30 Cleaning the Paper Path When the printouts are smeared or scuffed clean the roller inside cImportant Do not use tissue paper to clean the inside of the printer The print head nozzles may be clogged wi...

Страница 83: ...l or thinner to clean the printer These chemicals can damage the printer 1 Open the document cover 2 Use a soft dry clean cloth to clean the surface of the scanner glass Note If the glass surface is stained with grease or some other hard to remove material use a small amount of glass cleaner and a soft cloth to remove it Wipe off all remaining liquid Do not press the glass surface too hard Be care...

Страница 84: ...4 Click OK Related Information Windows Printer Driver on page 87 Saving Power Mac OS X 1 Select System Preferences from the menu Printers Scanners or Print Scan Print Fax and then select the printer 2 Click Options Supplies Utility Open Printer Utility 3 Click Printer Settings 4 Select the time period before the printer enters sleep mode as the Sleep Timer setting and click Apply To make the print...

Страница 85: ...te for details https www epsonconnect com http www epsonconnect eu Europe only Web Config Web Config is an application that runs in a web browser such as Internet Explorer and Safari on a computer or smart device You can confirm the printer status or change the network service and printer settings To use the Web Config connect the printer and the computer or device to the same network Note The fol...

Страница 86: ...ng WSD follow the steps below to run Web Config 1 Access the devices and printers screen in Windows Windows 10 Right click the start button or press and hold it and then select Control Panel View devices and printers in Hardware and Sound Windows 8 1 Windows 8 Select Desktop Settings Control Panel View devices and printers in Hardware and Sound or Hardware Windows 7 Click the start button and sele...

Страница 87: ...ct Printing preferences Windows 8 1 Windows 8 Select Desktop Settings Control Panel View devices and printers in Hardware and Sound Right click on your printer or press and hold it and then select Printing preferences Windows 7 Click the start button and select Control Panel View devices and printers in Hardware and Sound Right click on your printer and select Printing preferences Windows Vista Cl...

Страница 88: ...river for Windows To view explanations of the setting items right click on each item and then click Help Main Tab You can make basic settings for printing such as paper type or paper size You can also make settings for printing both sides of the paper or printing multiple pages on one sheet User s Guide Network Service and Software Information 88 ...

Страница 89: ...More Options Tab You can select additional layout and printing options such as changing the size of a printout or making color corrections User s Guide Network Service and Software Information 89 ...

Страница 90: ...ded Settings on the Maintenance tab 3 Make the appropriate settings and then click OK See the online help for explanations of the setting items Related Information Windows Printer Driver on page 87 Mac OS X Printer Driver The printer driver controls the printer according to the commands from an application Making settings on the printer driver provides the best printing results You can also check ...

Страница 91: ...Options Supplies Utility Open Printer Utility Guide to Mac OS X Printer Driver Print dialog Switch the pop up menu on the center of the screen to show more items Pop up Menu Descriptions Print Settings You can make the basic print settings such as paper type and print quality Layout You can select a layout for printing several pages on one sheet or select to print a border Paper Handling You can r...

Страница 92: ...r status and error information Making Operation Settings for the Mac OS X Printer Driver Accessing the Operation Settings Window of the Mac OS X Printer Driver Select System Preferences from the menu Printers Scanners or Print Scan Print Fax and then select the printer Click Options Supplies Options or Driver Operation Settings of the Mac OS X Printer Driver Skip Blank Page Avoids printing blank p...

Страница 93: ...n Scan 2 from a TWAIN compliant scanning application Starting on Windows Windows 10 Click the start button and then select All apps EPSON Epson Scan 2 Windows 8 1 Windows 8 Enter the application name in the search charm and then select the displayed icon Windows 7 Windows Vista Windows XP Click the start button and then select All Programs or Programs EPSON Epson Scan 2 Epson Scan 2 Starting on Ma...

Страница 94: ... photos with a frame See the application s help for details Note To use this application the printer driver needs to be installed Starting on Windows Windows 10 Click the start button and then select All apps Epson Software Epson Easy Photo Print Windows 8 1 Windows 8 Enter the application name in the search charm and then select the displayed icon Windows 7 Windows Vista Windows XP Click the star...

Страница 95: ...oto Scan Windows 8 1 Windows 8 Enter the application name in the search charm and then select the displayed icon Windows 7 Windows Vista Windows XP Click the start button and then select All Programs or Programs Epson Software Easy Photo Scan Starting on Mac OS X Select Go Applications Epson Software Easy Photo Scan Related Information Installing Applications on page 97 EPSON Software Updater EPSO...

Страница 96: ...cations Windows 1 Press the P button to turn off the printer 2 Quit all running applications 3 Open Control Panel Windows 10 Right click the start button or press and hold it and then select Control Panel Windows 8 1 Windows 8 Select Desktop Settings Control Panel Windows 7 Windows Vista Windows XP Click the start button and select Control Panel 4 Open Uninstall a program or Add or Remove Programs...

Страница 97: ...on inkjet printers and you only want to delete some drivers delete all of them first and then install the necessary printer driver again Note If you cannot find the application you want to uninstall in the application list you cannot uninstall using the Uninstaller In this situation select Go Applications Epson Software select the application you want to uninstall and then drag it to the trash ico...

Страница 98: ...ve or add functions by updating the applications and the firmware Make sure you use the latest version of the applications and firmware 1 Make sure that the printer and the computer are connected and the computer is connected to the internet 2 Start EPSON Software Updater and update the applications or the firmware cImportant Do not turn off the computer or the printer while updating Note If you c...

Страница 99: ...installed Install the ink cartridge An ink cartridge has not been recognized Press the ink cartridge down firmly An unsupported ink cartridge has been installed Install an ink cartridge that is supported by this printer You cannot use the cartridges that came with your printer for replacement An ink cartridge is nearly expended You can print until the B light turns on Prepare a new ink cartridge Y...

Страница 100: ...hes Finished The power light stays on In some print cycles a very small amount of surplus ink may be collected in the ink pad To prevent ink leakage from the pad the printer is designed to stop printing when the pad has reached its limit Whether and how often this is required will vary according to the number of pages you print the type of material that you print and the number of cleaning cycles ...

Страница 101: ...tion Windows Printer Driver on page 87 Checking Printer Status Mac OS X 1 Select System Preferences from the menu Printers Scanners or Print Scan Print Fax and then select the printer 2 Click Options Supplies Utility Open Printer Utility 3 Click EPSON Status Monitor Removing Jammed Paper Check the error displayed on the control panel and follow the instructions to remove the jammed paper including...

Страница 102: ...de the Printer Caution Be careful not to trap your hand or fingers when opening or closing the scanner unit Otherwise you may be injured Never touch the buttons on the control panel while your hand is inside the printer If the printer starts operating it could cause an injury Be careful not to touch the protruding parts to avoid injury User s Guide Solving Problems 102 ...

Страница 103: ...ner unit with the document cover closed 2 Remove the jammed paper cImportant Do not touch the white flat cable or translucent part inside the printer Doing so may cause a malfunction User s Guide Solving Problems 103 ...

Страница 104: ...l Specifications on page 127 Paper Handling Precautions on page 28 Available Paper and Capacities on page 29 Paper Jams Load paper in the correct direction and slide the edge guides against the edges of the paper Load one sheet of paper at a time if you have loaded several sheets of paper Related Information Removing Jammed Paper on page 101 Loading Paper in the Rear Paper Feed on page 30 Paper Fe...

Страница 105: ...ath on page 82 Power and Control Panel Problems Power Does Not Turn On Make sure the power cord is securely plugged in Hold down the P button for a little longer Power Does Not Turn Off Hold down the P button for a little longer If you still cannot turn off the printer unplug the power cord To prevent the print head from drying out turn the printer back on and turn it off by pressing the P button ...

Страница 106: ... printer If the printer is paused click Resume or Resume Printer Related Information Installing Applications on page 97 Connecting to a Computer on page 16 Canceling Printing on page 54 When You Cannot Make Network Settings Turn off the devices you want to connect to the network Wait for about 10 seconds and then turn on the devices in the following order access point computer or smart device and ...

Страница 107: ... has multiple SSIDs and devices are connected to different SSIDs on the same access point Connect the computer or smart device to the same SSID as the printer An access point that is compliant with both IEEE802 11a and IEEE802 11g has SSIDs of 2 4 GHz and 5 GHz If you connect the computer or smart device to a 5 GHz SSID you cannot be able to connect to the printer because the printer only supports...

Страница 108: ...e the manual provided with the access point for details Related Information Checking the SSID Connected to the Printer on page 108 Checking the SSID for the Computer on page 108 Checking the SSID Connected to the Printer You can check the SSID by printing a network connection report network status sheet or on Web Config Checking the SSID for the Computer Windows Select Control Panel Network and In...

Страница 109: ...cel printing if necessary Make sure the printer is not offline or pending If the printer is offline or pending clear the offline or pending setting from the Printer menu Make sure the printer is selected as the default printer from the Printer menu there should be a check mark on the menu item If the printer is not selected as the default printer set it as the default printer Check if the selected...

Страница 110: ...hanging the Connection Method to a Computer on page 25 Printout Problems Printout is Scuffed or Color is Missing If you have not used the printer for a long time the print head nozzles may be clogged and ink drops may not be discharged Perform a nozzle check and then clean the print head if any of the print head nozzles are clogged Related Information Checking and Cleaning the Print Head on page 8...

Страница 111: ...ical Banding or Misalignment Align the print head Related Information Aligning the Print Head on page 81 Print Quality Does Not Improve Even After Aligning the Print Head During bidirectional or high speed printing the print head prints while moving in both directions and vertical lines may be misaligned If print quality does not improve disable the bidirectional or high speed setting Disabling th...

Страница 112: ...hem When drying the printouts avoid direct sun light do not use a dryer and do not touch the printed side of paper When printing images or photos Epson recommends using genuine Epson paper rather than plain paper Print on the printable side of the genuine Epson paper Try to use genuine Epson ink cartridges This product is designed to adjust colors based on the use of genuine Epson ink cartridges T...

Страница 113: ...On the More Options tab select Custom in Color Correction and then click Advanced Change the Scene Correction setting from Auto Correct to any other option If changing the setting does not work use any color correction method other than PhotoEnhance in Color Management Related Information Adjusting the Print Color on page 51 Colors Differ from What You See on the Display Display devices such as co...

Страница 114: ...anner glass align the corner of the original with the corner indicated by a symbol on the frame of the scanner glass If the edges of the copy are cropped off move the original slightly away from the corner When placing the originals on the scanner glass clean the scanner glass and the document cover If there is dust or stains on the glass the copy area may extend to include the dust or stains resu...

Страница 115: ...s Appear in the Copied Image Clean the paper path Clean the scanner glass Do not press too hard on the original or the document cover when you are placing the originals on the scanner glass Related Information Cleaning the Paper Path on page 82 Cleaning the Scanner Glass on page 83 Moiré Cross Hatch Patterns Appear in the Copied Image Place the original at a slightly different angle Banding Appear...

Страница 116: ... Supplies Options or Driver Select On as the High Speed Printing setting Disable Quiet Mode Windows Disable the Quiet Mode setting on the printer driver s Main tab Mac OS X Select System Preferences from the menu Printers Scanners or Print Scan Print Fax and then select the printer Click Options Supplies Options or Driver Select Off as the Quiet Mode setting Printing Slows Down Dramatically During...

Страница 117: ...click Show Scanner and Camera and then check if the printer is displayed Windows 7 Click the start button and select Control Panel enter Scanner and Camera in the search charm click View scanners and cameras and then check if the printer is displayed Windows Vista Click the start button select Control Panel Hardware and Sound Scanners and Cameras and then check if the printer is displayed Windows ...

Страница 118: ... increasing the resolution and then scanning Related Information Scanning Using Epson Scan 2 on page 57 Offset Appears in the Background of Images Images on the back of the original may appear in the scanned image In Epson Scan 2 select the Advanced Settings tab and then adjust the Brightness This feature may not be available depending on the settings on the Main Settings tab Image Type or other s...

Страница 119: ... then scan again Related Information Scanning Using Epson Scan 2 on page 57 Cannot Scan the Correct Area on the Scanner Glass Make sure the original is placed correctly against the alignment marks If the edge of the scanned image is missing move the original slightly away from the edge of the scanner glass When placing multiple originals on the scanner glass make sure there is a gap of at least 20...

Страница 120: ...on the Advanced Settings tab When you increase the Threshold black becomes stronger In Document Mode in Epson Scan 2 select the Advanced Settings tab and then Image Option Text Enhancement Related Information Scanning Documents Document Mode on page 57 Cannot Solve Problems in the Scanned Image If you have tried all of the solutions and have not solved the problem initialize the Epson Scan 2 setti...

Страница 121: ...rd disk Scanning may stop if there is not enough free space Try scanning at a lower resolution Scanning stops if the total data size reaches the limit Related Information Scanning Using Epson Scan 2 on page 57 Other Problems Slight Electric Shock when Touching the Printer If many peripherals are connected to the computer you may feel a slight electric shock when touching the printer Install a grou...

Страница 122: ...and then select the printer Click Options Supplies Options or Driver Select On as the Quiet Mode setting Application Is Blocked by a Firewall for Windows Only Add the application to the Windows Firewall allowed program in security settings on the Control Panel User s Guide Solving Problems 122 ...

Страница 123: ... 75 to 90 g m2 20 to 24 lb Printable Area Printable Area for Single Sheets Print quality may decline in the shaded areas due to the printer s mechanism Border printing A 3 0 mm 0 12 in B 3 0 mm 0 12 in C 40 0 mm 1 57 in D 32 0 mm 1 26 in Borderless printing A 43 0 mm 1 69 in B 35 0 mm 1 38 in Printable Area for Envelopes Print quality may decline in the shaded areas due to the printer s mechanism ...

Страница 124: ...r pixel internal 16 bits per pixel per color internal 24 bits per pixel external 8 bits per pixel per color external Grayscale 16 bits per pixel internal 8 bits per pixel external Black and white 16 bits per pixel internal 1 bits per pixel external Light Source LED Interface Specifications For Computer Hi Speed USB Network Function List Functions Supported Remarks Network Interfaces Ethernet Wi Fi...

Страница 125: ...Printing Disable Wi Fi Restore the Factory Default Settings File Sharing Setup Network Printing EpsonNet Print Windows IPv4 Standard TCP IP Windows IPv4 IPv6 WSD Printing Windows IPv4 IPv6 Windows Vista or later Bonjour Printing Mac OS X IPv4 IPv6 IPP Printing Windows Mac OS X IPv4 IPv6 UPnP Printing IPv4 Information Appliance PictBridge Printing Wi Fi IPv4 Digital Camera Epson Connect Email Print...

Страница 126: ...n location of purchase 2Complies with WPA2 standards with support for WPA WPA2 Personal Security Protocol SSL TLS HTTPS Server Client Dimensions Dimensions Storage Width 390 mm 15 4 in Depth 300 mm 11 8 in Height 145 mm 5 7 in Printing Width 390 mm 15 4 in Depth 504 mm 20 8 in Height 279 mm 11 0 in Weight Approx 3 9 kg 8 6 lb Without the ink cartridges and the power cord Electrical Specifications ...

Страница 127: ... 50 to 95 F Humidity 20 to 80 RH without condensation Storage Temperature 20 to 40 C 4 to 104 F Humidity 5 to 85 RH without condensation You can store for one month at 40 C 104 F Environmental Specifications for Ink Cartridges Storage Temperature 30 to 40 C 22 to 104 F Freezing Temperature 16 C 3 2 F Ink thaws and is usable after approximately 3 hours at 25 C 77 F You can store for one month at 40...

Страница 128: ...isfy the protection requirements resulting from a non recommended modification of the products Standards and Approvals for Australian Model EMC AS NZS CISPR22 Class B Epson hereby declares that the following equipment Models are in compliance with the essential requirements and other relevant provisions of AS NZS4268 C462Q Epson cannot accept responsibility for any failure to satisfy the protectio...

Страница 129: ...rinter cImportant When storing or transporting the printer avoid tilting it placing it vertically or turning it upside down otherwise ink may leak Leave the ink cartridges installed Removing the cartridges can dry out the print head and may prevent the printer from printing 1 Turn off the printer by pressing the P button 2 Make sure the power light turns off and then unplug the power cord cImporta...

Страница 130: ...ou use the printer again make sure you remove the tape securing the ink cartridge holder If print quality has declined the next time you print clean and align the print head Related Information Part Names and Functions on page 12 Checking and Cleaning the Print Head on page 80 Aligning the Print Head on page 81 User s Guide Appendix 130 ...

Страница 131: ...ch more quickly if you give them the following information Product serial number The serial number label is usually on the back of the product Product model Product software version Click About Version Info or a similar button in the product software Brand and model of your computer Your computer operating system name and version Names and versions of the software applications you normally use wit...

Страница 132: ... Epson Helpdesk Phone 1300 361 054 Epson Helpdesk is provided as a final backup to make sure our clients have access to advice Operators on the Helpdesk can aid you in installing configuring and operating your Epson product Our Pre sales Helpdesk staff can provide literature on new Epson products and advise where the nearest dealer or service agent is located Many types of queries are answered her...

Страница 133: ...services users are welcome to contact Epson Hong Kong Limited Internet Home Page http www epson com hk Epson Hong Kong has established a local home page in both Chinese and English on the Internet to provide users with the following information Product information Answers to Frequently Asked Questions FAQs Latest versions of Epson product drivers Technical Support Hotline You can also contact our ...

Отзывы: