background image

Epson Expression 10000XL

6 - Epson Expression 10000XL

5/04

Scanning an Image

First, place your document on the scanner as described on 
page 5. Then follow these steps to start EPSON Scan and scan 
an image into an application:

1. Turn on the scanner, and wait about 30 seconds for it to 

initialize. The green 

Ready

 light stops flashing and stays on.

2. Open your imaging application, then choose the 

Import

 (or 

Acquire

) option in the application and select 

Epson 

Expression 10000XL

Note: 

If you are using Windows XP and choose WIA-

EPSON Expression 10000XL, certain features won’t be 
available.

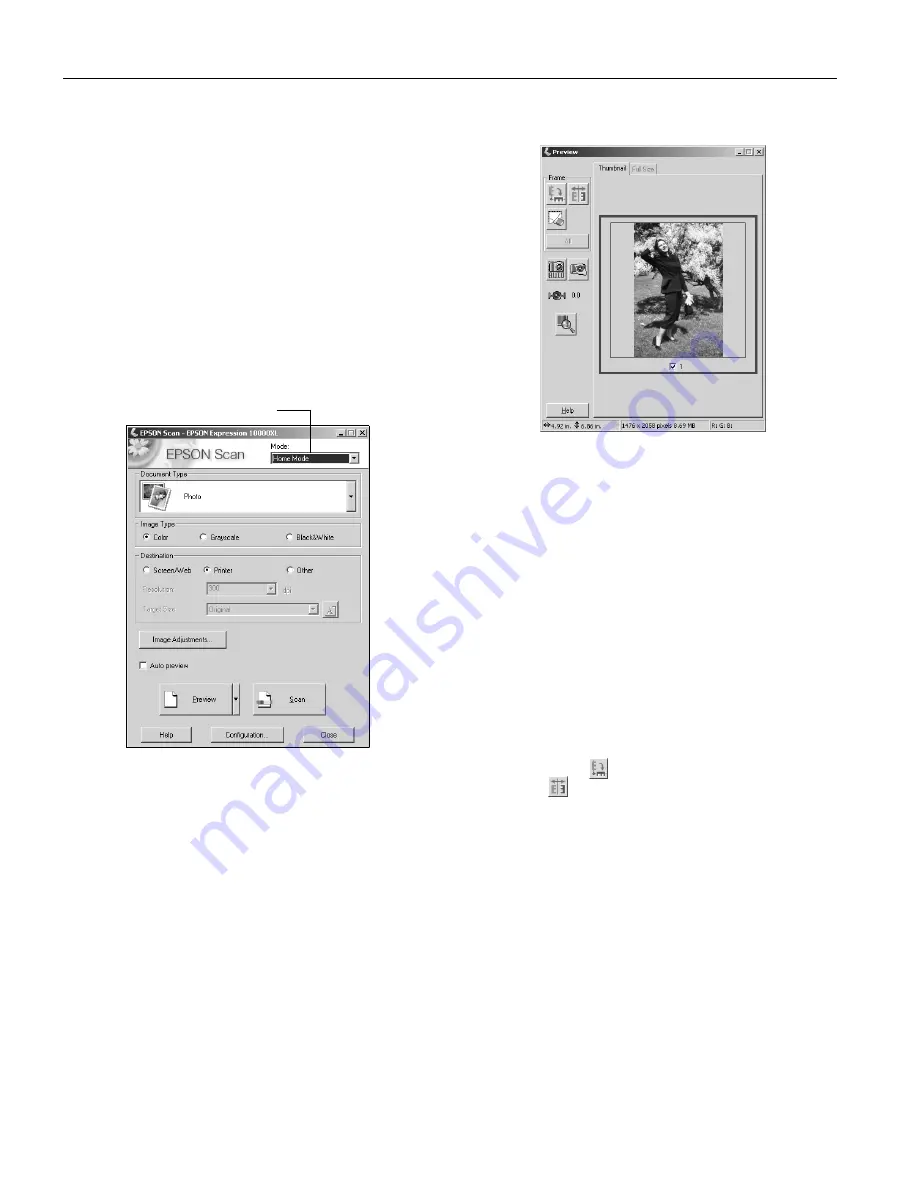
The EPSON Scan dialog box opens.

3. Choose a mode from the Mode list at the top of the 

EPSON Scan screen. (See page 5 for a description of the 
modes.)

4. Adjust any settings in EPSON Scan, as needed. For 

example, if you’re using Home Mode, select the 

Document 

Type

Image Type

, and 

Destination

 settings that are 

appropriate for your image and how you want to use it.

5. Click the 

Preview

 button to see a preview of your scan. 

Note: 

The Thumbnail preview screen is shown above. 

Depending on your selected mode, you may see the Normal 
preview screen instead. To switch between preview 
screens, click the arrow next to the Preview button and 
choose 

Thumbnail

 or 

Normal

.

In Home Mode, you can click the 

Auto preview

 checkbox to 

make the preview screen open automatically whenever you 
launch EPSON Scan.

6. Click and drag within the preview image to select the area 

you want to scan. 

Note: 

Image quality adjustments are automatically applied 

to the selected area, unless you’ve turned off the 

Continuous auto exposure

 setting (click the 

Configuration


button, then click the 

Color

 tab to access this setting). For 

best results, select only the part of the image you want to 
scan.

7. If you’re previewing your image as a thumbnail (as shown 

above), click the 

button to rotate the image, if needed. 

Click the 

button to mirror the image.

8. Click 

Scan

9. When scanning completes, click 

Close

 to exit EPSON Scan 

and view the scanned image in your imaging application. 

Choose a mode

Содержание Expression 10000XL Series

Страница 1: ...card B12B808393 You can purchase supplies and accessories from the Epson Store by calling 800 873 7766 or online at www epsonstore com U S sales only In Canada please call 800 463 7766 for dealer referral Specifications General Scanner type Flatbed color Photoelectric device Color CCD line sensor Effective pixels 29280 41280 pixels at 2400 dpi Color depth 48 bit internal 48 bit external Grayscale ...

Страница 2: ...fluorescent lamp Reliability 100 000 cycles of carriage movement MCBF Dimensions Width 25 8 inches 656 mm Depth 18 0 inches 458 mm Height 6 2 inches 158 mm Weight Approximately 31 9 lb 14 5 kg Electrical Input voltage 90 to 132 VAC Rated frequency 50 to 60 Hz Rated current 1 2 A Power consumption Operating approximately 45 W 55 W with ADF or TPU Standby approximately 6 W without ADF or TPU Environ...

Страница 3: ...reinstalled Windows 98SE Me 2000 or XP USB 1 1 or 2 0 or IEEE 1394 FireWire port To use the scanner s optional network card your computer must be connected to an existing network using TCP IP USB 1 1 and 2 0 require a preinstalled Windows operating system USB 2 0 works with Windows XP and 2000 only IEEE 1394 requires Windows Me 2000 or XP card must be IEEE1394a 2000 compatible and OHCI compliant 1...

Страница 4: ...turn the scanner off and unplug the power cord Caution Always unplug the scanner before cleaning 2 Use a soft damp cloth and mild detergent to clean the outer case Caution Be careful not to spill liquid or let water get into the scanner mechanism or electronic components This could permanently damage them Never use alcohol thinner or corrosive solvent to clean the scanner These chemicals can damag...

Страница 5: ...age document or film or slides see the User s Guide 1 Raise the scanner cover and place the document face down on the document table Place it in the upper left corner aligning it with the edges of the glass 2 Close the cover being careful not to move the document Tip If the edges of the document don t scan move it in about 1 16 of an inch 1 5 mm from the edges of the glass You can raise or remove ...

Страница 6: ...e and how you want to use it 5 Click the Preview button to see a preview of your scan Note The Thumbnail preview screen is shown above Depending on your selected mode you may see the Normal preview screen instead To switch between preview screens click the arrow next to the Preview button and choose Thumbnail or Normal In Home Mode you can click the Auto preview checkbox to make the preview screen...

Страница 7: ...ropriate compression ratio for your image For details on file format settings click the Help button Scanning With the a Start Button You can press the a Start button to open EPSON Scan or if you re running Windows you can set the button to open another application of your choice Note You cannot assign a different application to the a Start button on Macintosh systems Assigning an Application to th...

Страница 8: ... Scanners and Cameras icon in the Windows Control Panel 2 Select Epson Expression 10000XL and click the Properties button 3 Click the Events tab You see this window 4 Make sure Start Button appears in the Scanner events box then deselect any applications you don t want to use in the Send to this application list Leave checked only the application s you want to assign to the a Start button 5 Click ...

Отзывы: