background image

Printing From a Memory Card or Camera

19

6. Press the 

OK

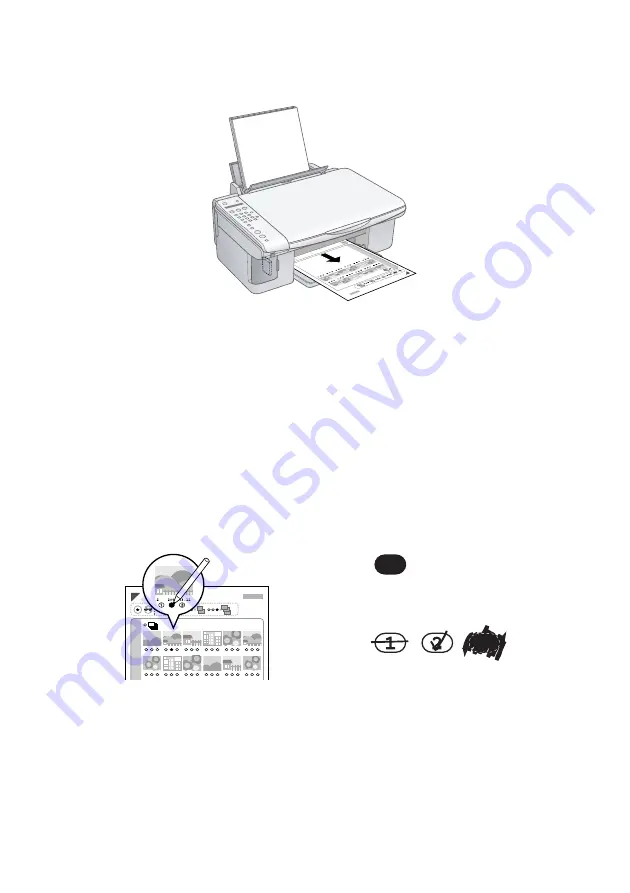
 button. The Epson Stylus CX5800F starts printing the index 

sheet(s). This may take a few minutes.

For multiple index sheets, the pages containing the most recent images 
are printed first. If you want to cancel printing more sheets, press 
the 

y

Cancel/Back

 button.

Now follow the instructions below to select which photos to print.

Selecting Photos on the Index Sheet

1. Once you have printed the index sheet, use a dark pen or pencil to fill in one 

of the ovals beneath each photo you want to print to indicate how many 
copies you want (1, 2, or 3).

Make sure just one oval is filled in for each selected photo and mark the sheet 
carefully; once it has been scanned you will not be able to change your 
selections.

Note: 

If you want one copy of all the photos on the index sheet, fill in the 

ALL

 oval at the 

top of the page.

OK:

No 
good:

Содержание CX5800F - Stylus Color Inkjet

Страница 1: ...Epson Stylus CX5800F Basics Guide Basic Copying Printing Faxing and Scanning Maintaining Your Epson Stylus CX5800F Solving Problems ...

Страница 2: ...opyrighted Materials Digital cameras scanners and ink jet printers like conventional photocopiers and cameras can be misused by improper copying or printing of copyrighted material While some countries laws permit limited copying of copyrighted material in certain circumstances those circumstances may not be as broad as some people assume Epson encourages each user to be responsible and respectful...

Страница 3: ... the Card 17 Printing an Index Sheet to Select Photos 18 Printing All Photos or DPOF Photos 21 Printing From a Digital Camera 22 Printing From Your Computer 23 Printing in Windows 23 Printing With Macintosh OS X 26 Using Special Papers 29 Faxing a Photo or Document 31 Connecting a Phone or Answering Machine 31 Setting Up Your Fax Features 32 Sending a Fax 39 Receiving a Fax 41 Scanning a Photo or ...

Страница 4: ...ylus CX5800F 47 Checking the Print Head Nozzles 47 Cleaning the Print Head 48 Checking the Ink Levels 49 Replacing Ink Cartridges 50 Solving Problems 55 Error Messages 55 Problems and Solutions 57 Where To Get Help 60 Notices 61 Index 69 ...

Страница 5: ...his book tells you how to do most of these things without ever turning on your computer Of course your Epson Stylus CX5800F can do lots more when you connect it to your Windows or Macintosh computer For additional instructions see the on screen User s Guide by selecting the icon for it on your desktop Please follow these guidelines as you read your Epson Stylus CX5800F instructions Warning Warning...

Страница 6: ...y Cancel Back button until you see a screen like this 2 Press the Setup button You see this display 3 Press the u or d button or press the 7 key on the numeric keypad to display this option 4 Press the OK button You see a display like this 5 Press the u or d button as necessary to select Español Français or English 6 Press the OK button 7 Press the y Cancel Back button until you return to the firs...

Страница 7: ...n slide out the extensions 2 Flip the feeder guard forward Then slide the left edge guide to the left 3 Insert the paper printable side up against the right edge guide Always load it short edge first even for landscape printing The printable side is often whiter or brighter than the other side Narrow paper Place paper beneath the tabs and arrow mark ...

Страница 8: ...f you are just making a copy or printing a rough draft of an image plain paper is fine However for the best results you ll want to use one of Epson s special ink jet papers designed for your printer For example your photos will look great printed on Epson Premium Glossy Photo Paper See page 29 for details 4 Slide the left edge guide against the left edge of the paper but not too tightly Then flip ...

Страница 9: ...over and place your original face down on the glass in the upper left corner Move your original about 0 04 inch 1 mm away from the top and left edges so all of it will be copied 2 Close the document cover gently so you don t move the original Caution Never open the document cover beyond where it stops and do not place heavy objects on top of the Epson Stylus CX5800F all in one Move the original ab...

Страница 10: ...d pull it straight up If you need to press the document flat while you copy or scan it do not press too hard and be careful not to move it Caution Do not use excessive force on the document cover and do not twist it You may damage the document cover When you are done replace the document cover by inserting the tabs back into the slots ...

Страница 11: ...e multiple copies up to 99 press the number keys on the numeric keypad The display shows the number you select Note If you need to cancel the number of copies selected press the y Cancel Back button To exit Copy mode press the y Cancel Back button again 7 Press the paper type button to select Plain Paper The light indicates which type is selected 8 Press the paper size button to select Letter 9 To...

Страница 12: ...ay shows the number you select Note If you need to cancel the number of copies selected press the y Cancel Back button To exit Copy mode press the y Cancel Back button again 7 Press the paper type button to select Photo Paper 8 Press the paper size button to select Letter 4 x6 or 5 x7 9 To make a color copy press the x Start Color button To make a black and white copy press the x Start B W button ...

Страница 13: ...d plain letter size paper 2 Press the Copy button You see this display 3 Press the paper type button to select Plain Paper 4 Press the paper size button to select Letter 5 Hold down the y Cancel Back button then press the x Start Color button to copy in color or the x Start B W button to copy in black and white When Color Draft Mode or B W Draft Mode appears on the display release both buttons Cop...

Страница 14: ...14 Copying a Photo or Document ...

Страница 15: ...he Epson Stylus CX5800F it knows which photos to print and how many copies of each If your camera is PictBridge or USB DIRECT PRINT compatible you can print your JPEG photos by connecting your digital camera directly to your Epson Stylus CX5800F Your photos must be sized from 80 80 to 9200 9200 pixels See these sections Compatible Cards and Image Formats on page 16 Inserting the Card on page 17 Pr...

Страница 16: ...ompliant File format JPEG DOS FAT FAT 12 or 16 one partition taken with a DCF version 1 0 or 2 0 compliant digital camera Supports Exif version 2 21 Image size 80 80 pixels to 9200 9200 pixels Number of files Up to 999 Right slot Memory card access light Adapter required Slot Type of card Right slot CompactFlash Microdrive Left slot SmartMedia Memory Stick MagicGate Memory Stick MagicGate Memory S...

Страница 17: ...ke sure the memory card access light is off and that no cards are in any of the slots Then insert your card into the correct slot See page 16 for details The memory card access light flashes and then stays on 4 Close the memory card door Now you can Print an index sheet so you can select which photos to print page 18 Print all the photos on the card page 21 Print photos pre selected on your camera...

Страница 18: ...t that you want to print scan the sheet and let the Epson Stylus CX5800F automatically print the selected photos Printing the Index Sheet 1 Make sure your Epson Stylus CX5800F is not connected to your computer or your computer is turned off 2 Load several sheets of letter size plain paper Use only letter size paper to print the index sheet Up to 30 images are printed on each page so if there are m...

Страница 19: ...tions below to select which photos to print Selecting Photos on the Index Sheet 1 Once you have printed the index sheet use a dark pen or pencil to fill in one of the ovals beneath each photo you want to print to indicate how many copies you want 1 2 or 3 Make sure just one oval is filled in for each selected photo and mark the sheet carefully once it has been scanned you will not be able to chang...

Страница 20: ... like this indicating that the Epson Stylus CX5800F is ready to scan the index sheet If this setting is not displayed press the Memory Card button until it is displayed 6 Select Plain Paper or Photo Paper whichever you loaded If you select Plain Paper the photos print with a white border If you select Photo Paper the photos print borderless to the edge of the paper 7 Select Letter 4 x6 or 5 x7 for...

Страница 21: ...ress the Memory Card button repeatedly until the display looks something like this Note If the memory card does not contain DPOF information one copy of all the photos on the card will be printed 4 Select Plain Paper or Photo Paper whichever you loaded If you select Plain Paper the photos print with a white border If you select Photo Paper the photos print borderless to the edge of the paper 5 Sel...

Страница 22: ...int borderless to the edge of the paper 5 Select Letter 4 x6 or 5 x7 for the paper size 6 Connect the USB cable that came with your camera to the USB connector on the front of your Epson Stylus CX5800F 7 Turn on your camera and select the photos you want to print Then adjust any necessary settings and print your photos as explained in your camera manual 8 When you re finished disconnect your camer...

Страница 23: ...our computer as described on the Start Here sheet Also be sure to use the right paper and select the correct paper type setting in the printer driver See page 29 for details Follow the instructions in these sections Printing in Windows below Printing With Macintosh OS X on page 26 Using Special Papers on page 29 Printing in Windows 1 Load paper See page 7 for details 2 Open the photo or document i...

Страница 24: ...ab select the basic print settings Make sure you choose the correct paper Type setting for the paper you are using See page 29 for details Note For more information about print settings click the or Help button Select the type of document you re printing choose Photo or Best Photo for photos Select your document Orientation Select your paper Size Select your paper Type Click here for more options ...

Страница 25: ...s click the Page Layout tab and select settings as necessary 8 Click OK to save your settings then click OK or Print to start printing This window appears and shows the progress of your print job Select a color management method To choose No Color Adjustment click ICM first Select Print Options as necessary Select Paper Quality Options as necessary Click here if you want to see this Advanced scree...

Страница 26: ... File menu and select Page Setup Make the following settings For borderless printing choose the Sheet Feeder Borderless option in the Paper Size list for your paper size US Letter 8 x 10 5 x 7 or 4 x 6 4 Click OK to close the Page Setup window 5 Open the File menu and select Print You see a window like this one Select Stylus CX5800F Select your Paper Size Select your document or image orientation ...

Страница 27: ...10 4 x click the PDF button instead Scheduler Schedule your print job to print at a later time Paper Handling Select page printing options such as Reverse print order or Page Order ColorSync or Color Management Select ColorSync or adjust the color controls change the gamma setting or turn off color adjustments in the printer software Cover Page OS X 10 4 x only Print a cover page before or after y...

Страница 28: ... progress of your print job click the printer icon when it appears in the dock on the bottom of your desktop If you re using OS X 10 2 x click the Print Center icon instead then double click Stylus CX5800F in the Printer List window You see a screen like this 11 When you re finished close the printer window or Print Center Select Print Quality and other options as necessary Cancel printing Resume ...

Страница 29: ...nches S041935 Epson Premium Semigloss Photo Paper Letter 8 5 11 inches S041331 Epson Glossy Photo Paper Borderless 4 6 inches S041809 Letter 8 5 11 inches S041141 S041649 S041272 S041271 Epson Matte Paper Heavyweight Borderless 8 10 inches S041467 Letter 8 5 11 inches S041257 Epson Double Sided Matte Paper Letter 8 5 11 inches S041568 Epson Photo Quality Ink Jet Paper Letter 8 5 x 11 inches S04106...

Страница 30: ...30 Printing From Your Computer ...

Страница 31: ...e or Answering Machine below Setting Up Your Fax Features on page 32 Sending a Fax on page 39 Receiving a Fax on page 41 For more information on faxing and selecting fax settings see the User s Guide Connecting a Phone or Answering Machine If you re connecting the Epson Stylus CX5800F to a phone line and connecting a telephone or answering machine to the same phone line so you can use it to make v...

Страница 32: ...o enter up to 28 digits of header information Use the number keys to enter the letters A to Z in uppercase or lowercase the numbers 0 to 9 and various symbols Press a key repeatedly to display first the numbers and symbols if available then the uppercase and lowercase letters as indicated on the key Then wait a moment or press the r button to move to the next character space When you re finished p...

Страница 33: ... number in the fax header press the u or d button or press the 3 key on the numeric keypad to display this option 17 Press the OK button The display goes blank except for the cursor _ 18 Press the keys on the numeric keypad to enter your fax number You can enter the numbers 0 to 9 and the characters and up to 20 digits total 19 Press the OK button 20 Press the y Cancel Back button until you return...

Страница 34: ...int reports only when an error occurs or On Send to print reports for every fax you send Fax Mode B W Color B W Only default Indicates whether you can send faxes in black and white or color by pressing the appropriate x Start button or in black and white only by pressing either x Start button If you send a color fax to a recipient s fax machine that prints only in black and white and the Fax Mode ...

Страница 35: ...button 6 Press the u or d button until the setting option you want is displayed then press the OK button to select it 7 Repeat steps 5 and 6 to change any other settings When you re finished press the y Cancel Back button to return to the 4 Scan Print Setup menu 8 If you need to change the Dial Mode DRD ECM V 34 or Rings to Answer settings press the u or d button or press the 5 key on the numeric ...

Страница 36: ... of up to 60 fax numbers so you can quickly select them for faxing You can also add names to identify the recipients and print the speed dial list 1 Press the Fax button once to enter Fax mode The Fax button lights up and you see this display 2 Press the Setup button You see this display 3 Press the u or d button or press the 3 key on the numeric keypad to display this option 4 Press the OK button...

Страница 37: ...aracter space When you re finished press the r button to move to a blank space Note If you need to change a character to the left press the l button to delete the character and re enter it Press the r button if you need to move the cursor to the right 10 Press the OK button You see this display indicating the next available speed dial entry number 11 If you want to add another speed dial entry rep...

Страница 38: ...te a speed dial entry press the OK button Then press the u or d button or the 3 key on the numeric keypad to display this option 8 Press the OK button You see the first speed dial entry number such as 1 and name displayed 9 Press the OK button to delete this entry or press the u or d button to select a different entry and press the OK button to delete it Printing Your Speed Dial List 1 Press the y...

Страница 39: ...used press the Redial Pause button instead of entering a fax number The last fax number appears on the screen 3 To send a black and white fax press the x Start B W button To send a color fax press the x Start Color button If the Fax Mode setting is set to B W Only the fax is sent in black and white See page 34 for details You see this display during faxing Note If you need to cancel faxing at any ...

Страница 40: ...o select a different speed dial entry press the u or d button to display the entry or press the number key that corresponds to the speed dial entry number Press the OK button then go to step 5 5 To send a black and white fax press the x Start B W button To send a color fax press the x Start Color button If the Fax Mode setting is set to B W Only the fax is sent in black and white See page 34 for d...

Страница 41: ...hen you can check for a fax tone from the sending fax machine and press a button on the Epson Stylus CX5800F to receive the fax or allow your answering machine to determine if the call is an incoming fax Note Make sure you selected the Paper Size setting that matches the size of paper you ve loaded If the incoming fax pages are larger than the paper size you loaded the fax size is reduced to fit o...

Страница 42: ...nswer the phone to confirm that the call is a fax press the x Start B W or x Start Color button to receive the fax The message Receiving appears on the display After the Epson Stylus CX5800F receives all the pages it begins printing the fax When it s finished you see the message Complete Note If you run out of paper during printing you see the error message Paper out Load more paper and press the ...

Страница 43: ...es automatic image adjustments cropping tools and preset options for various types of scans Professional Mode previews your image and lets you manually configure your scan settings with a full array of tools Basic Scanning You can scan from any TWAIN compliant application such as ArcSoft PhotoImpression using EPSON Scan Or you can start EPSON Scan directly from your computer and save your image to...

Страница 44: ... You see the EPSON Scan standby window 4 If the Mode setting in the upper right corner is set to Full Auto Mode click the Scan button Note If you want to automatically restore a color photo as you scan click the Customize button See page 45 for details If you are in Home or Professional Mode you see a different EPSON Scan settings window You can change the mode using the Mode selector in the upper...

Страница 45: ...essional Mode or for more information about Full Auto Mode settings see the on screen User s Guide You can also click Help on the EPSON Scan screen for information about all the available settings Home Mode Preview your image click to select the Color Restoration checkbox and click Scan Professional Mode Preview your image scroll down to the Adjustments area click to select the Color Restoration c...

Страница 46: ...46 Scanning a Photo or Document ...

Страница 47: ...s in the print head may be clogged Follow the steps below to check the print head nozzles using the control panel 1 Load letter size paper in the sheet feeder 2 Press the P On button to turn on the Epson Stylus CX5800F or press the y Cancel Back button until you see a screen like this 3 Press the Setup button You see this display 4 Press the u or d button or press the 3 key on the numeric keypad t...

Страница 48: ...ead needs to be cleaned If you see an ink error message on the display you cannot clean the print head In this case press the OK button and replace the appropriate ink cartridge first See page 50 for details 1 Press the P On button to turn on the Epson Stylus CX5800F or press the y Cancel Back button until you see a screen like this 2 Press the Setup button You see this display 3 Press the u or d ...

Страница 49: ...mate level of ink in your cartridges using the control panel 1 Press the P On button to turn on the Epson Stylus CX5800F or press the y Cancel Back button until you see a screen like this 2 Press the Setup button You see this display 3 Press the u or d button or press the 2 key on the numeric keypad to display this option 4 Press the OK button You see a display like this If one or more cartridges ...

Страница 50: ...psonstore com U S sales only In Canada please call 800 463 7766 for reseller referral Use these part numbers when you order or purchase new ink cartridges Caution Leave the empty cartridge installed until you have obtained a replacement or the ink remaining in the print head nozzles may dry out We recommend that you use genuine Epson cartridges The use of other products may affect your print quali...

Страница 51: ...open the scanner Caution Do not open the scanner when the document cover is open Do not move the print head by hand this may damage the Epson Stylus CX5800F Always select 5 Replace Cartridge from the display to move it 6 Open the cartridge cover then squeeze the tab at the back of the cartridge and lift it straight out Dispose of it carefully Do not take the used cartridge apart or try to refill i...

Страница 52: ...tear the label on the cartridge otherwise ink will leak Do not touch the green chip on the front of the cartridge This can damage the ink cartridge 8 Place the new ink cartridge into the cartridge holder and push it down until it clicks into place 9 Replace any other cartridges that need to be replaced 10 Close the ink cartridge cover and press it until it clicks into place ...

Страница 53: ...eplace Cartridge appears on the display Caution Never turn off the Epson Stylus CX5800F while Charging appears on the display or you ll waste ink Note If you see an ink cartridge error message on the display the ink cartridge may not be installed correctly Press the OK button and reinstall the ink cartridge until it clicks into place 13 Press the y Cancel Back button until you return to the first ...

Страница 54: ...54 Maintaining Your Epson Stylus CX5800F ...

Страница 55: ...in the sheet feeder and press the OK button to continue See page 7 for details Paper jam Press the OK button Remove any remaining jammed paper by hand See page 58 for instructions on clearing the paper jam Cyan Magenta Yellow Black ink low Press the OK button to begin ink cartridge replacement Ink is low in one or more of the indicated cartridges See page 50 for purchase and replacement instructio...

Страница 56: ...ect photos correctly and try again No marks are detected on the index sheet or the sheet includes more than one mark for an image Remove the index sheet mark it correctly and try again See page 19 for details Memory card data does not match index sheet Replace the card or index sheet and try again The index sheet does not match the photos on the memory card Remove the card and insert the one used ...

Страница 57: ... of paper The paper thickness lever is set to the m L position If you are printing on paper sheets press x Start Color or x Start B W to continue If you re printing on envelopes set the lever to the H position Service required See your documentation for details An Epson Stylus CX5800F part needs to be replaced Contact your local authorized servicer or contact Epson for a referral See page 60 for d...

Страница 58: ...rror Correction Mode setting and try faxing again See page 34 for details Paper Feeding Problems If paper doesn t feed remove it from the sheet feeder Flip through the stack to separate the sheets a little Then reload the paper against the right edge guide and slide the left edge guide against the paper but not too tightly Make sure the paper is not in front of the feeder guard Do not load too man...

Страница 59: ...genuine Epson ink cartridges see page 50 Set the paper thickness lever to the m L position for most paper types If you are printing on envelopes set the lever to the H position If you notice light or dark bands across your printouts or they are too faint you may need to clean the print head This unclogs the nozzles so they can deliver ink properly Run a nozzle check to see if the print head needs ...

Страница 60: ...e nearest reseller please call 800 GO EPSON 800 463 7766 To purchase online visit www epsonstore com U S sales only In Canada please call 800 463 7766 for reseller referral Other Software Technical Support Service Access World Wide Web From the Internet you can reach Epson Support at http support epson com At this site you can download drivers and other files look at product documentation access t...

Страница 61: ...f the devices plugged into the extension cord does not exceed the cord s ampere rating Also make sure the total ampere rating of all devices plugged into the wall outlet does not exceed the wall outlet s ampere rating Avoid locations that are subject to rapid changes in heat or humidity shocks or vibrations or dust Leave enough room around the Epson Stylus CX5800F for sufficient ventilation Do not...

Страница 62: ...r Do not put your hand inside the Epson Stylus CX5800F or touch any cartridges during printing Install a new ink cartridge immediately after removing an empty one Leaving cartridges uninstalled can dehydrate the print head and may prevent the Epson Stylus CX5800F from printing If you remove an ink cartridge for later use protect the ink supply area from dirt and dust and store it in the same envir...

Страница 63: ... to be within the variation accepted due to quantity production and testing on a statistical basis as required by 47CFR 2 909 Operation is subject to the following two conditions 1 this device may not cause harmful interference and 2 this device must accept any interference received including interference that may cause undesired operation Trade Name Epson Type of Product Multifunction printer Mod...

Страница 64: ...he REN without a decimal point e g 00 is a REN of 0 0 For earlier products the REN is separately shown on the label This equipment may not be used on coin service provided by the telephone company Connection to party lines is subject to state tariffs Should this equipment cause harm to the telephone network the telephone company may discontinue your service temporarily If possible they will notify...

Страница 65: ...nts are very destructive to customer terminal equipment connected to AC power sources and that this is a major nationwide problem If your home has specially wired alarm equipment connected to the telephone line ensure the installation of this equipment Model C271A does not disable your alarm equipment If you have questions about what will disable alarm equipment consult your telephone company or a...

Страница 66: ... Le présent matériel est conforme aux spécifications techniques applicables d Industrie Canada 2 The Ringer Equivalence Number is an indication of the maximum number of devices allowed to be connected to a telephone interface The termination on an interface may consist of any combination of devices subject only to the requirement that the sum of the RENs of all the devices does not exceed five L i...

Страница 67: ...If your printer is being repaired Epson will direct you to send your printer to Epson or its authorized service center where the printer will be fixed and sent back to you You are responsible for packing the printer and for all costs to and from the Epson authorized service center When warranty service involves the exchange of the printer or a part the item replaced becomes Epson property The repl...

Страница 68: ...IOD IDENTIFIED ABOVE UNLESS STATED HEREIN ANY STATEMENT OR REPRESENTATIONS MADE BY ANY OTHER PERSON OR FIRM ARE VOID EXCEPT AS PROVIDED IN THIS WRITTEN WARRANTY NEITHER EPSON AMERICA INC NOR ITS AFFILIATES SHALL BE LIABLE FOR ANY LOSS INCONVENIENCE OR DAMAGE INCLUDING DIRECT SPECIAL INCIDENTAL OR CONSEQUENTIAL DAMAGES RESULTING FROM THE USE OR INABILITY TO USE THE EPSON PRODUCT WHETHER RESULTING F...

Страница 69: ...otos 12 placing originals 9 to 10 problems 57 speeding up 13 D Date setting 32 to 33 Declaration of Conformity 63 Digital camera printing from 22 Display messages 55 to 57 DPOF printing 21 Draft mode copying in 13 DSL 58 E ENERGY STAR 63 EPSON Scan 43 to 45 Error messages 55 to 57 F Faxing answer mode 41 to 42 connecting for 31 creating header 32 to 33 paper size setting 33 to 35 problems 58 recei...

Страница 70: ... 21 removing 18 Messages display 55 to 57 N Nozzle Check utility 47 to 48 P Paper jams 55 58 loading 7 to 8 type settings 29 Paper thickness lever 8 56 59 PictBridge camera printing from 22 Print head checking nozzles 47 to 48 cleaning 48 to 49 Printing from camera 22 from computer 23 to 29 from memory card 15 to 21 Problems solving copying 57 error messages 55 to 57 faxing 58 help 60 paper feedin...

Страница 71: ...T Technical support 60 Telephone connecting 31 safety instructions 62 Time setting 32 to 33 Troubleshooting 55 to 60 U USB DIRECT PRINT camera printing from 22 W Warranty 67 to 68 Windows printing with 23 to 25 ...

Страница 72: ...CPD 20213R1 Printed in XXXXXX XX XX XX XXX ...

Отзывы: