


Note
The 486SX/25 microprocessor may be soldered onto an
adapter board that is seated in the socket. Remove the
adapter board as described above.
4.
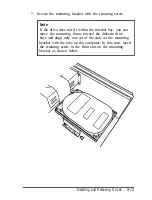
Remove the replacement chip from its package and inspect
the pins. If they are bent, do not install the processor chip.
Contact your vendor for a new microprocessor.
5.
Position the processor chip over the socket, aligning the
notched edge of the chip (marked with a dot) with pin 1 on
the socket, as shown below.
Note
If you install the processor chip in the wrong orientation,
you may damage the chip and void your warranty.
6.
Make sure the pins in the processor chip are directly over the
holes in the socket. Then gently push the microprocessor
straight into the socket, pressing evenly on all sides.
Installing and Removing Options
4-27
Содержание ActionDesk 4000
Страница 1: ......
Страница 128: ...Hard disk drive types continued Specifications A 9 ...
Страница 130: ...DMA Assignments Specifications A 11 ...
Страница 131: ...A 12 Specifications ...
Страница 132: ...System I O Address Map Specifications A 13 ...
Страница 133: ...A 14 Specification ...
Страница 134: ...Specifications A 15 ...
Страница 135: ...A 16 Specifications ...
Страница 136: ...Speaker connector pin assignments J21 Specifications A 17 ...
Страница 137: ...A 18 Specification ...
Страница 138: ...Specifications A 19 ...


