background image

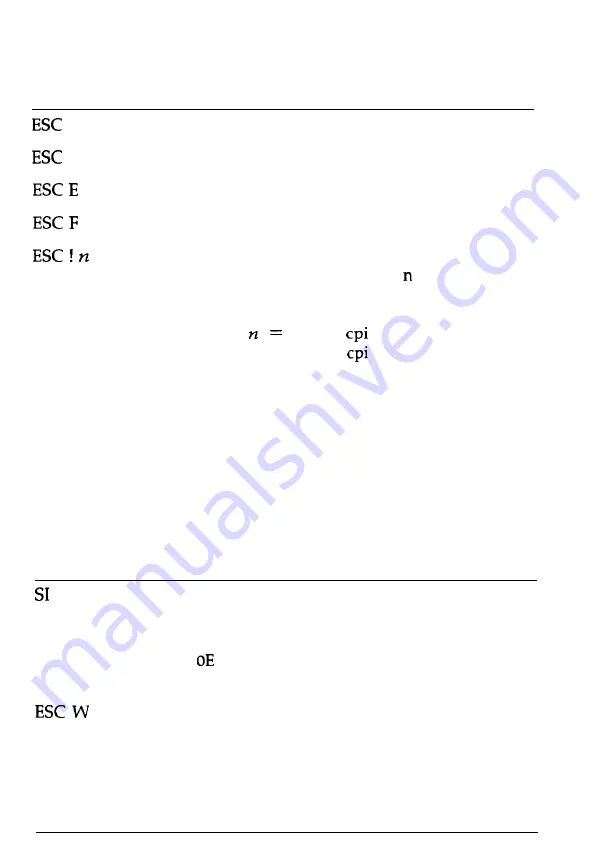
Commands Arranged by Topic

ASCII

Dec. Hex. Description


4

52 34

Select Italic Font


5

53 35

Cancel Italic Font


69 45

Select Bold Font


70 46

Cancel Bold Font

33

21

Master Select

To find the value of   add together

the numbers of the typestyles you

want to combine from the list below:


0: 

10 

1: 12 

2: 

proportional

4: 

condensed

8: 

bold

16: 

double-strike

32: 

double-width

64: 

italic

128: 

underline

Font enhancement

ASCII

Dec. Hex. Description

15 OF

Select Condensed Printing

DC2

18 12

Cancel Condensed Printing

SO

14 

Select Double-Width Printing (one

line)


1/0 87 57

Turn Double-Width Printing On/Off

DC4

20 14

Cancel Double-Width Printing (one

line)

Command Summary 8-7

Содержание 1170

Страница 1: ...LQ 870 1170 U s e r s M a n u a I 4000377 rn A ...

Страница 2: ...ties for damages losses costs or expenses incurred by purchaser or third parties as a result of accident misuse or abuse of this product or unauthorized modifications repairs or alterations to this product Seiko Epson Corporation and its affiliates shall not be liable against any damages arising from the use of any options other than those designated as Original Epson Products or Epson Approved Pr...

Страница 3: ...rom that to which the receiver is connected Consult the dealer or an experienced radio TV technician for help WARNING The connection of a non shielded equipment interface cable to this equipment will invalidate the FCC Certification of this device and may cause interference levels which exceed the limits established by the FCC for this equipment It is the responsibility of the user to obtain and u...

Страница 4: ...e an option to set the maximum lines per page If your program has a lines per page setting and you are using standard 83 x 11 inch paper set the lines per page to 61 Note To find the right lines per page setting for paper that is not St x 11 create a test document using your application program Set your top and bottom margins to 0 and then create a file of numbered lines from 1 to 66 When you prin...

Страница 5: ...ized Epson Reseller or Service Center P Technical assistance with the installation configuration and operation of Epson products LI Information on application software drivers P Sales of the Epson ESC P Reference Manual which has comprehensive information on all commands including ESC P 2 P Epson technical information library fax service P Product literature with technical specifications on our cu...

Страница 6: ... the Printer 1 10 Connecting the Printer to Your Computer 1 14 Configuring Your Software for the Printer 1 15 Chapter 2 Paper Handling 2 1 Selecting a Paper Feeding Method 2 2 Using Single Sheets 2 3 Using Continuous Paper 2 7 Switching Between Continuous and Single Sheets 2 21 Printing on Special Paper 2 24 Chapter 3 Using the Printer 3 1 Control Panel 3 2 DIP Switches 3 6 Micro Feed 3 13 Tear Of...

Страница 7: ...roubleshooting 6 1 Problems and Solutions 6 2 Power Supply 6 3 Printing 6 4 Paper Handling 6 8 Options 6 10 Chapter 7 Technical Specifications 7 1 Printer Specifications 7 2 Interface Specifications 7 10 Optional Specifications 7 14 Initialization 7 16 Chapter 8 Command Summary 8 1 Using the Command Summary 8 2 Commands Arranged by Topic 8 3 Appendix A 1 Character Tables A 2 International Characte...

Страница 8: ...ed graphics Compatibility Supports the Epson ESC P commands widely used in application programs written for other Epson LQ printers More about ESC P 2 Epson s enhanced printer control language ESC P 2 offers two scalable fonts in sizes from 8 to 32 points You can use this feature if your application program supports scalable fonts For DOS based word processing programs new ESC P 2 drivers may be a...

Страница 9: ...cally feeds up to 150 sheets of paper or 25 plain bond envelopes without reloading You can create a double bin cut sheet feeder by connecting this cut sheet feeder to the single bin model Additional Tractor Unit C800201 for LQ 870 C800211 for LQ 1170 This option improves the performance of continuous paper handling It is especially useful with continuous multi part forms You can also use it to loa...

Страница 10: ...6 contains troubleshooting information If the printer does not operate properly or the printed results are not what you expect see Chapter 6 for a list of problems and solutions Other chapters contain information on installing options general maintenance specifications and printer commands There is also a glossary of printer terms and an index Warnings Cautions and Notes I WARNINGS must be followe...

Страница 11: ...ion Printer parts paper guide edge guides front cover paper tension unit tractor paper thickness lever A C inlet fl front rant edge guide paw 1 Note In some countries the power cord is attached I 4 Introduction ...

Страница 12: ...gs should never be blocked by placing the product on a bed sofa rug or other similar surface This product should never be placed near or over a radiator or heat register This product should not be placed in a built in installation unless proper ventilation is provided 7 This product should be operated from the type of power source indicated on the marking label If you are not sure of the type of p...

Страница 13: ...e may expose you to dangerous voltage points or other risks Refer all servicing in those compartments to service personnel 13 Unplug this product from the wall outlet and refer servicing to qualified service personnel under the following conditions A When the power cord or plug is damaged or frayed B If liquid has been spilled into the product C If the product has been exposed to rain or water D I...

Страница 14: ...or the Printer 1 4 Assembling the Printer 1 6 Installing the ribbon cartridge 1 6 Attaching the paper guides 1 9 Testing the Printer 1 10 Plugging in the printer 1 10 Running the self test 1 11 Connecting the Printer to Your Computer 1 14 Configuring Your Software for the Printer 1 15 Choosing from a menu 1 15 Setting Up the Printer 1 1 ...

Страница 15: ...wer cord Note In some locations the power cord is attached to the printer Store the packing materials in case you ever need to transport your printer CAUTION It is not possible to adjust voltage of the printer for use at another voltage If the label on the back of the printer does not show the correct voltage for your country contact your dealer 1 2 Setting Up the Printer ...

Страница 16: ...put your printer together Follow the directions on the Notice Sheet inserted in your printer when removing the protective material Note l Make sure you remove all packing and protective materials from your printer before turning on the power l Save all packing and protective materials to protect your printer should you need to transport it elsewhere in the future Setting Up the Printer 1 3 ...

Страница 17: ...ct sunlight excessive heat moisture or dust Use a grounded outlet do not use an adapter plug Avoid electrical outlets controlled by wall switches or automatic timers Accidental disruption of power can wipe out information in the memory of your computer or your printer Avoid outlets on the same circuit with large motors or other appliances that might cause fluctuations in line voltage Keep the enti...

Страница 18: ...ow the printer stand make sure that you allow enough clearance 1 2 inches or 30 mm between the underside of the stand and the top of the paper supply to keep the paper from catching on the underside of the stand Also check that the distance between the stand s supports is at least 280 mm 11 inches to accommodate any paper size you may use l Position your printer s power cord and interface cable so...

Страница 19: ...ge make sure that the printer is not plugged into an electrical outlet 1 Lift the printer cover straight up and off _ 2 Grasp the tabs on each side of the paper tension unit as shown below Press up firmly with your thumbs to lift the front of the unit then pull the paper tension unit up and off of the printer 3 Slide the print head to the middle of the printer 1 6 Setting Up the Printer ...

Страница 20: ...bon tightening knob in the direction of the arrow to remove any slack in the ribbon Next hold the ribbon cartridge by its handle and push it firmly down into position then press on both ends of the cartridge to fit the plastic hooks 5 Use a pointed object such as a ball point pen to guide the ribbon between the print head and ribbon guide while you turn the ribbon tightening knob to help feed the ...

Страница 21: ...d 7 Replace the paper tension unit by placing it on the printer s mounting pegs then lowering it into place Press down both ends of the paper tension unit firmly until you feel it snap click into place 8 Replace the printer cover by first inserting the front tabs into the slots on the printer then lowering it into place 1 8 Setting Up the Printer ...

Страница 22: ... mounting slots on the printer You can stand the paper guide in an upright position or lower it back to lie flat on the printer Front paper guide The front paper guide fits inside the front of the printer and may be installed over the tractor unit Hold the paper guide as shown and slide it into place between the metal slots on either side of the opening fitting the plastic notches over the mountin...

Страница 23: ...k of the printer to make sure the voltage required by the printer matches that of your electrical outlet CAUTION If the rated voltage and your outlet voltage do not match contact your dealer for assistance Do not plug in the power cord 3 If the power cord is not attached to the printer connect it to the AC inlet on the printer s rear panel 4 Plug the power cord into a properly grounded electrical ...

Страница 24: ...etails on paper handling The printer prints the self test in the currently selected font 1 Make sure that the printer is turned off Move the paper release lever to the single sheet position 2 Hold down the LF FF button while you turn on the printer The printer beeps several times and the POWER and PAPER OUT lights come on The self test begins by printing on the first and last lines of page 1 The p...

Страница 25: ... Run the self test using paper at least 210 mm 8 i inches wide for the LQ 870 or 360 mm 14 inches wide for the LQ 1170 otherwise the print head prints directly onto the platen 4 Insert a sheet of paper down between the edge guides until it meets resistance After about two seconds the printer loads the paper automatically and starts the self test 1 12 Setting Up the Printer ...

Страница 26: ...ess the LOAD EJECT button to eject the paper Then turn off the printer to end the self test Here is part of a typical self test Roman I 0123456789 ABCDEFGHIJK x Lfl 0123456789 BABCDEFGHIJKL 0123456789 c ABCDEFGHIJKLM 8c 0123456789 BABCDEFGHIJKLMN L 0123456789 BABCDEFGHIJKLMNO 0 1 2 3 4 5 6 7 8 9 ABCDEFGHIJKLMNOP I 0123456789 BABCDEFGHIJKLMNOPQ Sans S e r i f I 0123456789 c BABCDEFGHIJKLMNOPQR o 01...

Страница 27: ...Make sure both the printer and computer are turned off then plug the cable connector securely into the printer Squeeze the wire clips together until they lock in place on either side of the connector Note If your cable has a ground wire attach it to the ground connector beneath the interface connector 2 Plug the other end of the cable into the computer If there is a ground wire at the computer end...

Страница 28: ...s including ESC P 2 choose the LQ 870 1170 or LQ 570 1070 when you set up your program If your printer is not listed call the software manufacturer or call Epson at 800 922 8911 to see if an update is available Until you receive an update choose from the following list the printers are listed in the order of preference LQ 850 l050 LQ 510 1010 LQ 500 LQ 2550 LQ 2500 LQ 800 1000 LQ 1500 LQ If none o...

Страница 29: ...sh tractor 2 11 Removing continuous paper from the front push tractor 2 13 Loading continuous paper with the rear push tractor 2 14 Removing continuous paper from the rear push tractor 2 16 Loading continuous paper with the pull tractor 2 17 Removing continuous paper from the pull tractor 2 20 Switching Between Continuous and Single Sheets 2 21 Switching to single sheets 2 21 Switching to continuo...

Страница 30: ...r needs use it as a front push tractor rear push tractor or top pull tractor Once you select a feeding method you simply set the paper release lever load your paper and print You can even print on single sheets without removing your continuous paper supply Setting the paper release lever You set the paper release lever to determine the active paper path in your printer The printer automatically lo...

Страница 31: ...nt push tractor position For continuous paper with the tractor unit installed in the front l Rear push tractor position For continuous paper with the tractor unit installed in the rear 0 Pull tractor position For continuous paper with the tractor unit installed on the top In this case you can load paper from either the front rear or bottom Paper Handling 2 3 ...

Страница 32: ...ther the top or front of the printer If the paper tension unit is removed you need to replace it before you print on single sheets See page 1 8 in Chapter 1 Loading single sheets from the top 1 Place the paper release lever in the single sheet position Make sure the paper guide is in the upright position 2 Turn on the printer The POWER light on the control panel comes on 2 4 Paper Handling ...

Страница 33: ...dth of your paper 4 Slide a sheet of paper down between the edge guides until it meets resistance The printer loads the paper automatically and you are CAUTION Use the knob on the left side of the printer only to clear paper jams when the printer is off Otherwise you may damage the printer or lose the top of form position If the platen turns but the printer doesn t load the paper completely remove...

Страница 34: ...pen the front cover 2 Turn on the printer The POWER light on the control panel comes on 3 Move the edge guide until you feel it click into place above the arrow mark on the paper guide You can slide the edge guide to the left in l lo inch increments to increase the size of the left margin on your printout 2 6 Paper Handling ...

Страница 35: ...eft side of the printer only to clear paper jams when the printer is off Otherwise you may damage the printer or lose the top of form position If the platen turns but the printer doesn t load the paper completely remove the page and reinsert it more firmly To eject the paper press the LOAD EJECT button Note The printer s paper guide serves as a built in stacker and can hold up to 50 sheets of ejec...

Страница 36: ... you can install the tractor unit in one of the following positions front rear or pull Be sure you set the paper release lever correctly before you print See Setting the paper release lever at the beginning of this chapter for a description of each position Tractor position and available paper paths Below are the possible ways of feeding continuous paper Always set the paper release lever to the p...

Страница 37: ...u can lift the paper path guide on the printer cover to change the direction that continuous paper is ejected as shown below Forward ejection Rear ejection Changing tractor positions Before installing the tractor in a different position remove it from its current position by pressing the lock tabs while you lift it out Installing in the front push tractor position 1 Make sure the printer is turned...

Страница 38: ... forward and lift it out of the printer See page 2 12 for instructions on loading continuous paper with the front push tractor Installing the push tractor in the rear position 1 Make sure the printer is turned off Lift the paper guide up and off the printer 2 While pressing in the tractor s lock tabs lower the tractor straight down into the printer s mounting slots 2 10 Paper Handling ...

Страница 39: ...he power is turned off Lift the printer cover and paper guide up and off the printer 2 Grasp both ends of the paper tension unit and lift it up and off the printer Store the paper tension unit in safe place 3 An arrow on each side of the mounting slots shows you where to install the tractor While pressing in the tractor s lock tabs tilt the tractor unit forward and lower it straight down into the ...

Страница 40: ... front push tractor 1 Make sure the printer is turned off and remove the front cover and the front paper guide 2 Make sure the tractor is in the front push tractor position and the paper release lever is in the front push tractor position 2 12 Paper Handling ...

Страница 41: ...ket unit to approximately 12 mm 0 5 inch from the far left position and pull the lever forward to lock it in place Now slide the right sprocket unit to approximately match the width of your paper but do not lock it Move the paper support so it is midway between the sprocket units 12 mm 0 5 inch Paper Handling 2 13 ...

Страница 42: ...n on the printer When the printer receives data it automatically loads the paper before printing Removing continuous paper from the front push tractor 1 To remove continuous paper press the TEAR OFF button to feed the paper s perforation to the tear off edge of the printer cover Note If the page perforation does not meet the tear off edge you can adjust the tear off position using the micro feed f...

Страница 43: ...Make sure the printer is turned off and the paper guide is removed 2 Make sure the tractor is in the rear push tractor position and the paper release lever is in the rear push tractor position 3 Release the sprocket units by pulling the sprocket locks forward Paper Handling 2 15 ...

Страница 44: ...se Push the lever back to lock it in place Then slide the right sprocket unit to match the width of your paper but do not lock it Move the paper support so it is midway between the sprocket units 5 Make sure your paper has a clean straight loading edge Open the sprocket covers and fit the holes of the paper over the sprocket pins 2 16 Paper Handling ...

Страница 45: ...printer is off Otherwise you may damage the printer or lose the top of form position Removing continuous paper from the rear push tractor 1 To remove continuous paper press the TEAR OFF button to feed the paper s perforation to the tear off edge of the printer cover Note If the page perforation does not meet the tear off edge you can adjust the tear off position using the micro feed feature See Ch...

Страница 46: ...the printer is turned off and the printer cover and paper guide are removed Make sure the tractor is installed in the pull tractor position and the paper release lever is set to the pull tractor position Release the sprocket units by pulling the sprocket locks forward 2 18 Paper Handling ...

Страница 47: ... unit to match the width of your paper but do not lock it Move the paper support so it is midway between the sprocket units 5 Make sure your paper has a clean straight edge Insert the paper into the desired paper slot front bottom or rear until it emerges between the platen and the ribbon guide Pull the paper up until the perforation between the first and second pages is even with the top of the p...

Страница 48: ...er guide in the flat position Then slide the edge guides to the center of the paper s width 10 Turn on the printer 11 Make any adjustments to the loading position with the micro feed feature as described in chapter 3 12 Install the printer cover CAUTION Use the knob on the left side of the printer only to clear paper jams when the printer is off Otherwise you may damage the printer or lose the top...

Страница 49: ...ge You may need to adjust the top of form to a certain position for printing on ready made forms To do this see Adjusting the loading position on page 3 14 Removing continuous paper from the pull tractor 1 Tear off the printed document or excess paper at the tear off edge 2 Hold the LF FF button to feed the continuous paper forward to be ejected Note When you are printing with the pull tractor do ...

Страница 50: ...the printer press the TEAR OFF button to feed the paper forward to the tear off position Tear off the document and press the TEAR OFF button again to feed the continuous paper backward to the loading position CAUTION Make sure you tear off your printed document before pressing the LOAD EJECT button Reverse feeding several pages at a time may cause a paper jam 2 Now press the LOAD EJECT button to f...

Страница 51: ...us and Single Sheets 3 Push the paper release lever back to the single sheet position 4 You can now load single sheets from either the front or top as described in Using Single Sheets earlier in this chapter Paper Handling 2 23 ...

Страница 52: ... LOAD EJECT button to eject it Lift up slightly on the paper guide and then lower it until it lies flat on top of the printer Slide the left and right edge guides together so that they meet at the middle Set the paper release lever to either the front or rear push tractor position depending on which tractor position you are using Your printer loads the continuous paper automatically 2 24 Paper Han...

Страница 53: ...t forms make sure that your printing stays within the printable area of the page to prevent damage to the print head For more information on the printable area see Chapter 7 Always return the paper thickness lever to position 0 when you return to printing on ordinary paper Setting the paper thickness lever To accommodate various thicknesses of paper the printer is equipped with a paper thickness l...

Страница 54: ...ve the MULTI PART light comes on and print speed is reduced Multi part forms You can use carbonless multi part forms of up to four parts including the original Make sure you set the paper thickness lever to the proper position described in the table above Except for the paper thickness setting you load multi part paper the same way as ordinary paper For details see the sections on loading continuo...

Страница 55: ...he paper thickness lever to 2 before printing labels See Loading continuous paper with the pull tractor earlier in this chapter for details Never feed labels backward with the LOAD EJECT or TEAR OFF buttons Labels can easily peel off the backing and jam the printer Because labels are especially sensitive to extreme temperature and humidity always use them under normal operating conditions Do not l...

Страница 56: ...thickness lever to position 2 3 or 4 depending on the thickness of the envelope To load an envelope follow the steps described in loading single sheets from the top earlier in this chapter Note l The print head must not print past the left or right edge of the envelope or other thick paper Make sure that your application program keeps printing entirely within the printable area of the envelope you...

Страница 57: ...setting 3 6 DIP switch tables 3 7 DIP switch functions 3 9 Micro Feed 3 13 Using micro feed 3 13 Adjusting the loading position 3 14 Tear Off 3 16 Using the tear off mode 3 16 Using the TEAR OFF button 3 17 Adjusting the tear off position 3 18 Typestyles 3 19 Character fonts 3 19 Character pitch 3 22 Data Dump Mode 3 23 Using the Printer 3 1 ...

Страница 58: ... memory buffer MULTI PART green On when the paper thickness lever is set to position 2 or higher When this light is blinking you can use the micro feed feature PAPER OUT red On when the printer runs out of paper PAUSE orange On when you press the PAUSE button This light stays off unless you press the PAUSE button to prevent printing TEAR OFF orange On when you press the TEAR OFF button to feed con...

Страница 59: ...utton again to resume printing LOAD EJECT Press this button to load paper if it is not loaded or to eject it if paper is loaded If the paper release lever is set to the single sheet position paper is ejected If the paper release lever is set to the front tractor or rear tractor position paper moves back to the standby position LF FF Line feed Form feed Press this button briefly to feed the paper f...

Страница 60: ...e paper bin when both optional cut sheet feeders are installed and you are printing on single sheets When printing on continuous paper press this button once to feed paper from the loading position to the tear off position Press this button again to feed the paper backward to the loading position FONT Press this button to select one of the 10 built in fonts If an optional font module has been inst...

Страница 61: ...hat your printer is operating properly and gives you a printout of the current DIP switch settings See the section on testing the printer in Chapter 1 for more information Hold down both the LF FF button and LOAD EJECT button while you turn on the printer to enter data dump mode The data dump mode allows advanced users to find the cause of communication problems between the printer and the compute...

Страница 62: ... effective when the printer is turned on reset or initialized Changing a DIP switch setting 1 Make sure the printer is turned off 2 Open the DIP switch cover 3 Use a pointed instrument such as the tip of a pen to turn a switch on or off The tables on the following pages give the DIP switch functions for each setting 4 Close the DIP switch cover The new DIP switch settings take effect when the prin...

Страница 63: ...test printout Table 1 DIP Switch 1 setting International character sets character tables See tables 3 and 4 Table 2 DIP Switch 2 setting SW Description ON OFF 2 1 Page length for continuous 2 2 paper See Table 5 2 3 Tear off ON OFF 2 4 Auto linefeed ON OFF Asterisks indicate the default settings Page 3 8 3 12 3 12 Using the Printer 3 7 ...

Страница 64: ...l character sets OFF according to Table 3 PC 437 United States ON ON ON ON PC 850 Multilingual ON ON OFF ON PC 860 Portugal ON OFF ON ON PC 863 Canada French ON OFF OFF ON PC 865 Norway OFF ON ON ON Settings not shown above select PC 437 United States Table 5 Page length for continuous paper Page length 1 sw2 1 I sw2 2 I 3 8 Using the Printer ...

Страница 65: ...SA France Germany United Kingdom Denmark I Sweden Italy and Spain I However you can also select the following sets only with the ESC R software command Japan English Norway Denmark II Spain II Latin America Korea and Legal Character tables Your printer has five graphics character tables in addition to the italic character table You can select these character tables by setting DIP switches 1 1 1 2 ...

Страница 66: ...6 on you can print at up to 330 cps characters per second if you select the 12 cpi draft font The printer reduces the number of dots in each draft character to increase the printing speed If you select emphasized printing or condensed printing during high speed draft mode printing speed temporarily switches to normal draft speed until the enhancement is turned off Also if a line contains superscri...

Страница 67: ...nless your program does not provide these margins You can adjust your top of form position with the MICRO FEED buttons if you want half of the space at the bottom of one page and half at the top of the next page Continuous paper page length When you are printing on continuous paper DIP switches 2 1 and 2 2 let you select one of the four page lengths described in DIP switch Table 5 Tear off You can...

Страница 68: ...ed is on DIP switch 2 4 on the printer follows each carriage return code CR received with a line feed code LF If your printer is double spacing turn DIP switch 2 3 off If each line overprints the next turn DIP switch 2 4 on 3 12 Using the Printer ...

Страница 69: ...ion when the power is turned on again When you adjust the loading position for single sheet paper the printer remembers the new position only until you turn off the power The loading position returns to the factory setting when the power is turned on again Using micro feed To use the micro feed feature you press the ALT button in combination with the LOAD EJECT or LF FF button as indicated on the ...

Страница 70: ...of the paper after it is automatically loaded by the printer If your printing is too high or low on the page you can change the loading position with the micro feed feature as follows 1 Make sure the printer is turned on 2 Load either continuous or single sheet paper load continuous paper by pressing the LOAD EJECT button The MULTI PART light begins to blink Note You can adjust the loading positio...

Страница 71: ...n and advances all subsequent pages to the new position Note l The printer has a minimum and maximum loading position If you try to advance the loading position beyond these limits the printer beeps and the paper stops moving l When the paper reaches the factory set loading position the printer beeps and paper feeding pauses briefly Use the factory setting as a reference point when adjusting the l...

Страница 72: ...ar push tractor feeding systems l Never use the tear off feature with labels When fed backward labels may come off the backing and jam the printer Using the tear off mode When you select tear off mode with DIP switch 2 3 the printer automatically advances continuous paper to the tear off position when you finish printing The printer advances paper to the tear off position whenever the printer rece...

Страница 73: ... you set the paper release lever to the single sheet or pull tractor position Using the TEAR OFF button Whether or not the printer is in tear off mode you can use the TEAR OFF button to advance continuous paper to the tear off position following the steps below 1 Make sure printing has finished Press the TEAR OFF button The printer advances the paper to the tear off edge and the TEAR OFF light com...

Страница 74: ...The printer remembers the new tear off position even after the printer is turned off 3 Tear off any printed pages 4 When you begin printing the printer automatically feeds the paper back to the loading position and begins printing Note l The printer has a minimum and a maximum tear off position If you try to advance the tear off position beyond the limits the printer beeps and the paper stops movi...

Страница 75: ...el to select typestyles If your panel setting does not work check your software user s manual for instructions on selecting typestyles Character fonts The printer has ten built in fonts draft Courier Roman Sans Serif Prestige Script Script C Orator Orator S and OCR B To select a font press the FONT button until the green indicator light of your desired font comes on Note that font selection skips ...

Страница 76: ...olled by the DIP switch 1 6 setting The following shows sample characters for each font Normal Draft DIP switch l 6 OFF 0123456789 ABCDEFGHIJK ILMN Pc RsTuVWXYZ abcdefghi jklmnopqrstuv wxyr l aC aaa s f F Epson Roman proportional 0123456789 8ABCDEFGHIJK LMNOPQRSTUVWXYZ _ abcdefghijklmnopqrstuv wxyz l oCiie LC o i 3 20 Using the Printer ...

Страница 77: ...xyz h 88 l A uu R f Epson Script C w j a 0123456789 ABCDEFGHIJK LMNOPQRSTt IVWX E I abcdefgfii j RI mnopqrst uv 4 0 8 4 I a wKyx DCii ciiihbceeertt QA oouuyt l2 YPtf6i Epson Orator WV 012 4 6789 ABCDEFGHIJK LMNOPQRsTUVWXYZ ABCDEFGHIJKLMNOPQRSTUV n h a wxYz n ai AA iAA ooouuYou Epson Orator S 012 456789 ABCDEFGHIJK LMNOPQRt TUVWXYZ y scpcdefghij klmnopqrstuv wxyz t 6Ca 8s 8c eiiiAA a o OCR B SX O 0...

Страница 78: ... 0 0 Orator S 0 0 0 0 OCR B 0 0 0 0 In the lo 12 15 17 or 20 cpi modes each character gets an equal amount of space In proportional mode the spacing varies from character to character A narrow letter like the lowercase i receives less space than an uppercase W The printout below compares the different pitches This is 10 cpi printing This is 12 cpi printing This is IS cpi printing This is 17 cpi pr...

Страница 79: ...lB 3 6 12 16 5 0 2 0 2 0 2 0 R t 6 P 54 68 69 73 20 69 73 20 61 6E 20 65 78 61 6D 70 This is an examp 6C 6 5 2 0 6F 6 6 2 0 61 2 0 64 61 74 61 2 0 6 4 75 6D le of data dum a 70 2 0 7 0 72 6 9 6E 74 6F 75 74 2E 20 54 6 8 69 7 3 p p r i n t o u t T h i s 2 0 6 9 7 3 2 0 6 6 6 5 61 74 75 7 2 6 5 2 0 6D 61 68 6 5 i s feature make 73 2 0 6 5 61 73 7 9 20 6 6 6F 7 2 OD OA s e a s y f o r 5 To turn off d...

Страница 80: ...h capacity cut sheet feeder 4 6 Assembling the double bin cut sheet feeder 4 9 Switching between continuous paper and the cut sheet feeder 4 11 Additional Tractor Unit 4 13 The tractor positions and paper paths 4 13 Using two tractor units in combination 4 14 Interface Cards 4 16 Installing an interface card 4 16 C823051 C823061 serial interface card 4 18 Using the Printer Options 4 1 ...

Страница 81: ... you to load two different types of paper automatically Follow the directions included with your cut sheet feeder to assemble it then install the cut sheet feeder as described in this chapter Installing a cut sheet feeder Installation of each cut sheet feeder single bin high capacity or double bin is basically the same Install your cut sheet feeder by following the steps below 1 Make sure the prin...

Страница 82: ...h levers to lock the cut sheet feeder in place 5 Replace the printer cover by first inserting the front tabs into the slots on the printer then lowering it into place You are now ready to load paper with your cut sheet feeder To remove a cut sheet feeder reverse the steps above Loading paper with the single bin cut sheet feeder Load paper using the single bin cut sheet feeder as follows 1 Make sur...

Страница 83: ...hly match the width of your paper Slide the paper support midway between the paper guides 3 Pull the paper set levers all the way forward until the paper guides retract and lock open 4 Take a stack of paper and fan it Next tap the side and bottom of the paper on a flat surface to even up the stack 4 4 Using the Printer Options ...

Страница 84: ...the paper against the guide rollers Attach the stacker support wires to the edge guides of the paper guide Then place the notches on the paper guide straight down over the mounting posts on the printer to reinstall it Slide the edge guides to the middle of your paper You can still insert single sheets using the rear paper guide or the front paper slot The cut sheet feeder automatically loads paper...

Страница 85: ... and right paper guides to release them 2 Slide the left paper guide until it is aligned with the triangle mark then lock it in place by pushing back on its lock lever Next slide the right paper guide to roughly match the width of your paper Slide the paper support midway between the paper guides 4 6 Using the Printer Options ...

Страница 86: ...p the stack CAUTION Do not use multi part forms carbon paper or labels in the cut sheet feeder 5 Insert up to 150 sheets of paper 25 plain bond or 30 air mail envelopes along the left paper guide 6 Adjust the position of the right paper guide so that it matches your paper s width and lock it in place Make sure that the position of the guide allows the paper to move up and down freely Using the Pri...

Страница 87: ... rollers Note You can also insert single sheets using the front paper slot or the slot between the paper guide and stacker The cut sheet feeder automatically loads paper when you send print data to the printer as long as the PAUSE light is not lit You can also load paper from the cut sheet feeder by pressing the LOAD EJECT button 4 8 Using the Printer Options ...

Страница 88: ...uble bin cut sheet feeder Follow these steps 1 Remove the gear cover from the back of the high capacity cut sheet feeder and store it in a safe place 2 Hold the single bin cut sheet feeder in both hands Fit the notches in the single bin cut sheet feeder over the mounting posts on the rear of the high capacity cut sheet feeder Using the Printer Options 4 9 ...

Страница 89: ... in this chapter You can now use either cut sheet feeder to load paper Note You can also insert single sheets using the front paper slot The high capacity cut sheet feeder becomes BIN 1 and the single bin cut sheet feeder becomes BIN 2 Select the bin number by pressing the BIN SELECT button The indicator light of the selected bin comes on You can also specify the bin number by using software comma...

Страница 90: ... feeding system without removing either the feeder or the continuous paper supply Switching to continuous paper 1 If a single sheet is in the paper path press the LOAD EJECT button to eject it 2 Place the paper release lever in the front or rear push tractor position 3 Open the paper path guide to eject the continuous paper forward Using the Printer Options 4 11 ...

Страница 91: ... come off their backing and jam the printer See the instructions below 4 Place the paper release lever in the single sheet position If you are printing labels follow these instructions to remove to the label supply and switch to the cut sheet feeder 1 Press the LF FF button until the last printed label is at the point where you can tear it off easily 2 Always remove labels by tearing off the fresh...

Страница 92: ...abels Use of two tractor units at once is also recommended to print the highest quality graphics Also if you install the tractor units in the front and rear push tractor positions you can load two types of continuous paper at the same time and switch between them by moving the paper release lever The tractor positions and paper paths Below are the various ways of feeding continuous paper with two ...

Страница 93: ... feed one page of paper CAUTION Use the knob on the left side of the printer only to clear paper jams when the printer is off Otherwise you may damage the printer or lose the top of form position 4 5 6 Release the sprocket lock levers of the pull tractor and adjust the sprocket units to match the width of the paper Be sure that the sprocket units on both the tractors are aligned so that the paper ...

Страница 94: ...e pull tractor position and use the micro feed feature to advance the paper until slack is removed Then place the paper release lever back in its original position 8 9 See that the paper is not crooked or wrinkled and lock the sprocket units in place Reinstall the printer cover and the paper guide Using the Printer Options 4 15 ...

Страница 95: ...r I Model number I Name I If you are unsure whether you need an optional interface or would like to know more about interfaces contact your dealer Note These interfaces are not available in some countries Installing an interface card 1 Make sure the printer is turned off Unplug the printer s power cable and disconnect the interface cable 4 16 Using the Printer Options ...

Страница 96: ...ly until the connector at the rear of the interface card fits into the printer s internal socket 4 Replace the cover and secure the screws to complete installation Note If the original screws do not fit use the screws provided in the interface package To remove the interface card first unplug the power cord then perform the reverse of the steps above Using the Printer Options 4 17 ...

Страница 97: ...ch as word structure or communications protocol see the manual supplied with your C823051 optional interface Baud rate selection You can select from the following baud rates 150 300 600 1200 2400 4800 9600 and 19 200 bps bits per second When you set the baud rate see the baud rate selection table in the C823051 interface manual Handshake timing When the vacant area for data in the input buffer dro...

Страница 98: ...Chapter 5 Maintenance and Transportation Cleaning the Printer 5 2 Replacing the Ribbon Cartridge 5 3 Transporting the Printer 5 4 Maintenance and Transportation 5 1 ...

Страница 99: ... dampened with a mild detergent Keep the printer cover in place to prevent water from getting inside the printer WARNING Be careful not to get water on the printer mechanism or electronic components 0 t0 CAUTION l Never use alcohols or thinners to clean the printer these chemicals can damage the components as well as the case l Do not use a hard or abrasive brush l Do not spray the inside of the p...

Страница 100: ...r Standard fabric Film LQ 870 7753 7768 LQ 1170 7754 7770 To replace the ribbon cartridge follow the steps described in Installing the ribbon cartridge in Chapter 1 Note l Use the optional film ribbon when you need especially high quality printing For everyday operations use the standard ribbon l Do not use ribbons designed for nine pin printers Maintenance and Transportation 5 3 ...

Страница 101: ...utlet then disconnect the interface cable from the printer 4 Remove the ribbon cartridge 5 If you have removed the tractor unit replace it now according to the instructions in Chapter 2 6 If your printer had a protective screw replace it now to protect the printer during shipment See Chapter 1 for instructions 7 Repack the printer ribbon cartridge paper guide and power cord in the original packing...

Страница 102: ...Chapter 6 Troubleshooting Problems and Solutions 6 2 H Power Supply 6 3 Printing 6 4 Paper Handling 6 8 Options 6 10 Troubleshooting 6 1 ...

Страница 103: ... 6 5 _ Dots are missing in the printed characters or graphics See 6 5 l Printed characters are not what you expected See6 5 _ l The print position is not what you expected See 6 6 Paper handling l Single sheets do not feed properly See 6 8 l Continuous paper does not feed properly See 6 9 Options l When you use the cut sheet feeder the paper does not feed properly See 6 10 l When you use two tract...

Страница 104: ... the power cable is plugged into the electrical outlet properly If the electrical outlet is controlled by an outside switch or automatic timer use a different outlet Plug another electrical device into the outlet to determine whether the outlet is operating properly Troubleshooting 6 3 ...

Страница 105: ...lel cable The PAPER OUT light is on Load paper in the printer The printer sounds like it is printing but nothing is printed The ribbon cartridge may not be installed properly See the section on ribbon installation in Chapter 1 The ribbon may be worn out Replace the ribbon cartridge The paper thickness setting may be incorrect See page 2 25 The printer makes a strange noise the beeper sounds severa...

Страница 106: ... the ribbon cartridge Check that the paper thickness lever is set correctly for the paper you are using Dots are missing in the printed characters or graphics l A line of dots is missing in the printout The print head is damaged Stop printing and have your dealer or a qualified service person to replace the print head l Dots are missing in random positions There is either slack in the ribbon or th...

Страница 107: ... the page Adjust the top margin set by your application software Use Micro feed to adjust the print position l All the text is printed on the same line Set DIP switch 2 4 on so that the printer automatically adds a line feed code to each carriage return a The text is printed with an extra blank line in between Two line feed signals are being sent Set DIP switch 2 4 off l The page length does not m...

Страница 108: ...or the bottom part of one page is printed at the top of the next page Be sure to choose the correct printer when you choose a printer from your application program s menu See Chapter 1 Use your application software to reduce or eliminate the top margin and to reduce the page length If possible specify single sheet paper with your application software If the printer still does not print correctly t...

Страница 109: ...oo far to the right Align the left edge guide with the arrow mark on the paper guide l When you insert the paper the platen rotates but paper does not feed Reinsert the paper more firmly l Printing starts too low on the page or the bottom part of one page is printed at the top of the next page Be sure to choose the correct printer when you choose a printer from your application program s menu See ...

Страница 110: ...Only use paper that is within the specified range Continuous paper does not feed properly l When you send data the platen does not turn and the push tractor does not feed the paper The PAUSE light is on Press the PAUSE button l The paper does not feed although the platen rotates Check that the paper release lever is set to the correct position l The paper feed is crooked or the paper jams Make sur...

Страница 111: ...Check that the paper thickness lever is set correctly for the paper you are using See page 2 25 Check that the paper thickness is within the specified range See page 7 6 l The paper does not eject properly The page is too long Tear off the paper and remove it from the printer Only use paper that is within the specified range 6 10 Troubleshooting ...

Страница 112: ... You may have loaded too many sheets in the cut sheet feeder s bin There may be only one sheet left in the bin Add more paper l Two or more sheets feed at the same time You may have loaded too many sheets in the cut sheet feeder s bin You may have forgotten to fan the stack of paper before loading it into the bin Remove the paper and fan it l The paper feed is crooked The paper may be old or creas...

Страница 113: ...l interface the printer does not operate properly l The printer does not print or the printout is not what you expected You may be trying to use an interface or interface cable with the wrong specifications Check the specifications to make sure you can use the interface with this printer The computer and printer interface settings may not match Make sure the settings on the computer and printer ma...

Страница 114: ... 2 Paper 7 4 Mechanical 7 7 Electrical 7 8 Environmental 7 9 Interface Specifications 7 10 Specifications and pin assignments 7 10 Interface timing 7 13 Optional Specifications 7 14 Cut sheet feeder 7 14 Initialization 7 16 Default settings 7 16 Technical Specifications 7 1 ...

Страница 115: ...directional logic seeking for text Unidirectional for graphics Bidirectional for graphics can be selected with DIP switch 1 5 or the proper software command Line spacing 1 6 inch 1 8 inch or programmable in increments of 1 360 inch Paper feed speed Friction 59 0 ms line at 1 6 inch line spacing Tractor 64 1 ms line at 1 6 inch line spacing Continuous feed 3 6 inches per second Buffer 8KB or 0KB DI...

Страница 116: ... 0 0 0 0 Epson Sans Serif 0 0 0 0 I Epson Prestige I I 0 I 0 I I Epson Script Epson Script C Epson Orator 0 0 0 0 I Epson Orator S I I 0 I I I 1 OCR B I 0 I You can also select other font pitch combinations using ESC P 2 commands See the command summary in chapter 8 for details Scalable fonts 1 Font min pt max pt increments 1 Epson Roman I 8 1 32 I 2Pt I I Epson Sans Serif I 8 I 32 I 2rY I Charact...

Страница 117: ...nches 1 max 364 mm 14 3 inches I Continuous paper I Width Envelope 101 to 254 mm 4 to 10 inch 101 to 406 mm 4 to 16 inch Width X length 166 X 92 mm 6 5 X 3 265 inch No 6 240 X 104 mm 9 5 X 4 125 inch No IO I Labels I I Width X length 1 min 63 5 X 23 8 mm 2 l 2 X 16 inches Printable area Single sheets 8 5 mm 10 33 7 or morr Printable area 13 5 mm 0 53 7 or more 3 0 mm 0 12 7 or more 6 mm lO 24 or m...

Страница 118: ...e area I I I M See the table below LQ 870 LQ 1170 Minimum left and right Paper width Paper width margin 101 to 241 mm 101 to 377 8 mm 13 mm 0 51 inch 4 to 9 5 inches 4 to 14 575 inches 381 to 406 mm 15 mm 0 59 inch 15 to 16 inches 254 mm 10 inches 26 mm 1 02 inches Technical Specifications 7 5 ...

Страница 119: ...tion 14 to 24 lb 52 3 to90 g m front insertion 17 to 24 lb 64 to 90 g m2 Continuous paper 14 to 22 lb 52 3 to82 g m2 Multi part forms 12 to 15 lb X 4 40 to 58 g m2 X 4 Envelopes 12 to 24 lb 45 to 91 g m2 Single sheets and continuous paper plain paper carbonless multi part forms Envelopes Number of copies bond paper plain paper air mail Carbonless multi part forms Single sheet front insertion or co...

Страница 120: ... expectancy In LQ at 48 dots character 0 2 million characters 7768 0 3 million characters 7770 MCBF For all components excluding print head 5 million lines MTBF LQ 870 4000 power on hours 25 duty LQ 1170 6000 power on hours 25 duty Print head life 200 million strokes wire for fabric ribbon 100 million strokes wire for film ribbon Dimensions and weight LQ 870 LQ 1170 Height 171 mm 6 8 in 171 mm 6 8...

Страница 121: ...range Insulation resistance Dielectric strength between AC line and chassis AC 120 V AC 103 5 to 132 V 2 0 A during self test printing in draft mode at 10 cpi LQ 870 approx 58 W LQ 1170 approx 58 W 50 to 60 Hz 49 5 to 60 5 Hz 10 Mohms minimum at DC 500 V between AC power line and chassis AC 1 2 kV rms 1 second 7 8 Technical Specifications ...

Страница 122: ...cations Environmental Temperature Humidity Operation 5 to 35 C 41 to 95 F Storage 30 to 60 C 22 to 140 F Operation 10 to 80 RH without condensation Storage 5 to 85 RH without condensation Technical Specifications 7 9 ...

Страница 123: ... shown in the following table Signal Return Pin Pin Signal Direction Description 1 19 STROBE in STROBE pulse to read data Pulse width must be more than 0 5 microseconds at the receiving terminal 2 20 DATA 1 IN These signals information of represent 3 21 DATA 2 IN the 1st to 8th bits of parallel data 4 22 DATA 3 IN respectively Each signal is at HIGH level 5 23 DATA 4 IN when data is logical 1 and ...

Страница 124: ...per is FEED automatically fed 1 line after printing R T The signal level can be fixed to this by setting DIP switch 2 4 to ON 15 NC Not used 16 GND Logic ground level 17 C H A S S I S Printer s chassis ground which is GND isolated from the logic ground 18 NC Not used 19 30 GND Twisted pair return signal ground level 31 16 INIT IN When this level becomes LOW the printer controller is reset to its p...

Страница 125: ...wisted pair cable for each signal and to complete the connection on the return side l All interface conditions are based on TTL level Both the rise and fall times of each signal must be less than 0 2 microseconds l Data transfer must be carried out by observing the ACKNLG or BUSY signal Data transfer to this printer can be carried out only after receipt of the ACKNLG signal or when the level of th...

Страница 126: ...Interface Specifications Interface timing The figure below shows the timing for the parallel interface BUSY AKm D A TA STROBE Technical Specifications 7 13 ...

Страница 127: ...the printer Bin capacity Single sheets C806371 and C806391 Up to 50 sheets of 22 lb 82 g m2 paper C806381 and C806401 Up to 150 sheets of 22 lb 82 g m paper Envelopes C806381 and C806401 Up to 25 plain and bond type Up to 30 air mail MCBF 100 000 cycles 7 14 Technical Specifications ...

Страница 128: ...in 18 to 24 lb 64 to 91 g m2 Envelopes N A N A 165 to 241 mm 6 54 to 9 49 in 165 to 241 mm 6 54 to 9 49 in 92 to 104 mm 3 62 to 4 09 in 0 25 to 0 50 mm 0 0098 to 0 0197 in 12 to 24 lb 45 to 91 g m2 Temperature 18 to 22 C 64 to 72 F Humidity 40 to 60 RH Operation 5 to 35 C 41 to 95 F Storage 30 to 60 C 22 to 140 F Operation 15 to 80 RH Storage 5 to 85 RH Note 24 lb paper printing is available only ...

Страница 129: ...l initialization do not initialize the printer mechanism or clear the user defined character set Also software initialization does not clear the data buffer of all text Default settings The table below shows the default conditions that take effect when the printer is initialized Item Default condition Top of form position Current paper position 1 Left and right margins 1 Cancelled I Line spacing V...

Страница 130: ...ummary 8 2 Commands Arranged by Topic 8 3 General operation 8 3 Paper feeding 8 3 Page format 8 4 Print position motion 8 5 Font selection 8 6 Font enhancement 8 7 Spacing 8 9 Character handling 8 9 Bit image 8 11 Graphics 8 12 Command Summary 8 1 ...

Страница 131: ... If a command has parameters they are explained Parameters are indicated by lowercase italicized letters usually n The examples below show how the parameters are indicated ESC is a command with no parameters ESC U l O is a command that uses 1 to turn the feature on and 0 to turn it off ESC nl 22 is a command with two parameters ESC D nn is a command with a variable number of parameters For compreh...

Страница 132: ...t a sheet For the ESC EM command the variables are the characters 1 49 decimal or 31 hex and 2 50 decimal or 32 hex Do not use 1 decimal 01 hex 2 decimal or 02 hex Paper feeding ASCII Dec Hex Description CR 13 OD FF 12 oc LF 10 OA ESC 0 48 30 ESC 2 50 32 ESC 3 n 51 33 ESC n 43 2B Carriage Return Form Feed Line Feed Select l B inch Line Spacing Select l 6 inch Line Spacing Set n 180 inch Line Spaci...

Страница 133: ...n defined units n nl I n2 X 256 n Bottom margin in defined units Set Page Length in Defined Units ESC C 2 0 nl n2 n nl i n2 X 256 n Number of defined units Set Page Length in Lines n number of lines 1 127 Set Page Length in Inches n number of inches 1 22 Set Bottom Margin for Continuous Paper n number of lines 1 127 Cancel Top Bottom Margin for Continuous Paper Set Left Margin n left margin column...

Страница 134: ...l 120 inch in draft and l 180 inch in LQ for this command ESC V nn 40 86 28 56 Set Absolute Vertical Print Position ESC V 2 0 nl n2 n nl n2 X 256 n Specifies print position from top margin in defined units ESC v nn 40 118 28 76 Set Relative Vertical Print Position ESC v20nln2 n nl t n2 X 256 n Moves current print position in defined units ESC D nn 68 44 HT 9 09 ESC B nn 66 42 VT ESC J n 11 OB 74 4...

Страница 135: ... 0 1 18 21 24 30 36 42 48 60 or 72 n nl k n2 X 256 n Set point size in 0 5 points Total points nl n2 X 256 X 0 5 n 0 No change in point n 0 16 20 21 24 28 32 36 40 42 44 48 52 56 60 or 64 for Roman and Sans serif n 0 21 42 for other typeface Cancel ESC X with ESC I M g p or ESC I 80 50 Select 10 5 point 10 cpi ESC M 77 4D Select 10 5 point 12 cpi ESC g 103 67 Select 10 5 Point 15 cpi ESC p l o 112...

Страница 136: ... of the typestyles you want to combine from the list below n 0 10 cpi 1 12 cpi 2 proportional 4 condensed 8 bold 16 double strike 32 double width 64 italic 128 underline Font enhancement ASCII Dec Hex Description SI 15 OF Select Condensed Printing DC2 18 12 Cancel Condensed Printing SO 14 OE Select Double Width Printing one line ESCW 1 0 87 57 Turn Double Width Printing On Off DC4 20 14 Cancel Dou...

Страница 137: ...ct Superscript Printing 83 53 Select Subscript Printing 84 54 Cancel Superscript Subscript Printing 40 45 28 2D Select Line Score ESC 3 0 1 nl n2 nl 1 Underline nl 2 Strikethrough nl 3 Overscore n2 0 Cancel score line selected by nl n2 1 Single continuous line n2 2 Double continuous line n2 5 Single broken line n2 6 Double broken line Turn Underline On Off Select Character Style n 0 Normal style 1...

Страница 138: ...inch LQ and proportional ESC U 1 0 n Define positioning unit as n 3600 inch n 10 20 30 40 50 60 n 10 default Set Horizontal Motion Index HMI Change Pitch in n 360 inch units Total units nl n2 X 256 Description ESC t nn 40 116 28 74 Assign Character Table ESC t 3 0 dl d2 d3 Assign Character Table set by d2 and d3 to dl dl 0 1 2 3 0 l 2 or 3 d2 d3 Character Table 0 0 Italic 1 0 PC 437 USA 3 0 PC 850...

Страница 139: ...y 64 Legal 7 Spain ESC nn 38 26 Define User Defined Character ESC 0 nl n2 d0 dl d2 data nl first character number n2 last character number d0 left space of character Al Body width of character A2 right space of character data 3 bytes required for each column super subscripts require only 2 bytes per column _ ESC 0 n 0 58 3A Copy ROM to RAM n 0 1 2 3 4 5 or 9 n Typeface ESC n 37 25 Select User Defi...

Страница 140: ...6 Print Data as Characters ESC a nl n2 data n nl k n2 x 256 n amount of data data n byte data for printing as character Description ESC nn 42 2A Select Bit Image ESC m nl n2 data n nl n2 x 256 n Total columns Total data nl I n2 X 256 X t 33 120 180 24 enable 3 38 90 180 24 enable 3 39 180 180 24 enable 3 40 360 180 24 disable 3 Command Summary 8 11 ...

Страница 141: ... nn 46 2E Print Raster Graphics ESC c v h m nl n2 data c 0 Full graphics mode 1 Compressed mode v 10 20 Dot density for vertical in 3600 v DPI h 10 20 Dot density for horizontal in 3600 h DPI m Number of vertical dots I m 2 4 n Number of horizontal dots Total dots nl I n2 X 256 The following combination is not allowed v 10 and h 20 8 12 Command Summary ...

Страница 142: ...Appendix Character Tables A 2 Italic character table A 2 Graphics character tables A 3 International Character Sets A 6 Appendix A 1 ...

Страница 143: ...whether hex codes 80 to 9F are characters ESC 6 or control codes ESC 7 Italic character table CDDE0123456769ABCDEF 0 NUL SPO P ptU sPO4 P p 1 IAQaq IAQaq 2 DC2 2BRbr DC2 ZBRbr 3 3CScs 3CScs 4 oCS 4 D T d t DC4 4 D T d t 5 5EUeu SEUeu 6 6FVfv 6FVfv 7 7GWgw 7GWgw 8 8HXhx BHXhx 9 HTEM 9IYiyKTEM 9IYiy A LF JZjzLF JZjz B VTESC l K k VTESC K k C FF D CR L L l FF L l M m CR Mlm E SO N n SO N n F SI TO 0 ...

Страница 144: ...fiaiglfp 2 DC2 2BRbr 16 r 1 3 3CScsd6ti 4 DC4 4DTdtgid 5 SEUeu bfi PC 850 Multilingual 0 1 2 3 4 5 6 7 8 9 A B C D E F I 0123456789ABCDEF WL SP 0 P l pCfi LB j 1 A Q a q ii i iii glDg DC2 2BRbre16 3CScs 86 DC4 4DTdt id SEUeuh fiA lo 6FVfvbQaffgfpt 7GWgwqtiQAxfp MJm i0iQ iP2 S O N n Ax Yj i m SI O 0 AfB n Appendix A 3 ...

Страница 145: ...3 3CScsb6ti 4 DC4 4DTdt e A PC 863 Canada French CODE0123456789ABCDEF 0 NUL i_ SPO P p C E sis Ly a L 1 lAQaq i sl pf 2 DC2 2BRbr6 6 3 3CScs ii 4 DC4 4DTdtAli Lc 5 SEUeuhf t PO J 6 6FVfvab ilk p 7 7GWgwqti I r R 8 BHXhx nfTk a 9 f 8 l A B VlESC K kfx qT C FF L l zf d 1 D CR I M m 03U E S O N n AoaA F SI O 0 f A 4 Appendix ...

Страница 146: ... 1 3 3CScsb6ti 4 DC4 4DTdtaifi 5 SEUeuhbfi 6 6 FV 7 7GWgw hQ Characters available with ESC 0 1 2 3 4 5 6 7 8 9 A B C D E F l o 1 7 1 To print the characters in the table Q 5 0 I 4 on he left you must first send the ESC a cdmmand This command is valid only on printers featuring Epson ESC P2 Q a P R A 0 v cl Appendix A 5 ...

Страница 147: ...FF ON OFF 6 Italy o 6 A h h b 6 i OFF OFF ON 7 Spain R i fi i A fi N OFF OFF OFF DIP switch 1 4 must be off for you to select the above international character sets by DIP switch The following eight additional sets are available only when you use ESC R software command Country 8 Japan 9 Norway 10 Denmark II 11 Spain II 12 Latin America 13 Korea 64 Legal ASCII code hex 23 24 40 56 5C 5D 5E 60 78 7C...

Страница 148: ... is selected using a DIP switch each carriage return code CR is automatically followed by a line feed LF code bidirectional printing Printing in which the print head prints from left to right only on every other line On the other lines it prints from right to left This increases the speed of printing because the head prints in both directions bit A binary digit 0 or 1 which is the smallest unit of...

Страница 149: ... holes on each side is perforated between pages and is supplied in a folded stack Also called fanfold paper control code Special codes used to control printer functions such as performing a carriage return or line feed cpi See characters per inch cut sheet feeder CSF An optional detachable device that automatically feeds single sheets of paper into the printer data dump A troubleshooting feature t...

Страница 150: ...producing bolder characters Each character is printed twice double width printing Printing in which each character is twice as wide as normal draft One of three print qualities available on your printer Draft uses a minimum number of dots per character for high speed printing See also high speed draft and Letter Quality emphasized printing A way of producing darker characters Each character is pri...

Страница 151: ...ing See also draft and Letter Quality initialize To establish the initial default status of the printer by turning on the printer or sending an INIT signal _ interface The connection between the computer and the printer A parallel interface transmits data one character or code at a time and a serial interface transmits data one bit at a time italics A typestyle in which the characters slant This s...

Страница 152: ...character to character For example a capital W receives much more space than a lower case i The result looks more like a typeset book than a typewritten draft RAM Random Access Memory The portion of the printer s memory used as a buffer and for storing user defined characters All data stored in RAM is lost when the printer is turned off reset To return a printer to its defaults by sending a comman...

Страница 153: ...aper to when you press the TEAR OFF button or when the auto tear off mode is on This position can be adjusted using micro feed so that the paper s perforation meets the printer s tear off edge top of form The position on the paper that the printer recognizes as the first printable line The printer feeds the paper to this position when it loads the paper unidirectional printing Printing in one dire...

Страница 154: ...3 4 Buttons control panel 3 2 5 C Cable parallel interface 1 14 Cartridge see Ribbon cartridge Character fonts 3 19 21 pitch 3 22 symbol sets A 2 6 tables 3 9 A 2 6 Cleaning the printer 5 2 Commands see Printer commands Configuring software 1 15 Connecting printer to computer 1 14 parallel interface 1 14 power cord to printer 1 10 serial interface 4 16 17 optional interface card 4 16 17 Continuous...

Страница 155: ...able 3 19 20 Form length adjusting iii continuous paper 3 7 8 3 11 Form top of 3 13 15 Front push tractor 2 8 11 position 2 8 G Graphics character tables A 3 5 Graphics print direction 3 7 3 10 H Handshake timing 7 13 Hexadecimal numbers see Data dump High speed draft 3 11 Help where to get iv I Icons paper path 2 8 4 13 Initialization 7 16 Input buffer 3 4 3 7 3 11 7 2 Installing ribbon cartridge...

Страница 156: ...ng problems 6 8 10 envelopes 2 28 feed methods 2 2 3 jam problems 6 12 labels 2 27 loading 2 1 28 multi part forms 2 26 release lever 2 2 3 4 13 single sheets iii 2 4 7 specifications 7 4 6 thickness lever 2 24 26 Paper feed methods 2 2 3 Paper guides 1 9 Paper jams 6 8 12 Paper paths icons for 2 3 2 8 choosing 2 2 3 2 8 PAPER OUT light 3 2 Paper release lever 2 2 3 4 13 Paper thickness lever 2 24...

Страница 157: ...ftware configuring 1 15 Special paper 2 25 28 Specifications 7 1 16 Symbol sets 3 7 9 A 2 6 T TEAR OFF button control panel 3 4 3 17 light 3 2 Tear off 3 16 18 adjusting position 3 18 using 3 16 18 Technical specifications 7 1 16 Telephone number toll free iv Testing computer to printer 3 23 creating a test file iii data dump 3 23 printer 1 11 13 Top of form position 3 13 15 Tractor unit loading p...

Страница 158: ...U Unidirectional printing 3 7 3 10 7 2 Unpacking the printer 1 2 V Voltage 1 2 7 8 W Warnings cautions and notes Intro 3 Weight 7 7 Where to get help iv Index IN 5 ...

Страница 159: ...Epson America Inc 20770 Madrona Avenue Torrance CA 90503 Printed in Japan 92 01 50 ...

Отзывы: