32
GB
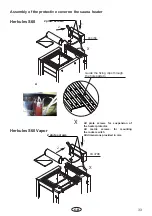
• Screw the water tank onto the rear wall
using the 2 4.2x 9.5 self-tapping screws
provided.
• Now install the fl oat valve into the tank.
Ensure that the fl oat makes a vertical
movement and does not contact the tank
wall.
• There is a 3/4" thread on the fl oat valve
output. From here you can now connect
your supply line individually to the fi xed
water connection.
Please observe:
A shut-off valve must be installed be-
tween the mains and the fi xed water con-
nection. If the fi xed water connection is not
used for a longer period of time, the shut-off
valve should be closed.
Observe: Maximum operating pres-
sure 6 bar.
Содержание Herkules S60
Страница 2: ...2 Deutsch 3 English 20 37...
Страница 41: ...41 RU DIN EN ISO 9001 2008 110 C 30 40 C 110 C 20 25 85 C 80 90 C 76 C...
Страница 42: ...42 RU 8 VDE 0100 49 DA 6 VDE 0100 703 2006 2 5 10...
Страница 43: ...43 RU DIN EN VDE 0100 T 703 40 170 C...
Страница 44: ...44 RU S Guard...
Страница 48: ...48 RU STB S 2 STB 5 2 3 3 4 STB 4 1 2 3 400 VDE 2...
Страница 50: ...50 RU E C 2 4 2x9 5 3 4 6...
Страница 51: ...51 RU 1 2 X 94 4708 X X 1 2 94 4708 A 2 2 Herkules S60 Herkules S60 Vapor...
Страница 52: ...52 RU I Herkules vapor 1 2 max...
Страница 53: ...53 RU 4 5 5 1 0 8 4 II Ill 10...
Страница 54: ...54 RU 100 10...
Страница 56: ...56 RU RMA RMA RMA 3 1 2 2 RMA...

