background image


CLM-194 

User Guide


EOPTIS SRL 

Via Alto Adige, 152 – 38121 Trento (TN) – ITALY  
Tel.: +39 0461 260 552 – Fax: +39 0461 260 617 
www.eoptis.com – [email protected] 

Page 23 of 29 

CLM-194 

Rev. 1.05 - 06/2014 

Copyright © 2013-2014 EOPTIS SRL 


All colours in a database are organised in groups. There will always be a “default group”, while other groups are user 
defined; the maximum allowed number of user defined groups is 15. Every newly acquired sample will be added to 
the default group. You can manage groups by right-clicking on a colour in the list and selecting: 


Add to group: to add the colour to an existing group or a new one (“New group…” option) 


 dit group name…: to change the name of the group that the colour belongs to 


Remove group: to remove the colour’s group from the database. All the colours belonging to this group will be 

moved to “default group”. 

 
The groups of the 

Measures

  list  are used  mainly to organise the  colours,  while  groups  in the 

References

 list  can be 

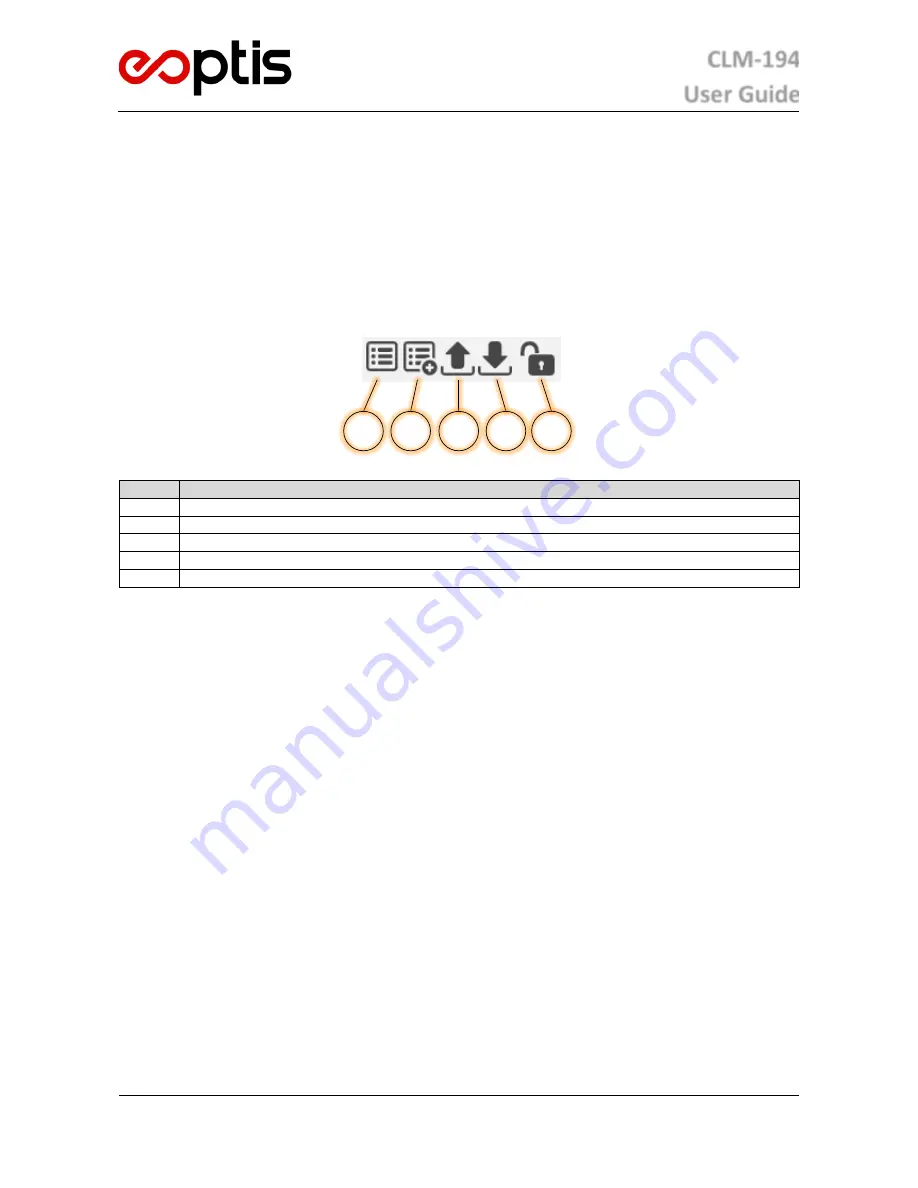
used to filter the results in Colour Difference Check and Colour Matching functions. The Database Control buttons can 
be used to manage the software’s current databases as well as previously stored databases. 


Database control buttons


Item 

Description 

① 

Create new database 

② 

Merge databases  

③ 

Load database  

④ 

Save database  

⑤ 

Lock/Unlock database  

 
The Create new database button ① removes all colors from the list so you can start with an empty database. 
The Merge databases button ② allows you to merge a previously saved database with the current database; all the 
colours and groups in the saved database will be added to the current database. 
With the Load database button ③ you can load a previously saved database, removing all current colours. 
The Save database button ④ allows ypu to save a database on the computer for future use. Files can be saved in .cdb 
(proprietary), in .pdf and .xml (Excel readable) format. The following flags can be adding to the database when saving: 


Is read only: the database becomes a read-only; no colours or colours grup can be added, removed or updated, 

as well as colour groups. This is a “soft” lock that can be removed with the Lock/Unlock database button 


Has hidden coordinates: the colours coordinates are hidden; only the colour name can be seen by the user. This 

flag can be used to release a proprietary database without sharing sensitive data about the colours. Note that 
this flag, once set, can’t be removed. 

The Lock/Unlock database button ⑤ allows you to toggle the read-only mode for the database. This can be used to 
prevent database modification during colour analysis.  
 

5.9.2


P

ROJECT 

M

ANAGEMENT


The “File” list in the software main menu is used to manage projects. The software treates each program session as a 
project  that  cointains  all  relevant  information  about  the 

Measures

  and 

References

  databases,  including  analysis 

parameters. With this feature you can save the current session and resume a previously saved one.  
When  loading  a  previously  saved  project  or  creating  a  new  project,  the  current  database  entries  and  analysis 
parameters are replaced by the saved data or deleted.  
 

5.9.3


M

ULTIPLE 

A

CQUISITION


Multiple Acquisition should always be performed in cases of uneven or structured surfaces. The advantage of Multiple 
Acquisition is that the visual  evaluation is supplemented by the calculation of a mean for the measured values.  The 
Mutiple Acquisition feature is enabled by specifying the number of measurements to be averaged and by thicking the 

3


2


1


4


5


Содержание CLM-194

Страница 1: ...CLM 194 Digital handheld colorimeter User Guide Rev 1 05 06 2014...

Страница 2: ...products can reasonably be expected to result in personal injury Eoptis customers using or selling these products for use in such applications do so at their own risk and agree to fully indemnify Eop...

Страница 3: ...sition 13 5 3 Colour Difference Check 14 5 3 1 How to Perform a Colour Difference Check Analysis 15 5 3 2 Using the Interface 15 5 4 Colour Matching 17 5 4 1 How to Perform a Colour Matching Analysis...

Страница 4: ...using a standard PC or laptop with a Microsoft Windows operating system After having performed the measurement of the sample of interest the application software allows you to evaluate the colour diff...

Страница 5: ...System parts Item Description 1 Measurement aperture with sealed glass window 2 Handle 3 Handle end with stand pad 4 Instrument label with serial number 5 Display panel 6 USB cable for power and data...

Страница 6: ...nised by host PC M Green steady ON system in Measure mode alternative to Reference mode R Green steady ON system in Reference mode alternative to Measure mode ACQ Red steady ON colour acquisition in p...

Страница 7: ...batch to batch comparison in production and quality acceptance assembly of multi component products using different materials printed materials and the graphic arts industry where a 45 c 0 is the con...

Страница 8: ...strument optically averages the colour on the area corresponding to the measurement spot For longer range non uniformities it is recommended to average several measurements taken at different position...

Страница 9: ...tions The file is not signed by Microsoft and the Operating System might prompt for approval to proceed It is necessary to grant the approval in order to successfully complete the installation The ins...

Страница 10: ...4 User Guide EOPTIS SRL Via Alto Adige 152 38121 Trento TN ITALY Tel 39 0461 260 552 Fax 39 0461 260 617 www eoptis com info eoptis com Page 10 of 29 CLM 194 Rev 1 05 06 2014 Copyright 2013 2014 EOPTI...

Страница 11: ...item for few seconds 5 1 MAIN CONTROLS This section describes the main controls of the user interface Main controls Item Description Item Description Main menu with toolbar Measure Reference control...

Страница 12: ...tion Each acquisition can be either addressed as a Measure or a Reference depending on its expected usage Measure and Reference data are indeed handled in different ways depending on the selected oper...

Страница 13: ...w the instructions in 7 1 5 Place the colorimeter s measurement aperture in perfect contact with the sample surface 6 Trigger the acquisition Hardware triggered acquisition Software triggered acquisit...

Страница 14: ...tive elements The result can be used for the quality control of a product to evaluate the colour aging of an object and for many other applications Colour Difference Check interface Item Description C...

Страница 15: ...ur display area or by acquiring a new Reference colour Manual mode allows the colour difference of the current Measure either that just acquired or selected from the Measure list to be evaluated with...

Страница 16: ...The Chroma and Lightness plots show the Measure coordinates plotted against the Reference coordinates set at the origin of axes Also the three Acceptance Thresholds are displayed as boundaries in thes...

Страница 17: ...select the colour that resembles the measured sample by simply checking a best candidate colour palette instead of looking up a large set of physical samples Colour Matching interface Item Description...

Страница 18: ...lour of the sample This is due to several factors such as the ambient light monitor calibration gamma settings which must be controlled and fine tuned in order for the colours to match The Colour Matc...

Страница 19: ...ples of the same set With this feature sorting and classification processes become much more reliable and accurate than visual inspection Colour Classification interface Item Description Colour Classi...

Страница 20: ...es list The selection can be made by dragging the colours from the References list to one of the five sections in the Reference colour display area These colours will set the classes to which the meas...

Страница 21: ...2014 Copyright 2013 2014 EOPTIS SRL 5 6 L A B CHART The L a b chart displays all the colours in the Measure list on a graphical representation of the CIELAB colour space This provides the user with vi...

Страница 22: ...rmation related to the selected analysis feature 5 8 USER CALIBRATION Each colorimeter is supplied with its own white reference standard necessary to perform the user calibration The standard is manuf...

Страница 23: ...load a previously saved database removing all current colours The Save database button allows ypu to save a database on the computer for future use Files can be saved in cdb proprietary in pdf and xml...

Страница 24: ...ptions are available and can be selected in any SI SO combination The selected combination is automatically saved for future software sessions when it will be restored and used as default settings Ill...

Страница 25: ...ement time 0 1 s with 5 s minimum recommended measurement interval Recommended warm up time 20 minutes Dimensions Approx 225 mm L x 84 mm H x 99 mm W excluding cable Weight Approx 710 g Interface USB...

Страница 26: ...is com info eoptis com Page 26 of 29 CLM 194 Rev 1 05 06 2014 Copyright 2013 2014 EOPTIS SRL Data view Colour Data see available scales above Colour Difference Data see colour differences indexes abov...

Страница 27: ...all drivers To check the Device Manager to confirm that installation was successful go to the Windows Start menu select Run and enter devmgmt msc You will find the LM 194 Colorimeter under the Ports C...

Страница 28: ...r from shipment date Should a unit fail during this period Eoptis will at its option repair or replace the damaged unit Repaired or replaced units will be covered for the remainder of the original equ...

Страница 29: ...description added Rev 0 11 09 2013 Advanced features added Rev 1 0 09 2013 Inital full release Rev 1 01 09 2013 Minor corrections Rev 1 02 12 2013 Setup procedure updated additional Illuminant and Ob...

Отзывы: