8
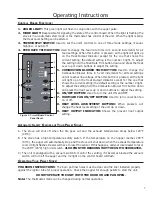
Figure 4: Thermostat Switch in
MANUAL position.
Figure 5: Thermostat Switch in
HIGH/LOW position.
ROOM AIR
FAN ON/OFF
ON/OFF
FEED RATE
TRIM
COMBUSTION
BLOWER TRIM
HEAT LEVEL
AUTO/OFF
HIGH/LOW
MANUAL
AUGER
C-11625
MODE
ROOM AIR
FAN ON/OFF
ON/OFF
FEED RATE
TRIM
COMBUSTION
BLOWER TRIM
HEAT LEVEL
AUTO/OFF
HIGH/LOW
MANUAL
AUGER
C-11625
MODE
1
2
3
4
5
6
8
7
9
Figure 6: Thermostat Switch in
ON/OFF position.
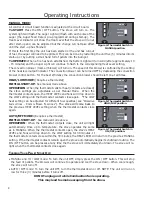
HIGH/LOW MODE: (Requires a thermostat)
INITIAL START-UP: See manual mode above.
OPERATION: When the thermostat calls for heat (contacts are closed)
the stove settings are adjustable as per Manual Mode. When the
thermostat contacts open, the HEAT LEVEL and Fans will drop down to
the LOW setting until the thermostat contacts close again. *The LOW
heat setting can be adjusted for different fuel qualities (see “
O
perating
i
nstructiOns
- c
OntrOl
B
Oard
F
unctiOns
”). The stove will come back to
the previous HEAT LEVEL setting when the thermostat contacts close
again.
AUTO/OFF MODE: (Requires a thermostat)
INITIAL START-UP: See manual mode above.
OPERATION: When the thermostat contacts close, the unit will light
automatically. Once up to temperature, the stove operates the same
as in MANUAL. When the thermostat contacts open, the stove’s HEAT
LEVEL and Fans will drop down to the LOW setting for 30 minutes. If
ROOM AIR
FAN ON/OFF
ON/OFF
FEED RATE
TRIM
COMBUSTION
BLOWER TRIM
HEAT LEVEL
AUTO/OFF
HIGH/LOW
MANUAL
AUGER
C-11625
MODE
ROOM AIR
FAN ON/OFF
ON/OFF
FEED RATE
TRIM
COMBUSTION
BLOWER TRIM
HEAT LEVEL
AUTO/OFF
HIGH/LOW
MANUAL
AUGER
C-11625
MODE
1
2
3
4
5
6
8
7
9
ROOM AIR
FAN ON/OFF
ON/OFF
FEED RATE
TRIM
COMBUSTION
BLOWER TRIM
HEAT LEVEL
AUTO/OFF
HIGH/LOW
MANUAL
AUGER
C-11625
MODE
ROOM AIR
FAN ON/OFF
ON/OFF
FEED RATE
TRIM
COMBUSTION
BLOWER TRIM
HEAT LEVEL
AUTO/OFF
HIGH/LOW
MANUAL
AUGER
C-11625
MODE
1
2
3
4
5
6
8
7
9
the thermostat contacts close within the 30 minutes, the HEAT LEVEL will return to the previous MANUAL
setting. If the thermostat contacts remain open the stove automatically begins its shutdown routine. The
ON / OFF button can be presses at any time the the stove will immediately shut down. The stove will re-
light when the thermostat contacts close again.
t
uRning
y
ouR
P
eLLet
S
tove
o
ff
:
•
MANUAL and HI / LOW mode: To turn the unit OFF, simply press the ON / OFF button. This will stop
the feed of pellets. The blowers will continue to operate and cool the stove down. When cool enough,
the stove will turn off.
•
AUTO / OFF mode: To turn the unit OFF, turn the thermostat down or off. NOTE: The unit will run on
low for three (3) minutes before it turns off.
DO NOT unplug unit while Combustion fan is operating.
This may lead to smoke escaping from the stove.
MANUAL MODE:
All control of circuit board function is adjusted at the circuit board.
To START: Press the ON / OFF button. The stove will turn on. The
system light will flash. The Auger Light will flash with each pulse of the
auger (the Auger Feed Rate is pre-programmed during start-up). The
Heat Level Indicator will show the Heat Level that the stove will run at
after start-up and can be adjusted but the change will not take affect
until the start -up has finished.
If this is the first time the unit has been started or the unit has run out
of fuel, the auger will need to be primed. This can be done by restarting the unit five (5) minutes into its
start-up or by putting a small hand full of pellets into the burnpot.
To OPERATE: When a fire has been established, the System Light will turn solid (after approximately 10
- 15 minutes) and the Auger Light will continue to flash to the corresponding Heat Level setting.
The convection blower (room air blower) will turn on. The speed of this blower is controlled by the setting
of the heat level output indicator. The convection blower can be turned OFF by depressing the convection
blower control button. For the best efficiency the convection blower should be left on at all times.
Operating Instructions
Содержание MERIDIAN-A
Страница 13: ...13...


