background image

19

4  WARTUNG

4.1 

Vorschriften (Häufigkeit)

Reinigen Sie Innen- wie Außenseiten des Geräts regelmäßig. Damit stellen Sie einen einwandfreien Betrieb auf lange Zeit sicher.

4.2 

Außenreinigung

Mit der täglichen Außenreinigung und Pflege der Türinnenseite werten Sie nicht nur die Optik des Geräts auf, sondern garantieren 
auch einen langfristig perfekten Erhaltungszustand.

WARNUNG


Verwenden Sie zur Reinigung der Außenflächen ausschließlich ein mit lauwarmem Wasser und 

mildem Putzmittel angefeuchtetes Tuch. Wischen Sie nach und trocknen Sie gründlich mit einem 

weichen Tuch.


Verwenden Sie für das Türglas einen Fensterreiniger oder eine Lösung aus Wasser und mildem 

Reinigungsmittel.

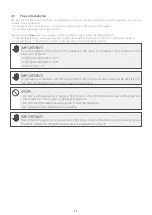
VERBOTEN


Der Einsatz von Scheuerpulver, Lösemittel oder Reiniger, die die Oberflächen des Geräts 

beschädigen können


Der Kontakt der kalten Glasteilen mit heißem Wasser. Das Glas könnte sich infolge der hohen 

Temperaturdifferenz verbiegen oder sogar springen.

4.3 

Reinigung von Innenseite und empfindlichen Teile

VORSICHT STROMGEFAHR

Schalten Sie das Gerät vor jeder Reinigung im Temperierschrank unbedingt aus, siehe Abschnitt "

Vorübergehende Abschaltung

" auf Seite 18.

VORSICHT STROMGEFAHR

Verwenden Sie kein Wasser für elektrische Teile und Bedienfeld.

VERBOTEN


Der Einsatz von Scheuerpulver, Lösemittel oder Reiniger, die die Oberflächen des Geräts 

beschädigen können


Der Kontakt der kalten Glasteilen mit heißem Wasser. Das Glas könnte sich infolge der hohen 

Temperaturdifferenz verbiegen oder sogar springen.

Entscheiden Sie die Häufigkeit der Innenreinigung nach dem jeweiligen Verschmutzungsgrad. Sie sollten aber in jedem Fall 
den Innenraum des Temperierschranks und die nachstehen beschriebenen empfindlichen Teile 

mindestens einmal im Monat


reinigen.

19 

Содержание i.Am H1200 ST 1P 1V

Страница 1: ...Bedienungsanweisung Weinlagerschrank WINE BLACK Art 436600100 2019 11 ...

Страница 2: ... Am H2000 ST 1P 1V FIT B1S1 i Am H1200 VT 1P 1V S1V1 i Am H1600 VT 1P 1V M1V1 i Am H2000 VT 1P 1V L1V1 i Am H2000 VT 1P 1V FIT B1V1 i Am H2000 VT 1T 1V TROPENFESTE VERSION L1W1 i Am H2000 VT 1T 1V TROPENFESTE VERSION FIT B1W1 i Am H2000 VT 1P 2V DUAL VENT L2V1 i Am H2000 VT 1T 2V DUAL VENT FIT B2V1 BEDEUTUNG DER IN DER ANWEISUNG VERWENDETEN SYMBOLE l HINWEIS Kennzeichnet spezielle Informationen m ...

Страница 3: ...4 1 2 Verbote 5 1 3 Beschreibung des Geräts 6 1 4 Identifizierung 6 1 5 Aufbau 7 1 6 Sicherheitsvorrichtungen 8 1 7 Technische Eigenschaften 8 1 8 Bedienfeld 9 2 Installation 10 2 1 Produktempfang 10 2 2 Abmessungen und Gewicht 10 2 3 Installationsraum 11 2 4 Installation 13 2 4 1 Transport 13 2 4 2 Aufstellung und Nivellierung 14 3 Bedienung 15 3 1 Grundlagen 15 3 1 1 Prüfungen 15 3 1 2 Anschluss...

Страница 4: ...sentation potentiell gefährlicher Lebensmittel Das Gerät ist nicht für die Installation und Verwendung in Witterungseinflüssen ausgesetzten Standorten konzipiert Nehmen Sie bei Klärungsbedarf im Zusammenhang mit den Bedingungen und Funktionen des Geräts und seiner Bestandteile bitte mit Ihrem Händler Kontakt auf TeilenSiedemProduktzuliefereretwaigenachInbetriebnahmedesGerätsfestgestellteStörungen ...

Страница 5: ...angs Die Berührung des Geräts barfuß oder mit nassen bzw feuchten Körperteilen Sollten Sie bei Berührung mit den Metallteilen des Geräts das Entweichen von Strom feststellen schalten Sie den Schalter aus ziehen Sie den Stecker aus der Steckdose heraus und verständigen Sie den Fachhändler Die Verwendung des Geräts durch Kinder und Personen mit verminderten Fähigkeiten oder mit unzureichender Erfahr...

Страница 6: ... Stahl mit Polycarbonat Flaschenhaltern sind in der Höhe verstellbar Zur Wahl stehen Modelle mit statischer oder belüfteter Kühlung Mit der statisch belüfteten Version lassen sich in einem Gerät bis zu vier verschiedene Temperaturzonen erzielen So können gleichzeitig Rot und Weißweine bei idealer Temperatur gelagert werden Bei der Version mit belüfteter Kühlung kann der gewünschte Sollwert für ein...

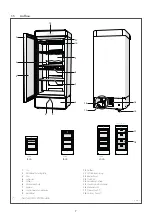
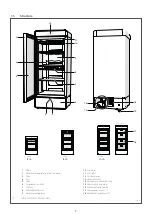
Страница 7: ...Tür 2 Roll Bond Schutzplatte 3 Glas 4 Schlüssel 5 Schloss 6 Ventilatorschutz 7 Regale 8 Ausziehbare Schubladen 9 Roll Bond 10 Aufbau 11 LED Beleuchtung 12 Bedienfeld 13 Stellfüße 14 Kondensatschale 15 Stecker und Netzkabel 16 Motorschutz 17 Oberes Fach 18 Unteres Fach Nur für DUAL VENT Modelle Abb 2 7 ...

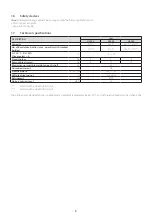
Страница 8: ...te Flaschen 170 272 358 179 UT 30 C RF 55 Klimaklasse 4 C 2 20 Feste Regale Anz 2 3 4 Ausziehbare Schubladen Anz 6 10 13 Höchstbelastung jedes Einlegebodens kg 80 Stromaufnahme A 1 6 Elektrische Kenndaten V Ph Hz 230 1 50 Elektrische LED Leistung W 1 2 LEDs Kältemittel Hfc R290 Geräuschpegel dB A 38 Modelle mit Tiefe 760mm Modelle mit Tiefe 560mm Die oben angegebenen Leistungen wurden bei einer Ra...

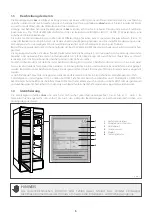
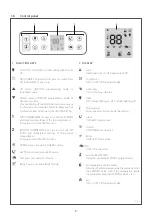
Страница 9: ...aktiviert beim Drücken den Modus NORMAL J SILENT aktiviert beim Drücken den Modus SILENT N ECO aktiviert beim Drücken den Modus ECO O BOOST aktiviert beim Drücken den Modus BOOST 2 DISPLAY a Schloss ON Tastatursperre aktiviert OFF Tastatursperre deaktiviert 0 Verdichter ON ein OFF aus Blinkend Warten auf Einschaltung b Abtauung ON aktiviert Blinkend Warten I Beleuchtung ON Temperierschrank Beleuch...

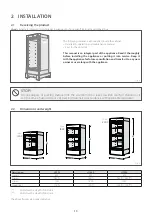
Страница 10: ... künftigen Bedarf bzw zur Übergabe an einen neuen Besitzer oder Benutzer aufbewahrt werden Abb 4 d VERBOTEN Die Verpackungsstoffe stellen eine potenzielle Gefahrenquelle dar und dürfen daher weder in die Umwelt freigesetzt noch in der Reichweite von Kindern gehalten werden Sie sind nach den geltenden Bestimmungen umweltgerecht zu entsorgen 2 2 Abmessungen und Gewicht L D H i Am 1600 i Am 2000 i Am...

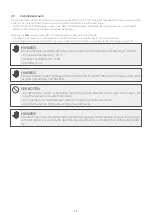
Страница 11: ...chen sowie gesundheitlichen Vorschriften und geltenden Bestimmungen entspricht m HINWEIS Für den optimalen Gerätebetrieb muss der Installationsraum folgende Anforderungen erfüllen Umgebungstemperatur 30 C Relative Feuchtigkeit RF 55 Klimaklasse 4 m HINWEIS BeiderInstallationinüber900MeterHöheistINDERBESTELLBEZEICHNUNGeinKompensationsventil für jedes Verbundglas ANZUGEBEN d VERBOTEN Der Betrieb des...

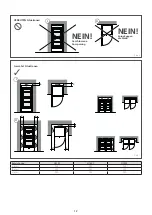
Страница 12: ...ERBOTEN Situationen Geschlossene Aussparung Zurück gegen die Wand NEIN I II Abb 6 Gewährt Situationen B A A A A I II C C Abb 7 Bezeichnung H1200 H1600 H2000 A mm 200 200 200 B mm 200 200 200 C mm 200 200 200 12 ...

Страница 13: ...ahren Sie die Gabeln des Handhubwagens vorsichtig heraus 1 2 3 1 Abb 8 lösen Sie die Schrauben 6 und nehmen Sie die beiden Frontplatten der Palette 7 ab kippen Sie das Gerät vorsichtig und ziehen Sie die rechte Hälfte der Palette 8 heraus stellen Sie das Gerät auf den Boden und achten Sie dabei weder Stellfüße noch Bodenseite zu beschädigen wiederholen Sie die Arbeitsschritte zur Abnahme der linke...

Страница 14: ...tallationsstandort neigen Sie das Gerät mit größter Vorsicht leicht seitlich und stellen Sie die Füße 8 ein überprüfen Sie die einwandfreie Öffnung der vorderen Tür 8 Abb 10 a VORSICHT GEFAHR Achten Sie bei Aufstellung und Nivellierung des Geräts darauf weder Stellfüße noch Bodenseite zu beschädigen 14 ...

Страница 15: ...d geltenden Bestimmungen entspricht d VERBOTEN Die Inbetriebnahme des Geräts früher als MINDESTENS ZWEI STUNDEN nach dem Auspacken Dies insoweit als das Gerät möglicherweise horizontal transportiert worden ist und sich deswegen der Schmierstoff im Motor noch nicht stabilisiert hat 3 1 2 Anschluss an das Stromnetz Das Gerät ist mit einem Netzstecker entsprechend dem im Bestimmungsland geltenden Sta...

Страница 16: ...lten wird Sie sollten diesen Modus für einen leisen Betrieb bei anwesender Kundschaft aktivieren Modus ECO Beim Druck der Taste N schaltet das Kühlaggregat auf den Modus ECO Symbol n erleuchtet Im Modus ECO sinkt der Energieverbrauch wobei weiterhin der Sollwert der vorherigen Einstellung gehalten wird Sie sollten diesen Modus nachts oder während der Schließzeiten des Lokals aktivieren Modus BOOST...

Страница 17: ... ein LED System mit direkter Beleuchtung des Schrankinnenraums garantiert Wenden Sie sich bei Störungen bzw Defekten des Beleuchtungssystems bitte ausschließlich an den Händler des Geräts 3 4 1 Aus Einbau des Regals und der Schublade Sofern erforderlich können Sie Regale oder Schubladen im Temperierschrank versetzen oder hinzufügen Gehen Sie zum Ausbau der Regale folgendermaßen vor lösen Sie die v...

Страница 18: ... Stecker 1 aus der Steckdose 2 I 0 1 2 Abb 18 3 5 2 Abschaltung für längeren Zeitraum Gehen Sie zur längeren Abschaltung des Geräts Urlaub usw folgendermaßen vor die Taste zdrücken Kühlaggregat und Display schalten sich aus betätigen Sie den zweipoligen Netzschalter des Geräts und ziehen Sie den Stecker 1 aus der Steckdose 2 Räumen Sie den gesamten Inhalt des Geräts ein reinigen Sie es und lassen ...

Страница 19: ...Geräts beschädigen können Der Kontakt der kalten Glasteilen mit heißem Wasser Das Glas könnte sich infolge der hohen Temperaturdifferenz verbiegen oder sogar springen 4 3 Reinigung von Innenseite und empfindlichen Teile f VORSICHT STROMGEFAHR Schalten Sie das Gerät vor jeder Reinigung im Temperierschrank unbedingt aus siehe Abschnitt Vorübergehende Abschaltung auf Seite 18 f VORSICHT STROMGEFAHR V...

Страница 20: ...dem Sie das Gerät abgeschaltet und den Stecker aus der Steckdose abgezogen haben Öffnen Sie die Tür der Vitrine und lösen Sie die Schrauben 1 gemäß Abbildung Nehmen Sie den Lüfterschutz 2 ab indem Sie dessen Oberseite zu sich hinziehen reinigen Sie den Verflüssiger 3 mit einem Staubsauger und oder Pinsel verwenden Sie AUF KEINEN FALL Werkzeuge Geräte die den Verflüssiger beschädigen können Bringen...

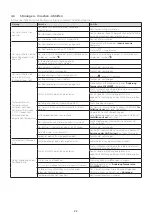
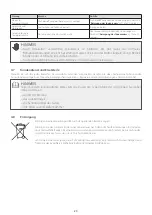
Страница 21: ...ühren Sie vor der Prüfung die im entsprechenden Abschnitt beschriebene Vorübergehende Abschaltung aus Kein oder wenig Tauwasser an der Roll Bond Platte Täglich Bei Störungen siehe Störungen Ursachen Abhilfen Ordnungsgemäßer Motorbetrieb Täglich Bei Störungen siehe Störungen Ursachen Abhilfen Alarmmeldungen am Display Täglich Bei Störungen siehe Störungen Ursachen Abhilfen 4 5 Außerplanmäßige Wartu...

Страница 22: ... Die Tür schließen und überprüfen ob die hermetisch dichte Schließung behindert ist Den Zustand der Dichtung überprüfen Eine abgenutzte Dichtung durch den Fachhändler ersetzen lassen Der Temperierschrank ist übermäßig gefüllt Die Füllmenge verringern Das Gerät ist in Nähe einer Wärmequelle installiert worden Das Gerät versetzen und die Angaben in Abschnitt Ins tallationsraum auf Seite 11 beachten ...

Страница 23: ...rsatzteile Wenden Sie sich für jeden Bedarf an den Hersteller oder den autorisierten Händler die über Fachpersonal und spezielle Ausrüstungen verfügen um Ihnen die bestmöglichen Inspektions Reparatur oder Ersatzteilleistungen anbieten zu können l HINWEIS Teilen Sie dem Kundendienst bitte stets die Daten am Typenschild mit und geben Sie dabei insbesondere an die Art der Störung das Gerätemodell die...

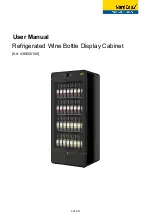
Страница 24: ...User Manual Refrigerated Wine Bottle Display Cabinet Art 436600100 2019 11 ...

Страница 25: ... ST 1P 1V FIT B1S1 i Am H1200 VT 1P 1V S1V1 i Am H1600 VT 1P 1V M1V1 i Am H2000 VT 1P 1V L1V1 i Am H2000 VT 1P 1V FIT B1V1 i Am H2000 VT 1P 1V TROPICALIZED L1W1 i Am H2000 VT 1P 1V TROPICALIZED FIT B1W1 i Am H2000 VT 1P 2V DUAL VENT L2V1 i Am H2000 VT 1P 2V DUAL VENT FIT B2V1 SYMBOLS USED IN THIS MANUAL AND THEIR MEANINGS l IMPORTANT Indicates particularly important information m CAUTION Indicates...

Страница 26: ...3 Description of the appliance 6 1 4 Identification 6 1 5 Structure 7 1 6 Safety devices 8 1 7 Technical specifications 8 1 8 Control panel 9 2 Installation 10 2 1 Receiving the product 10 2 2 Dimensions and weight 10 2 3 Place of installation 11 2 4 Installation 13 2 4 1 Moving 13 2 4 2 Positioning and levelling 14 3 Operation 15 3 1 Preliminary steps 15 3 1 1 Checks 15 3 1 2 Connecting to the el...

Страница 27: ... the weather If you have any doubts concerning the operating conditions and or functioning of the appliance or any of its component parts contact your local dealer for clarifications If you notice any problems or malfunctions when you put the appliance into service report them immediately to the dealer who sold it Check the condition of the power cable plug and socket at regular intervals If the p...

Страница 28: ...ot touch the appliance with damp or wet hands or while standing in bare feet If you experience an electrical shock on contact with a metal surface of the appliance turn it off at the switch disconnect the plug from the power socket and contact an authorised dealer immediately Do not allow children differently able persons or persons with insufficient experience or knowledge to operate the applianc...

Страница 29: ...olycarbonate bottle supports and can be arranged at various heights Refrigeration is static or ventilated depending on the model chosen The static refrigeration version permits four different temperatures to be achieved within the same cabinet This allows one cabinet to be used for both red and white wines The ventilated refrigeration version lets you select a uniform storage temperature A wide ra...

Страница 30: ...rotection panel 3 Glass 4 Key 5 Lock 6 Fan protection grille 7 Shelves 8 Removable drawers 9 Roll bond evaporator 10 Structure 11 LED light 12 Control panel 13 Adjustable feet 14 Condensate collection tank 15 Power cable and plug 16 Motor protection grille 17 Top compartment 18 Bottom compartment Only for DUAL VENT models Fig 2 7 ...

Страница 31: ...d bottles 170 272 358 179 A T 30 C R H 55 Climate class 4 C 2 20 Fixed shelves No 2 3 4 Removable drawers No 6 10 13 Maximum permissible weight on each shelf kg 80 Absorbed current A 1 6 Electrical data V Ph Hz 230 1 50 LED electrical power W 1 2 x LEDs Refrigerant Hfc R290 Noise emission level dB A 38 Models with a depth of 760 mm Models with a depth of 560 mm The performance declared above is ob...

Страница 32: ...the bottom compartment Only present on DUAL VENT models K NORMAL press to activate NORMAL mode J SILENT press to activate SILENT mode N ECO press to activate ECO mode O BOOST press to activate BOOST mode 2 DISPLAY a Lock ON keypad lock on OFF keypad lock off 0 Compressor ON on OFF off Flashing standby b Defrosting ON on Flashing standby I Light ON cabinet lighting on OFF cabinet lighting off q The...

Страница 33: ...th the appliance for future consultation and transfer it to any new owner or user along with the appliance Fig 4 d STOP Do not dispose of packing material into the environment or leave it within reach of children as it can become a hazard Dispose of packing materials in accordance with applicable legislation 2 2 Dimensions and weight L D H i Am 1600 i Am 2000 i Am 1200 L D H L D H Fig 5 Descriptio...

Страница 34: ...nical and health standards m IMPORTANT To ensure optimal functioning of the appliance the place of installation must conform to the following conditions ambient temperature 30 C RH relative humidity 55 climate class 4 m IMPORTANT In installations at altitudes over 900 metres 2950 feet a compensation valve must be SPECIFIED AT THE TIME OF ORDER for each double glazed compartment d STOP Do not use t...

Страница 35: ...NO FORBIDDEN positions Narrow niche Back against wall NO I II Fig 6 PERMITTED positions B A A A A I II C C Fig 7 Description H1200 H1600 H2000 A mm 200 200 200 B mm 200 200 200 C mm 200 200 200 12 ...

Страница 36: ... Lower the appliance to the floor and carefully manoeuvre it clear of the forks of the pallet transporter 1 2 3 1 Fig 8 Unscrew the screws 6 and remove the two cross plates 7 from the pallet Very carefully tilt the appliance to the left and remove the right side of the pallet 8 Lower the appliance to the floor again taking care not to damage the feet or the bottom Tilt the appliance to the right a...

Страница 37: ...ion proceeding in small steps at a time Very carefully tilt the appliance and adjust the feet 8 Make sure that the door of the cabinet opens properly 8 Fig 10 a WARNING Take care not to damage the feet or the bottom of the appliance throughout the positioning and levelling procedure 14 ...

Страница 38: ...sible after installation Check that the place of installation conforms to all applicable technical and health standards d STOP Do not put the appliance into service immediately Wait AT LEAST TWO HOURS from the time of unpacking If the appliance has been placed horizontally during transport this time will be needed for the refrigerant to settle inside the cooling system 3 1 2 Connecting to the elec...

Страница 39: ...et makes less noise though the temperature setpoint remains as set previously Use SILENT mode to reduce noise from the cabinet when customers are nearby ECO mode Press the N key to switch the refrigeration system to ECO mode the nsymbol lights up In ECO mode the cabinet consumes less energy though the temperature setpoint remains as set previously Use ECO mode at night or when your business is clo...

Страница 40: ...ensure an optimal view of the products on display In the event of a malfunction or failure of the lighting system contact the dealer who sold the appliance 3 4 1 Removing and fitting shelves and drawers If necessary shelves or drawers can be repositioned or added inside the cabinet Proceed as follows to remove the shelves Unscrew the four screws 1 securing the shelf to the sides of the cabinet Rem...

Страница 41: ...ll out the plug 1 from the socket 2 I 0 1 2 Fig 18 3 5 2 Switching off for extended periods If you need to switch the appliance off for an extended period e g for holidays proceed as follows Press the zkey The refrigeration system and the display switch off Turn off the two pole power switch supplying power to the cabinet and pull out the plug 1 from the socket 2 empty the cabinet completely clean...

Страница 42: ...ge the surfaces of the cabinet Do not use excessively hot water to clean cold glass parts The difference in temperature could cause the glass to crack or even shatter 4 3 Cleaning the interior and important parts f WARNING RISK OF ELECTROCUTION Beforestartingtocleantheinsideoftherefrigeratedcabinet switchitoffasinstructedin Switching off temporarily on page 18 f WARNING RISK OF ELECTROCUTION Do no...

Страница 43: ...enser The condenser must be cleaned once a month With the cabinet switched off and the plug removed from the electrical power socket Open the cabinet door and remove the screws 1 as shown in the figure Remove the fan cover 2 by pulling the top part towards you Clean the condenser 3 using a vacuum cleaner and or brush Do NOT use tools that might cause damage to the condenser On completion of cleani...

Страница 44: ...pliance off as instructed in Switching off temporarily Little or no frost on the roll bond evaporator Daily If any problem is detected see Problems Possible causes Solutions Correct functioning of refrigeration system Daily If any problem is detected see Problems Possible causes Solutions No alarm indications on display Daily If any problem is detected see Problems Possible causes Solutions 4 5 Ex...

Страница 45: ...ng the temperature SETPOINT procedure has been carried out correctly The door is not hermetically closed Close the door and check that nothing is preventing it from closing tightly Check the condition of the door seal If it is worn contact an authorised dealer to have it replaced The refrigerated compartment has been over filled Reduce the load The appliance has been installed near a source of hea...

Страница 46: ...cturer or an authorised dealer to have any servicing repair or replacement work completed rapidly and correctly by specialist personnel using purpose made equipment l IMPORTANT In all dealings with the technical assistance service always quote the details given on the appliance s nameplate and the nature of the problem the model of the appliance the serial number of the appliance your address and ...

Страница 47: ... 28307 Bremen Hauptsitz Service Finanzen Personal Lager IT Marketing Telefon 49 421 48557 0 Telefax 49 421 488650 E Mail bremen nordcap de Die NordCap Verkaufsniederlassungen in Deutschland Nord Hamburg Ost Berlin Süd Ingelheim West Erkrath ...

Отзывы: