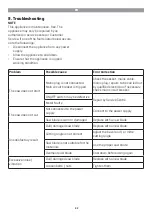
EN
30
2. Adjust the saw blade (6) to the desired
bevel angle (refer to the “Bevel angle
adjustment” section). Make sure the
turntable locking knob (22) is locked firmly.
3. Follow the same instruction of “Operation-
cutting /sawing”.
WARNING!
After use, switch the saw off and disconnect it
from the power supply and let it cool down.
6. Clean and Maintenance
WARNING! RISK OF INJURY!
- Pull the mains plug before clean,
maintenance or repair.
- Repair and servicing work not described in
this manual should always be carried by the
Service Centre. Use only the original parts.
- The following cleaning and servicing should
be done regularly. This will ensure a long
and reliable service life.
●
Keep the mitre saw clean, remove the
debris from the saw after each use and
before storage.
●
Regular and proper cleaning will help
ensure safe use and prolong the life of the
product.
●
Inspect the saw before each use for worn
and damaged parts. Do not operate if there
are broken or worn parts.
General Cleaning
●
Do not spray the appliance with water and
do not immerse it in water. Electric Shock
hazard.
●
Keep clean the ventilation slots, motor
housing and handles of the appliance. Use a
damp cloth or a brush. Do not use cleaning
agents or solvents. You may otherwise
irreparable damage the appliance.
●
Use the damp cloth to clean the guarding
system carefully.
●
Have the supply cord repaired by
a manufacturer or an authorized
representative in order to avoid safety
hazards.
●
Dry the saw blades with a soft, lint-free
cloth.
●
Clean the chip ejection opening with a
brush or by blowing out with compressed
air.
Maintenance
Before and after each use, check the mitre
saw and accessories (or attachments) for
wear and damage. If required, exchange
them for new ones and observe the technical
requirements.
Changing the saw blade(Fig. I & J)
WARNING! RISK OF INJURY!
- Always use the correct saw blade according
to the intended use.
- Always allow the motor of the saw to come
to a complete stop before engaging the
spindle lock.
- Always make sure that the spindle lock
is disengaged before reconnecting the
product to the power supply.
- The rotational direction arrow on the saw
blade should comply with the one on the
upper fixed guard.
1. Rotate the lower guard (5) upwards to
expose the screw (4a).
2. Loosen the screw (4a) on the guard
mounting plate (4) with a suitable cross
screwdriver.
3. Slide the lower guard (5) upwards to expose
the saw blade (6).
4. Press the spindle lock button (2) fully and
hold it in position.
5. Turn the clamping screw (6a) slightly with
the hex key until the spindle is locked.
6. Loosen the clamping screw (6a) in
clockwise direction and remove it together
with the outer flange (6b) and saw blade (6).
Do not remove the inner flange (6c) from
the spindle (6d).
7. Place a new saw blade on the spindle and
make sure that the bore of the saw blade
properly fits the inner flange (6c). Ensure
that the rotational direction indicated on


