Endura ENAR24HC Скачать руководство пользователя страница 21

16

www.uniquip.ca

Maintenance Procedures 


This section encompasses two general types of maintenance: 1. Preventative Maintenance and 2. General Service.  

The fi rst refers to regularly scheduled routine care of the aerator, such as cleaning and lubrication.  The second provides in-
formation on common procedures, such as changing tines, and adjusting chain tension that are to be performed as needed.


By following the Inspection Schedule below BEFORE and AFTER each use of the aerator, appropriate actions can be 

taken to extend the service life of the machine and reduce any costly repairs and unnecessary downtime for the unit.

A.Inspection Schedule

The following list aims offer some basic guidelines to performing a detailed inspection BEFORE and AFTER each use.  Cer-
tain checks will require some disassembly, i.e. the removal of the drive guard, to perform.  Depending on various environ-
mental conditions and frequency of use, other inspection points may have to be added for each machine.

Item

Yes No

Is the engine oil fi lled to recommended levels?  Consult Engine Manufacturer’s Manual.
Is the gear box well lubricated and clean?  Check p.17 “Lubrication Schedule”.
Is the engine air cleaner properly attached and clean?  Consult Engine Manufacturer’s Manual.
Is the clutch cable properly attached?  Refer to p.12 “Setting up the Aerator” for details.
Is the clutch cable worn or visibly damaged?  Replace if necessary.
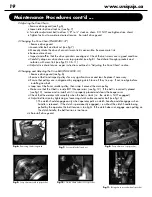
Is the chain tension properly set for jobsite?  Refer to p.19 “Adjusting the Drive Chain” for details.
Is the drive chain and surrounding area clean and free of any debris?  Clean if necessary.
Is the drive belt tension set properly?  Refer to p.19 “Changing and Adjusting the Drive Belt” 
for details.
Does the drive belt show signs of wear and tear?  Replace if necessary.
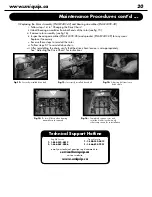
Are all tines in good condition?  Are any tines worn down to minimum length of 4-3/8”?  If so, 
have they been replaced?
Are the sprockets and set screws showing signs of wear?  If so, make sure that the sprockets will 
be replaced before any further use as worn sprocket can lead to chain slippage and other me-
chanical issues that may cause serious harm to the jobsite and/or bodily damage to the operator.
Is the carriage securely fastened and free of all debris?  Lingering debris may lead to premature 
wear on the machine and shorten performance life. 
Are the safety warning labels and other decals clearly identifi able and legible?  If not, ensure that 
fresh decals will be re-applied prior to use for operator safety.

B.Preventative Maintenance Procedures

Maintaining a regular cleaning and lubrication schedule as well as taking time to perform preventative maintenance pro-
cedures will prolong the service life of the ENAR24HC.  The following are guidelines to setting up a regular maintenance 
routine for the aerator.
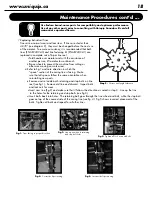
 1.Cleaning 

the 

ENAR24HC


  i.After each use, the aerator, in particular the coring tine and rotor assembly, should be cleaned and 


               washed of any dirt or debris that may be trapped in the unit.  


 ii.When using a power pressure washer to clean the unit, DO NOT USE ANY MACHINE RATED HIGHER 


    THAN 1000 PSI.  


iii.Beware of damaging any warning decals and labels, as well as the drive chain, bearings and engine.     


    Limit direct spray on these objects to help prevent their wear and tear.


iv. For easier access to cleaning the aerator, the machine may be tipped on its engine


    guard for NO MORE THAN 2 MINUTES.  Engine damage may result from gasoline fl owing into the 


    crankshaft due to prolonged tipping.

!

All service should be performed by trained 
technicians.

Содержание ENAR24HC

Страница 1: ...t Uniquip Canada 2005 All rights reserved DO NOT operate this equipment until you have read and understood all the enclosed Operator s Manual English Service T 1 888 332 4012 F 1 866 567 0956 French S...

Страница 2: ...da the unit and or parts should be shipped to Uniquip Canada or the specified Authorized Service Centre at the customer s expense Be sure to securely pack the unit and parts in a strong container Dam...

Страница 3: ...participating in this program Registration helps to facilitate warranty service and notify you of any updates changes and service advisories on your product Complete this Warranty Registration Card a...

Страница 4: ...Place Stamp Here Uniquip Canada Inc 4101 boul Industriel Laval QC H7L 6G9 ATTN SERVICE DEPARTMENT Fold along dotted line Fold along dotted line...

Страница 5: ...ENAR24HC Aerator 12 Contents List 12 Pre Operation Procedures 12 Operation Procedures 14 A Transporting the ENAR24HC 14 B Preparing to aerate 14 C Aerating on Flat Surfaces 14 D Aerating on Inclined S...

Страница 6: ...nvironment and operator It is imperative that the operator of this equipment be responsible for the operational environment of the aerator Please be prepared and well informed for all specific require...

Страница 7: ...ay from moving parts of the machine e Avoid coming in contact with the muffler and other engine parts after the engine is started and the time immediately after the machine is turned off Machine and e...

Страница 8: ...manner a Always start aerating a safe distance away from any object such as a fence foundation or any other structural obstructions The coring tines could possibly catch and climb on the object b Use...

Страница 9: ...serves the right to update and modify the equipment without prior notification Prior to undertaking to perform any maintenance or repair procedures please contact our Technical Support Hotline for cla...

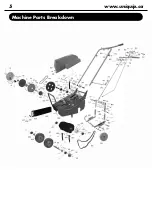
Страница 10: ...5 www uniquip ca Machine Parts Breakdown...

Страница 11: ...2 2 7 2 2 2 7 3 2 2 8 1 1 8 1 1 9 1 1 10 1 1 11 1 1 12 1 1 13 1 1 14 1 1 15 4 4 16 4 4 17 1 1 ENAR24 02 1 O Ring Seal Kit for Gear Box 1 1 11 1 1 17 1 1 ENAR24 03 9 Inner Bearing for Gear Box 1 1 ENA...

Страница 12: ...1 1 34 2 2 35 1 1 36 1 1 37 1 1 38 1 1 ENAR24 09 39 Stamping Kit for Idler 4 2 39 1 4 2 39 2 4 2 42 4 2 ENAR24 10 40 Idler Arm Assembly 1 1 40 1 1 1 40 2 3 3 40 3 1 1 41 1 1 53 1 1 54 1 1 55 1 1 56 2...

Страница 13: ...NAR24 20 65 Clutch Handle Assembly Grips not included 1 1 66 2 2 66 1 2 2 66 2 4 4 66 3 2 2 ENAR24 21 67 Grips for Clutch Handle 2 2 ENAR24 22 68 Rear Wheel Control Handle 1 1 ENAR24 23 69 Complete Cl...

Страница 14: ...84 2 4 2 84 3 4 2 ENAR24 32 85 Lift Link 2 1 ENAR24 33 86 Axle Carriage Assembly 1 1 89 2 2 90 2 2 91 2 2 ENAR24 34 87 Rear Wheel Axle Kit 2 1 87 1 2 1 87 2 2 1 ENAR24 35 88 Axle Spring 2 1 ENAR24 36...

Страница 15: ...2 1 107 2 1 ENAR24 46 108 Lock Collar 2 2 109 4 4 ENAR24 47 110 Front Wheel Assembly 2 2 111 1 1 112 2 2 ENAR24 48 42 Front Axle Stamping Kit 4 2 113 4 2 113 1 4 2 113 2 4 2 ENAR24 49 114 Wheel Sprock...

Страница 16: ...erves as an unique identifier for warranty and support purposes If you have any questions please do not hesitate to contact Uniquip Canada at 1 888 332 4012 for further assistance ENAR24HC CAL Qty Req...

Страница 17: ...y NEVER ATTEMPT TO LIFT THE MACHINE WITH ONLY ONE PERSON Before using the Endura ENAR24HC Professional Aerator please perform the following procedures for the personal and property safety of the opera...

Страница 18: ...d condition and set to the appropriate tension Consult the Maintenance Procedures section of this manual for guidelines and instructions on taking care of the belt and chain iv The torque on the tine...

Страница 19: ...es with more than 35 grade 3 If the removable weights are being used ensure that they are securely latched in by tightening the bolts on the security latch If the weights are not in use store them saf...

Страница 20: ...esults Opeation Procedures cont d IF MACHINE IS USED ON EXTREME INCLINES THE MACHINE MAY BECOME UNBALANCED TO THE POINT OF PRESENTING THE DANGER OF ROLLING OVER Diag 1 Aerating on inclined site Diseng...

Страница 21: ...Adjusting the Drive Belt for details Does the drive belt show signs of wear and tear Replace if necessary Are all tines in good condition Are any tines worn down to minimum length of 4 3 8 If so have...

Страница 22: ...key components that may lead to serious damage to the machine and cause severe bodily harm to the operator or technician Before performing any service and maintenance procedures consult these general...

Страница 23: ...te direction in which the spoon section of the coring tine is facing Make sure that all spoons follow the same orientation when re installing new parts iv Remove and set aside both retaining and stop...

Страница 24: ...ignificant wear and tear Replace if necessary iii Ensure that pulleys are in alignment by engaging clutch to see if they line up If not re align before installing new belt iv Loop new V belt over smal...

Страница 25: ...rive chain vii After re installing the chain verify that the drive chain tension is set appropriately See Adjusting the Drive Chain for instructions Fig 12 Correctly installed drive belt Fig 13 Incorr...

Страница 26: ...lug wire is disconnected or improperly connected Engine oil level too low Oil Alert Dirty air cleaner Check that all switches are on Verify that throttle and choke position are in proper setting Fill...

Страница 27: ...22 www uniquip ca Notes...

Страница 28: ...866 567 0956 French Service T 1 800 332 4012 F 1 866 825 2221 Technical Support Hotline email your technical questions and comments to service uniquip ca visit our website www uniquip ca Copyright Uni...

Отзывы: