background image

ISEmax compressed air cleaning unit (230 V AC)

Installation

Hauser

11

5.2  

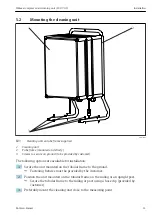
Mounting the cleaning unit

1

2

3

  A0011385

 3

Cleaning unit on tube frame supplied

1

Cleaning unit

2

Tube frame (mounted on delivery)

3

Screws to secure on ground (to be provided by customer)

The following options are available for installation:

1. Secure the unit mounted on the tubular frame to the ground.

 Fastening fixtures must be provided by the customer.

2. Position the unit mounted on the tubular frame on the railing or an upright post.

 Secure the tubular frame to the railing or post using a hose clip (provided by

customer).

3. Preferably mount the cleaning unit close to the measuring point.

Содержание ISEmax compressed air cleaning unit

Страница 1: ...Products Solutions Services Operating Instructions ISEmax compressed air cleaning unit 230 V AC Order no 71072583 BA00438C 07 EN 17 17 71396473 ...

Страница 2: ......

Страница 3: ...ming acceptance 8 4 2 Product identification 8 4 3 Scope of delivery 9 4 4 Certificates and approvals 9 5 Installation 10 5 1 Installation conditions 10 5 2 Mounting the cleaning unit 11 5 3 Post installation check 12 6 Electrical connection 12 6 1 Connecting the cleaning unit 12 6 2 Post connection check 13 7 Commissioning 13 7 1 Function check 13 7 2 Switching on the cleaning unit 14 8 Maintenan...

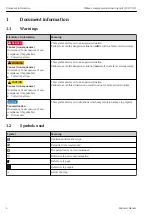
Страница 4: ...u to a dangerous situation Failure to avoid the dangerous situation can result in a fatal or serious injury LCAUTION Causes consequences If necessary Consequences of non compliance if applicable Corrective action This symbol alerts you to a dangerous situation Failure to avoid this situation can result in minor or more serious injuries NOTICE Cause situation If necessary Consequences of non compli...

Страница 5: ...Designated use The product is designed for the cyclic cleaning of ion selective sensors with compressed air in municipal wastewater treatment plants The cleaning intervals are controlled by the connected transmitter Use of the device for any purpose other than that described poses a threat to the safety of people and of the entire measuring system and is therefore not permitted The manufacturer is...

Страница 6: ...ant regulations and European standards have been observed 2 6 IT security We only provide a warranty if the device is installed and used as described in the Operating Instructions The device is equipped with security mechanisms to protect it against any inadvertent changes to the device settings IT security measures in line with operators security standards and designed to provide additional prote...

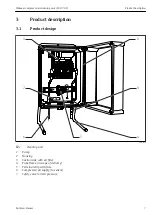
Страница 7: ...ress Hauser 7 3 Product description 3 1 Product design 1 2 4 3 5 6 7 A0016120 1 Cleaning unit 1 Pump 2 Housing 3 Suction side with air filter 4 Tube frame in scope of delivery 5 Terminal strip with fuse 6 Compressed air supply to sensor 7 Safety valve to limit pressure ...

Страница 8: ...4 Pack the product for storage and transportation in such a way that it is protected against impact and moisture The original packaging offers the best protection Make sure to comply with the permitted ambient conditions If you have any questions please contact your supplier or your local Sales Center 4 2 Product identification 4 2 1 Nameplate The nameplate provides you with the following informat...

Страница 9: ...tions in German 1 set of Operating Instructions in English If you have any queries Please contact your supplier or local sales center 4 4 Certificates and approvals 4 4 1 mark The product meets the requirements of the harmonized European standards As such it complies with the legal specifications of the EU directives The manufacturer confirms successful testing of the product by affixing to it the...

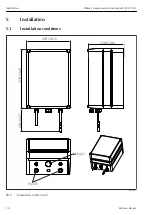
Страница 10: ...Installation ISEmax compressed air cleaning unit 230 V AC 10 Endress Hauser 5 Installation 5 1 Installation conditions 230 9 06 378 14 9 278 10 9 106 4 17 Pg21 Pg13 5 A0011377 2 Dimensions in mm inch ...

Страница 11: ...round to be provided by customer The following options are available for installation 1 Secure the unit mounted on the tubular frame to the ground Fastening fixtures must be provided by the customer 2 Position the unit mounted on the tubular frame on the railing or an upright post Secure the tubular frame to the railing or post using a hose clip provided by customer 3 Preferably mount the cleaning...

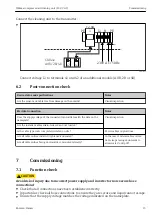
Страница 12: ... technician must have read and understood these Operating Instructions and must follow the instructions contained therein Prior to commencing connection work ensure that no voltage is present on any cable 6 1 Connecting the cleaning unit NOTICE Use of impermissible cable diameters IP65 degree of protection is voided Use cables with a diameter of 6 to 12 mm 0 24 to 0 47 for the Pg 13 5 cable gland ...

Страница 13: ...ual inspection Are the installed cables strain relieved and not twisted Is the cable type route completely isolated on site Power cables signal lines Are all cable entries installed tightened and sealed In the case of lateral cable entries Cable loops facing downwards to allow water to drip off Are all cable entries facing downwards or mounted laterally 7 Commissioning 7 1 Function check LCAUTION ...

Страница 14: ...with the transmitter firmware see BA00444C 8 Maintenance LWARNING Device is live Risk of serious or fatal injury from electric shock Disconnect the device from the mains voltage Secure the device to prevent it from being switched on again unintentionally Take all the necessary precautions in time to ensure the operational safety and reliability of the entire measuring system NOTICE Effects on proc...

Страница 15: ...tched on 1 Check if air is escaping from the cleaning nozzle on the sensor 2 If not and if air is instead escaping only via the safety valve on the cleaning unit Check the complete supply line to the cleaning nozzle and check the nozzle itself for contamination and blockage 3 Remove the contamination If this is not possible Replace blocked hoses connectors or nozzles ...

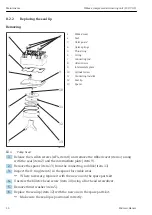
Страница 16: ...acer 1 Release the 4 Allen screws AF4 item 8 and remove the ribbed cover item 1 along with the seal item 2 and the intermediate plate item 9 2 Remove the spacer item 13 from the connecting rod disk item 11 3 Inspect the O ring item 6 in the spacer for visible wear Where necessary replace it with the new one in the spare parts kit 4 Unscrew the fillister head screw item 10 using a flat head screwdr...

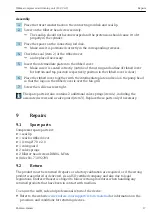
Страница 17: ... pump head so that the logo on the ribbed cover is over the fan grill 7 Screw the 4 Allen screws tight The spare parts kit also contains 2 additional valve springs item 4 including the associated screws and a valve guard item 3 Replace these parts only if necessary 9 Repairs 9 1 Spare parts Compressor spare parts kit 1 seal lip 1 seal for ribbed cover 1 O ring Ø 70 x 2 0 1 valve guard 2 valve spri...

Страница 18: ...ating of 10 A must be provided by the customer Please observe the local installation guidelines 10 1 2 Power consumption 300 VA cos phi 0 8 10 1 3 Cable specification Permitted cable diameter 6 to 12 mm 0 24 to 0 47 if using Pg 13 5 13 to 18 mm 0 51 to 0 71 if using Pg 21 provided for mains supply line 10 1 4 Electrical fuse of pump Slow blow 2 0 A 10 2 Performance characteristics 10 2 1 Conveying...

Страница 19: ...Emax compressed air cleaning unit 230 V AC Technical data Endress Hauser 19 10 3 2 Degree of protection IP65 10 3 3 Overheating protection Automatic switch off at T 130 C 266 F in the motor winding sensor ...

Страница 20: ...eck 13 Fuse 18 I Incoming acceptance 8 Installation conditions 10 M Maintenance 14 Maintenance schedule 14 Manufacturer s address 8 N Nameplate 8 O Occupational safety 5 Operating interval 18 Operational safety 5 Overheating protection 19 P Performance characteristics 18 Post connection check 13 Post installation check 12 Power consumption 18 Product description 7 Product identification 8 Product ...

Страница 21: ......

Страница 22: ......

Страница 23: ......

Страница 24: ...www addresses endress com ...

Отзывы: