background image

32039-1-0314

Page 5

Introduction

Vented wall furnace is shipped ready to install in a 2" x 4"  stud wall, 

with studs 16" (406mm) center to center.  Always consult your local 

Building Department regarding regulations, codes or ordinances 

which apply to the installation of a  vented wall furnace.

Instructions to Installer

1.  Installer must leave instruction manual with owner after instal-

lation.

2.  Installer must have owner fill out and mail warranty card sup

-

plied with furnace.

3.  Installer should show owner how to start and operate furnace 

and thermostat.

Warning:

Any change to this furnace or its control can be dangerous.  

This is a heating appliance and any panel, door or guard 

removed for servicing an appliance must be replaced prior 

to operating the appliance.

To conserve Gas: Turn off pilot when heater is not in use.

General Information

This series is design certified in accordance with American National 

Standard / CSA Standard Z21.86 and CSA 2.32 by the Canadian 

Standards Association, as a Vented Wall Furnace and must be 

installed according to these instructions.

Any alteration of the original design, installed other than as 

shown in these instructions or use with a type of gas not 

shown on the rating plate is the responsibility of the person 

and company making the change.
Important

All correspondence should refer to complete Model No., Serial No. 

and type of gas.

Notice

:

  During initial firing of this furnace, its paint will bake out and 

smoke will occur.  To prevent triggering of smoke alarms, ventilate 

the room in which the furnace is installed.

Installation in Residential Garages

Gas utilization equipment in residential garages shall be installed 

so that all burners and burner ignition devices are located not less 

than 18" (457mm) above the floor.

Such equipment shall be located, or protected, so it is not subject 

to physical damage by a moving vehicle.  

Qualified Installing Agency

Installation and replacement of gas piping, gas utilization equipment 

or accessories and repair and servicing of equipment shall be 

performed only by a  qualified agency.  The term "qualified agency" 

means any individual, firm, corporation or company which either in 

person or through a representative is engaged in and is responsible for 

(a) the installation or replacement of gas piping or (b) the connection, 

installation, repair or servicing of equipment, who is experienced in 

such work, familiar with all precautions required and has complied 

with all the requirements of the authority having jurisdiction.

State of Massachusetts:

 The installation must be made 

by  a  licensed  plumber  or  gas  fitter  in  the  Commonwealth  of 

Massachusetts.

The installation must conform to local codes  or, in  the absence of 

local codes, with the 

National Fuel Gas Code ANSI  Z223.1/NFPA 

54* Natural Gas and Propane Installation Code, CSA B149.1.

*Available from the American National Standards Institute, Inc., 11 

West 42nd St., New York, N.Y. 10036.

High Altitudes

For altitudes/elevations above 2,000 feet (610m), input ratings 

should be reduced at the rate of 4 percent for each 1,000 (305m) 

feet above sea level. 

Canadian High Altitudes 

for locations having 

an elevation above mean sea level between 2,000 feet (610m) and 

4,500 feet (1370m), the manifold pressure is to be decreased from 

3.5" w.c. (.871kPa) to 3.0" w.c. (.747kPa) for Natural Gas and from 

10.0" w.c. (2.49kPa) to 8.0" w.c. (1.992kPa) for Propane Gas.

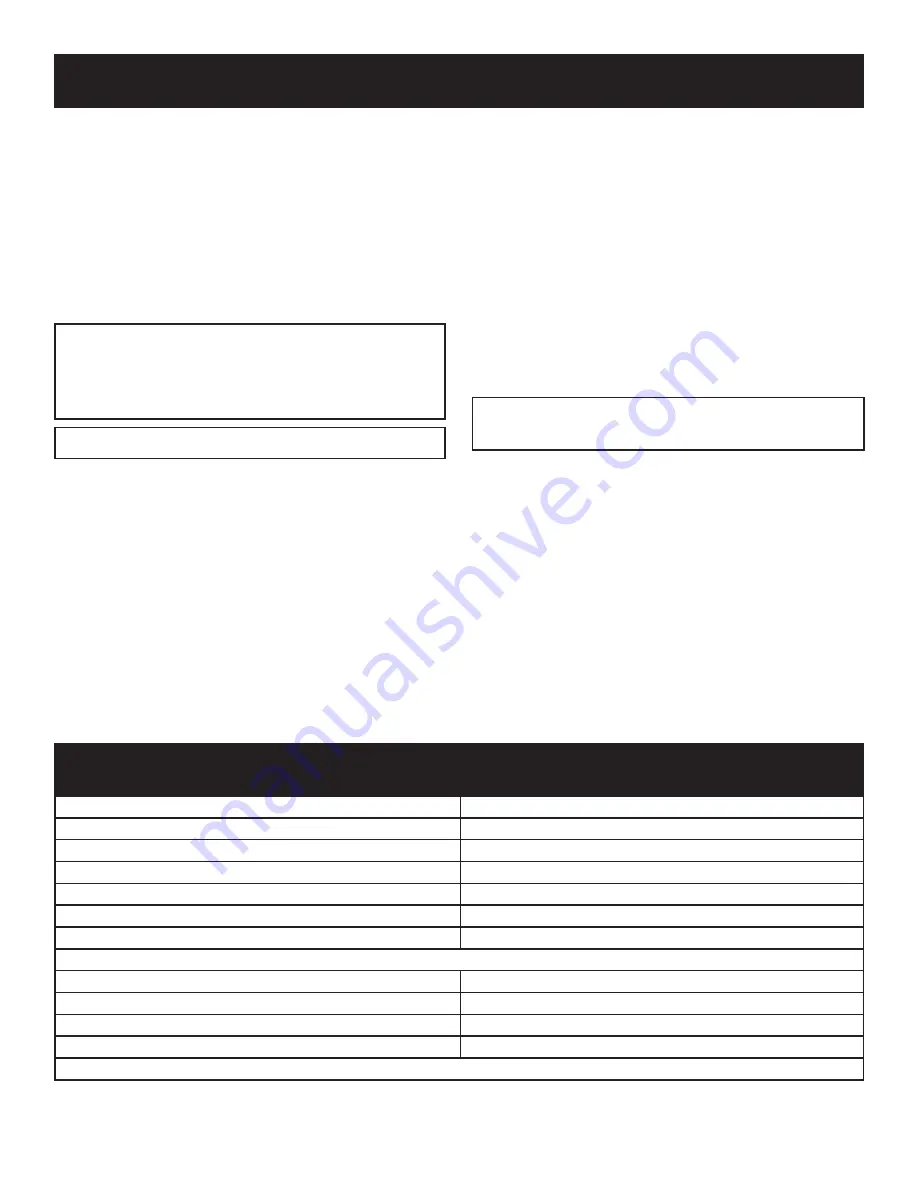
Model

GWT-50

Input BTU/HR (KW/H)

50,000 (14.7)

Height

66 1/8" (1679mm)

Width

16" (406mm)

Depth (Out of wall)

6" (152mm)

Gas Inlet Pipe

1/2"

Vent Pipe Type B Oval

4" (102mm)

Accessory

Blower Package

GWTB-2

Wall Thermostat Millivolt

TMV

Wireless Remote Wall Thermostat

TRW

Remote Bulb Thermostat

GWRBT

GWT-50 (SG, RB) Is a DUAL WALL Furnace.  Warmed air is discharged into two rooms which share a common wall.

INTRODUCTION

SPECIFICATIONS

Содержание GWT-50-3

Страница 1: ...or other flammable vapors and liquids in the vicinity of this or any other appliance WHAT TO DO IF YOU SMELL GAS Do not try to light any appliance Do not touch any electrical switch do not use any ph...

Страница 2: ...ough In Instructions 8 9 Finishing Instructions 9 10 Optional Thermostat Location SG Models 11 Lighting Instructions 12 Vent Safety Shutoff System 13 Proper Main Burner Flame 13 Proper Pilot Flame 13...

Страница 3: ...inspectedbeforeuseandatleast annually by a qualified service person More frequent cleaning may be required due to excessive lint from carpeting bedding materials etc It is imperative that control comp...

Страница 4: ...hts perform service or make adjustments in an area where the conditions are such that you may not detect the odor if there has been a leak of LP Gas Odor fade due to oxidation by rust or adsorption on...

Страница 5: ...all be located or protected so it is not subject to physical damage by a moving vehicle Qualified Installing Agency Installation and replacement of gas piping gas utilization equipment or accessories...

Страница 6: ...as well as condensation of flue products an insulated vent enclosure is recommended Use Type B vent pipe and maintain at least a one inch 25mm clearance to combustibles Use metal thimble to protect ve...

Страница 7: ...at a drip line be installed near the gas inlet This should consist of a vertical length of pipe tee connected into the gas line that is capped on the bottom in which condensation and foreign particles...

Страница 8: ...ts Do not install in a closet alcove or small hallway where the furnace could be isolated by closing doors to the heated space When location is selected check the walls attic and roof to make sure the...

Страница 9: ...finish materials to project into furnace recess 66 1 8 1679 mm WALL OPENING 14 368 mm Figure 4 Installing Furnace Figure 5 Cleartherecessofalldebris andremoveanywoodplaster grounds Stand the furnace...

Страница 10: ...o header with one 1 8 x 3 8 Phillips screw when optional blower is not installed Attention Use outside clearance holes on outer casing top for attachment to header with two 2 8 x 3 8 Phillips screws w...

Страница 11: ...on a good pilot flame The flame must cover the top of the thermopile Cleaning of the pilot orifice and burner may be required due to spiders System Check Figure 7 A millivolt meter is required to che...

Страница 12: ...l door 4 Push in gas control knob slightly and turn clockwise to OFF Do not force 5 Replace control access panel control door 1 STOP Read the safety information above 2 Set the thermostat to lowest se...

Страница 13: ...hort blue inner flame with a much larger light blue outer flame The burner does not have a primary air adjustment The flame will be proper if the factory set pressure and orifice are used After the fu...

Страница 14: ...e lighter rod to light pilot with a match If Pilot Does Not Light By Any Means 1 Check gas control knob for being in the Pilot position 2 Check pilot adjustment for being full open counterclockwise to...

Страница 15: ...listed in the Parts List have a Part Number When ordering parts first obtain the Model Number from the name plate on your equipment Then determine the Part Number not the Index Number and the Descrip...

Страница 16: ...32039 1 0314 Page 16 PARTS VIEW 7 5 6 4 8 9 10 13 16 22 23 24 25 26 20 22 23 26 25 24 21 19 18 9 27 10 11 12 13 17 8 15 14 6 5 7 4 3 2 1 28 12 29 30 30...

Страница 17: ...right side of the outer casing carefully bend or loop capillary wire around control This will enable the sensing bulb to be positioned at the bot tom of the unit 8 Secure sensing bulb on the inside a...

Страница 18: ...rews from Step 3 to wall 12 Attach caps and plugs from blower housing and blower front 13 Attach blower front to blower housing with 4 8 x 3 8 screws from Step 6 14 Installation of optional blower ass...

Страница 19: ...d receptacle an adapter which has two prongs and a wire for grounding can be purchased plugged into the ungrounded receptacleanditswireconnectedtothereceptaclemountingscrews With this wire completing...

Страница 20: ...Systems Empire Comfort Systems Inc 918 Freeburg Ave Belleville IL 62220 If you have a general question about our products please e mail us at info empirecomfort com If you have a service or repair qu...

Страница 21: ...ranty parts All parts listed in the Parts List have a Part Number When ordering parts first obtain the Model Number and Serial Number from the name plate on your equipment Then determine the Part Numb...

Страница 22: ...rols Thermostats Accessories and Parts Should any remote control thermostat accessory or other part fail because of defective workmanship within one year from the date of purchase Empire will repair o...

Страница 23: ...uides inflammables dans le vois nage de cet appareil ou de tout autre appareil QUE FAIRE SI VOUS SENTEZ UNE ODEUR DE GAZ Ne pas tenter d allumer d appareil Ne touchez a aucun interrupteur Ne pas vous...

Страница 24: ...placement du Thermostat Mod les SG 11 Instructions d Allumage 12 Le Syst me de Fermeture de S ret de l vent 13 Aspect Convenable de la Flamme du Br leur Principal 13 Aspect Convenable de la Flamme de...

Страница 25: ...yages seront requis Il est imp ratif que les compartiments de commandes les br leurs et les passages de circulation d air de l appareil soient gard s propres Ne rien mettre autour de la fournaise qui...

Страница 26: ...de ces endroits avant d y aller Utiliser le t l phone de votre voisin et appeler les pompiers et une personne entra n e avec le propane Ne pas ouvrir les soupapes d approvisionnement de gaz m me si vo...

Страница 27: ...s Tousles quipementsdanslesgaragesr sidentielsemployant du gaz doivent tre install s de fa on ce que les br leurs et les appareils pour allumer les br leurs doivent tre situ s au moins 45 7cm au dessu...

Страница 28: ...nt un toit plat peuvent avoir une vacuation inad quate Un d lai de l vacuation ad quate se fera lorsque le tuyau d vacuation est froid par cons quent l interrupteur de s ret de l vent fermera la fourn...

Страница 29: ...cept es par les autorit s ayant juridiction L tat de Massachusetts exige qu une connexion flexible d un appareil n exc de pas une longueur de trois pieds Test de Pression du Syst me d Alimentation de...

Страница 30: ...le grenier et le toit pour tre certain qu il n y a pas d obstruction telles que des tuyaux des fils lectriques etc lesquels entraveraient l installation de la fournaise ou le tuyau d vacuation Note Si...

Страница 31: ...NE PRISE DE COURANT 115VOLT POUR LA SOUFFLERIE FACULTATIVE BAS DU REBORD CLOU DU COLLECTEUR PLAQUE COLLECTRICE 62 1581 mm 14 368 mm LAMBOURDE 2 x4 51mm x 102mm Figure 2 VENT B AVEC UN ADAPTATEUR BW JO...

Страница 32: ...ux 2 vis Phillips 8 x 3 8 lorsque la soufflerie facultative est install e 3 Aligner les trous libres au bas de la paroi ext rieur avec les trous de vis qui sont sur les supports de la paroi en ajustan...

Страница 33: ...lamme ad quate de la veilleuse La flamme doit recouvrir le haut de la thermopile Le nettoyage de l orifice de la veilleuse et du br leur doit tre fait cause des araign es V rification du Syst me Figur...

Страница 34: ...voir lectrique de l appareil si applicable 13 Mettre le thermostat au r glage d sir 1 Mettre le thermostat au plus bas r glage 2 Si l entretien doit tre fait teindre tout le pouvoir lectrique l appare...

Страница 35: ...bleue int rieure avec une flamme ext rieure bleue p le beaucoup plus grande Il n y a pas d ajustement d air primaire pour le br leur La flamme sera ad quate si la pression pr ajust e l usine et les or...

Страница 36: ...euse ne s Allume Pas 1 V rifierleboutondecontr ledegaz ildoit tredanslaposition Veilleuse 2 V rifier l ajustement de la veilleuse il doit tre compl tement ouvert dans le sens oppos des aiguilles d une...

Страница 37: ...vendeur Toutes les pi ces num r es dans la liste ont un num ro de pi ce Lorsque vous commandez des pi ces premi rement obtenez le num ro du mod le sur la plaque d identification de l appareil Puis en...

Страница 38: ...32039 1 0314 Page 38 VUE DES PI CES 7 5 6 4 8 9 10 13 16 22 23 24 25 26 20 22 23 26 25 24 21 19 18 9 27 10 11 12 13 17 8 15 14 6 5 7 4 3 2 1 28 12 29 30 30...

Страница 39: ...oient endommag sparunsurchauffage ceux cidoivent tre plac s ad quatement Un acheminement inad quat des fils de la commande lumineuse distance peut avoir pour r sultat d endommager les fils et avoir un...

Страница 40: ...tion de la soufflerie facultative est compl t e Attention Lorsque vous installez le ch ssis de la soufflerie sur le mur faites attention de ne pas endommager le serpentin du moteur Installation de la...

Страница 41: ...le fil doit tre attach la vis du support de la prise de courant Avec ce fil compl tant la mise terre la fiche de l appareil peut tre branch e dans l adaptateur AVERTISSEMENT D brancher l accessoire de...

Страница 42: ...NOTES DE SERVICE Date Nom du distributeur Nom du technicien de service Entretien effectu notes...

Страница 43: ...Pi ces Radiateurs foyers et barbecues Able Distributors 2501 North Central Avenue Chicago IL 60639 T l phone 773 889 5555 Sans frais 800 880 2253 T l copieur 773 466 1118 Website www abledistributors...

Страница 44: ...t Dommages pouvant r sulter de l emploi de l emploi abusif ou d une installation incorrecte de cet appareil Frais de d placement de diagnostic et de transport des pi ces sous garantie vers et depuis l...

Отзывы: