background image

Sapag Safety Valves Series 8400/8500/8490/8590

Installation and Maintenance Instructions

Emerson reserves the right to change the contents without notice 

page 12

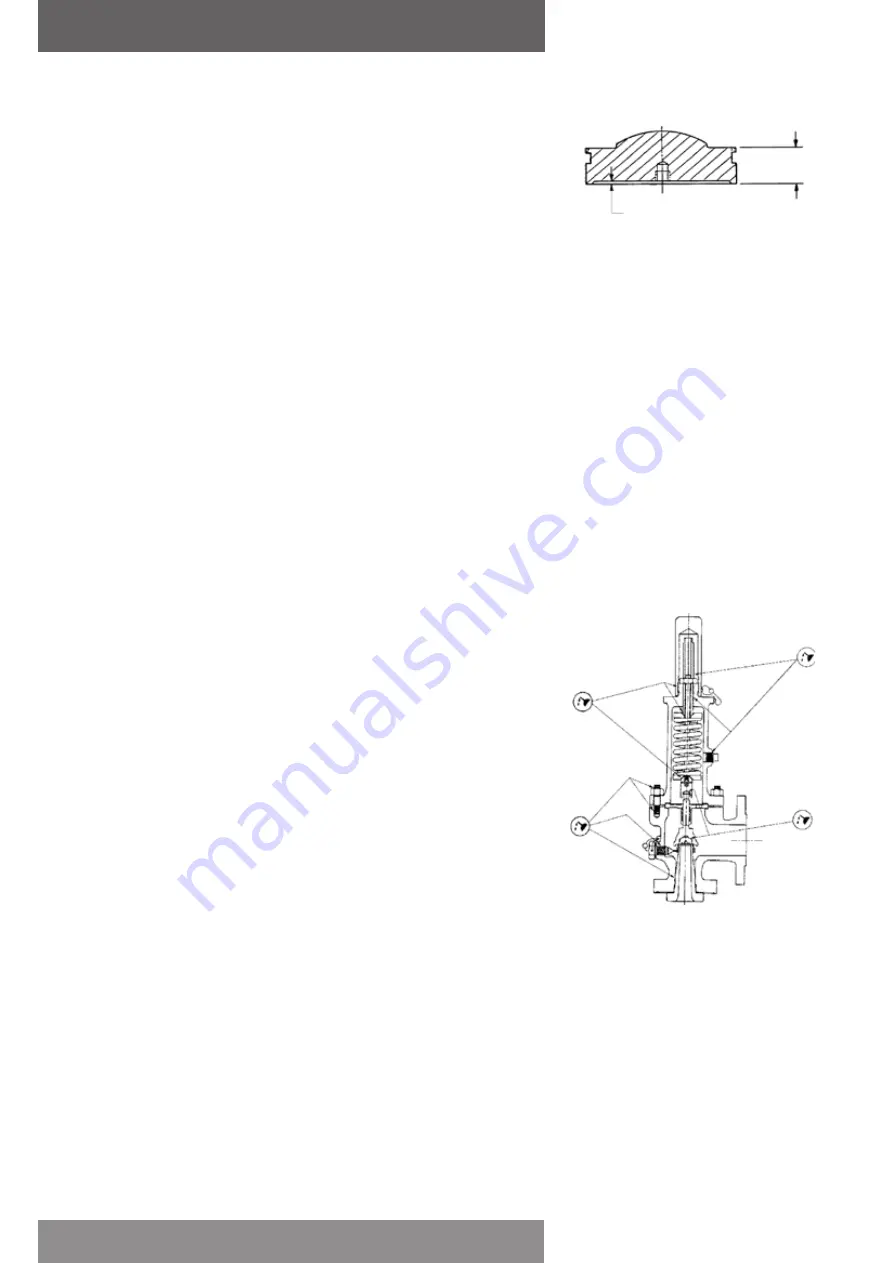
Figure 12 - Recommended lubrication 

points

Assembly

All components should be clean. Before assembling the following parts, lubricate with pure nickel 
“Never-Seez”.
•  Nozzle and body threads
•  Nozzle and body sealing surface
•  All studs and nut threads
•  Spindle and threads
•  Set screw threads
•  Spring washer bevels
•  Adjusting bolt and bonnet threads
•  Bonnet pipe plug
•  Cap threads
•  Dog shaft bearing threads
•  Disc holder threads (bellows valves only)
Lubricate the spindle point thrust bearing and disc insert bearing with pure nickel “Never-Seez”. 
Special attention should be given to the guiding surfaces, bearing surfaces and gasket surfaces to 
ensure that they are clean, undamaged and ready for assembly. (Figure 12)

For parts identification, refer to Figure 1.
a. Before installing the nozzle (2) apply lubricant to the flange surface in contact with the valve 

body (1) and on the body to nozzle threads. Screw the nozzle (2) into the valve body (1) and 
tighten with a nozzle wrench.

b. Screw the nozzle ring (3) onto the nozzle (2).
 

Note:

 The top of the nozzle ring should be above the nozzle seating surface. For P, Q, R and T 

Orifice Style 8500/8590, position the nozzle ring per table 2.

c. For bellows valves only, place the disc holder in a vise (larger sizes may require a 3 jaw vise) as 

shown in Figure 8. Install the tailpiece gasket (29).

  Screw the bellows assembly onto the disc holder. Tighten with a suitable wrench.
d. Assemble the disc insert (8) and the disc holder (5).
  (See page 15 for O-ring soft seat assembly)
  Install the disc insert retention clip (9) onto the disc insert.
  Install the disc insert into the disc holder. The disc insert should snap into place using hand 

force only.

  Safety precautions should be followed whenever heavy parts are being lifted or transported. 

Dropping disc holder assembly may dislodge the insert.

e. Assemble the disc holder (5) and guide (15) by sliding the guide over the disc holder.
 

Note:

 The guide for D and E orifice valves protrudes up into the valve bonnet.

f.  Install the two guide gaskets (28), one above and one below the guide.
 

Note:

 When assembling bellows valves, the bellows flange eliminates the need for a bottom 

guide gasket.

g. While holding the top of the disc holder, install the guide into the body. Align the hole of the 

guide with the body outlet. Once the guide is seated, the disc holder and disc insert can be 
lowered onto the nozzle.


Note:

 Lower the nozzle ring below the seats so that it moves freely.

h. Place the spring (18) and washers (19) onto the spindle (16) and assemble the spindle to the disc 

holder (5) with the spindle cotter pins.


Note:

 No cotter pins are required in D through K orifice sizes all other orifice sizes use two 

cotter pins.

i.  Lower the bonnet (20) over the spindle and spring assembly onto the bonnet studs (21) in the 

body. Position the bonnet counter bore on the O.D. of the guide and lower the bonnet onto the 
guide.

j.  Screw the bonnet nuts (22) onto the bonnet studs and tighten down evenly to prevent 

unnecessary strain and possible misalignment.

k. Screw the adjusting bolt (24) and nut (25) into the top of the bonnet to apply force on the 

spring. (The original set pressure can be approximated by screwing the adjusting bolt down to 
the predetermined measurement.)

l.  Move the nozzle ring up until it touches the disc holder, then lower it two notches. This is a test 

stand setting only.

m. Place the set screw gasket (27) onto the set screw (4) and screw the set screw into the body 

engaging the nozzle ring. The nozzle ring should move back and forth slightly after the set 
screw is tightened.

n.  The valve is now ready for testing.

After testing, the following measures should be taken:
•  Be sure that adjusting bolt nut (25) is locked.
•  Return the nozzle ring to either the original recorded position or to the recommended position 

shown in Table 1.

•  Install the cap or lifting device. See Figure 13 for lifting lever assembly.
•  Seal the cap or lifting lever device and nozzle ring set screw to prevent tampering.

“A” min.

after lapping

“B” mach.

Figure 11 - Disc Insert Minimum Seat 

Height (Table 9)

Содержание SAPAG 8400 Series

Страница 1: ...y Adjusting Lifting Gear Other Causes of Seat Leakage Corrosion 11 Emerson Valves Controls Field Services and Repair Programs Ordering Information Attention The safety of lives and property often depends on the proper operation of the pressure relief valves Consequently the valves should be kept clean and should be periodically tested and reconditioned to make sure they function properly WARNING S...

Страница 2: ...2 Bonnet Stud Nut 24 Adjusting Bolt 25 Adjusting Bolt Nut 26 Pipe Plug 27 Set Screw Gasket 1 28 Guide Gasket 2 29 Tailpiece Gasket 1 34 Seal Wire 35 Seal Clip 36 Nameplate 40 Screwed Cap 41 Cap Gasket 1 Gasket Kit 1 4 42 Test Gag Plug Plug only shown 43 Test Gag plug gasket 1 Notes 1 Consumable Spare Parts Valve parts which should be replaced as part of any disassembly and discs and disc inserts w...

Страница 3: ...ling storage installation use or maintenance of any Emerson Valves Controls Product by a non Emerson Valves Controls employee may void any Emerson Valves Controls guarantees or warranties with respect to such Product All personnel working with Emerson Valves Controls products should be adequately trained and thoroughly familiar with the contents of the appropriate instruction manual s Emerson Valv...

Страница 4: ...fted or handled using the lifting lever Inlet and outlet protectors should remain in place until the valve is ready to be installed on the system Inspection Pressure relief valves should be visually inspected before they are installed to ensure that no damage has occurred during shipment or while in storage All protective material sealing plugs and any extraneous material inside the valve body or ...

Страница 5: ...ervice When the hydrostatic test must be performed with the valve in place a test gag may be used Sapag Series 8000 are provided with test gags as standard In the case of the Type C cap with lifting lever the lifting lever assembly must be replaced with a hydrostatic test cap and test rod prior to hydrostatic testing When test rods are used care must be exercised to prevent overtightening that cou...

Страница 6: ...vertent valve opening A strong high ring position is necessary to obtain a good clean popping action of the valve on air or gas with the limited volume available on the test bench a Not required for testing on liquid Remove the nozzle ring set screw and raise the nozzle ring until it touches the disc holder then back it down two 2 notches Exercise care in counting the number of notches moved so th...

Страница 7: ...est position with the valve closed contact with disc holder Table 2 8500 8590 Nozzle Ring Setting Orifice Size Total revolutions below highest lock position P and Q 3 4 Revolution R and T 1 Revolution Cold Differential Test Pressure Adjustments When a pressure relief valve is on a test bench at room temperature and atmospheric pressure and is to be installed on a system operating at a higher tempe...

Страница 8: ...inute shall be observed for at least one minute and shall not exceed the values indicated in table 6 below b Soft Seated Valves For soft seated valves there shall be no leakage for one minute zero bubbles for one minute Table 6 Maximum seat leakage rate Metal seated pressure relief valves Set Effective Orifice Sizes 0 307 In2 and Smaller Effective Orifice Sizes Larger than 0 307 In2 Pressure Max B...

Страница 9: ...sc insert 8 For balanced bellows valves Style 8490 8590 special care must be taken not to damage the bellows subassembly 6 If parts are difficult to remove due to the presence of corrosive or foreign materials soaking in a suitable solvent may be required i Remove the spindle from the disc holder j Lift the guide off the disc holder k Disc Insert Removal Table 7 Series 8000 disc insert threaded ho...

Страница 10: ...ected for evidence of cracking pitting or deformation that might develop into a leak The bearing surfaces on the guide and disc holder should be checked for residual product build up and any evidence of scoring Inspection of valve components is important to ensure proper valve performance Damaged valve parts must be repaired or replaced Reconditioning of Valve Seats The tightness of a valve and it...

Страница 11: ...on any damaged pressure relief valve seat except where the damage requires remachining The following lapping compounds or their commercial equivalents are suggested Grit Compound No Description 320 Medium Coarse 400 Medium 600 Fine 900 Polish Machining of Nozzle Seats If machining of the nozzle seat or other major repairs are necessary it is recommended that the valve be returned to a Emerson Valv...

Страница 12: ...older 5 and guide 15 by sliding the guide over the disc holder Note The guide for D and E orifice valves protrudes up into the valve bonnet f Install the two guide gaskets 28 one above and one below the guide Note When assembling bellows valves the bellows flange eliminates the need for a bottom guide gasket g While holding the top of the disc holder install the guide into the body Align the hole ...

Страница 13: ... Packed lifting lever with test rod Type E Spindle Adjusting bolt Adjusting bolt nut Seal and wire Cotter pin Cap top gasket Dog Dog shaft Cap top Spindle nut Cap Cap stud Cap stud nut Regular lifting lever Type C Cap Cotter pin Pin Lever Cap set screw Spindle nut Forked lever Cotter pin Pin Cap test rod Type B Threaded cap Low profile Type E Packed lifting lever Type H Bolted cap Low profile Type...

Страница 14: ...n the valve Install the dog shaft O ring in the dog shaft bearing and place the dog shaft bearing gasket on the dog shaft bearing Screw the dog shaft bearing into the cap Rotate the dog shaft so that the dog is pointing down and install the cap assembly onto the bonnet Rotate the dog shaft so that the dog contacts the spindle nut With the scribed line horizontal remove the assembly and adjust the ...

Страница 15: ... together with set pressure part name and item number valve size and style On the valve nameplate the valve serial number is shown Spare parts may be ordered from any Emerson Valves Controls Regional Sales Office or Representative 10 Trouble Shooting Pressure Relief Valves Troubles encountered with pressure relief valves can vitally affect the life and performance of the valve and must be correcte...

Страница 16: ...rosion may result in pitting of valve parts failure of various valve parts build up of corrosive products and general deterioration of the valve materials Corrosive attack is generally controlled through selection of suitable materials or by employing a bellows seal to isolate the valve spring adjusting bolt spindle and guiding surfaces from the corrosive attack of the process fluid Environmental ...

Отзывы: