background image

February 2014

4

Quick Start Guide

Vertical pipe installation

Step 3: Primary element installation

Note

For the 1496 Flange Union refer to the Rosemount 1495 Orifice Plate reference manual (document 
number 00809-0100-4792).

Use the following steps to install the 1495 Orifice Plate 

(paddle or universal plate style).

1. Determine Location and Orientation (see 

page 3

).

2. Install the Orifice Plate

Gas

Steam

Liquid

FLOW

Fl

o

w

*

Flo

w

HI Instrument

Line

LO Transmitter 
Connection

LO Instrument Line

Flo

w

* Bring height of HI instrument line to the same height as 

LO instrument line before running down to the transmitter

HI Instrument Line

LO Transmitter Connection

LO Instrument Line

4792_ QIG_Rev BB.fm  Page 4  Thursday, February 13, 2014  8:46 AM

Содержание Rosemount 1495

Страница 1: ...Quick Start Guide 00825 0100 4792 Rev BB February 2014 Rosemount 1495 Orifice Plate Rosemount 1496 Orifice Flange Union ...

Страница 2: ...I S installations Refer to the 1495 reference manual document number 00809 0100 4792 for more instruction This manual is also available electronically on www rosemount com Process leaks may cause harm or result in death To avoid process leaks only use gaskets designed to seal with the corresponding flange and o rings to seal process connections Contents Primary element location page 3 Primary elem...

Страница 3: ...ual 00809 0100 4792 for a list of required straight pipe recommendations based on ISO 5167 AGA Report No 3 and ASME MFC 3M Standards Shorter straight runs are possible but accuracy will be affected per the Standards Consult the Factory for further information Step 2 Primary element orientation Horizontal pipe installation Gas Steam Liquid FLOW 30 degrees Recommended Zone 120 degrees 30 degrees Flo...

Страница 4: ...owing steps to install the 1495 Orifice Plate paddle or universal plate style 1 Determine Location and Orientation see page 3 2 Install the Orifice Plate Gas Steam Liquid FLOW Flow Flow HI Instrument Line LO Transmitter Connection LO Instrument Line Flow Bring height of HI instrument line to the same height as LO instrument line before running down to the transmitter HI Instrument Line LO Transmit...

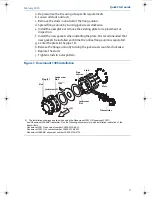
Страница 5: ...ated g Center the plate in the pipe I D h Release the flange union by turning the jackscrews counter clockwise i Replace the studs j Tighten studs in a star pattern Figure 1 Rosemount 1495 installation Nuts Transmitter Stud Pipe Section 1595 1 Jackscrew 2 Plug 2 Nut Gasket 2 Jackscrew Nut Flow 1 The installation drawings applies when using the Rosemount 3051S Rosemount 3051C and Rosemount 3095MV t...

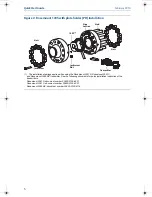
Страница 6: ...installation drawings applies when using the Rosemount 3051S Rosemount 3051C and Rosemount 3095MV transmitter See the following documents for quick installation instruction of the transmitters Rosemount 3051S document number 00825 0100 4801 Rosemount 3051C document number 00825 0100 4001 Rosemount 3095MV document number 00825 0100 4716 Jackscrew 1495 1 ...

Страница 7: ...found on the Rosemount website at www rosemount com A hard copy may be obtained by contacting our local sales office European Pressure Equipment Directive PED 97 23 EC Rosemount 1495 Orifice Plate Sound Engineering Practice SEP Pressure Transmitter See appropriate Pressure Transmitter QIG Hazardous locations certifications For information regarding the electronics product certification see the app...

Страница 8: ...8153 9390 F49 8153 939172 Beijing Rosemount Far East Instrument Co Limited No 6 North Street Hepingli Dong Cheng District Beijing 100013 China T 86 10 6428 2233 F 86 10 6422 8586 2014 Rosemount Inc All rights reserved All marks property of owner The Emerson logo is a trade mark and service mark of Emerson Electric Co Rosemount and the Rosemount logotype are registered trademarks of Rosemount Inc M...

Отзывы: