background image

 MPS-4009 Multi-Chemistry Power Supply Operations Manual Supplement, Doc. No. L01-497 

25 

InterMetro Industries Corporation  


Hiding the Desktop Status Window 

The Desktop Status Window is hidden (disabled from display) in two ways: 

1.  Open the Metro BatteryPro Power Properties dialog, select the “Scheme” tab and left 

click on (to clear) the “Always Display Battery Status” box (see also “Scheme” under 
“Metro BatteryPro Configuration and Status” below). 

2.  Show/Hide status window. 

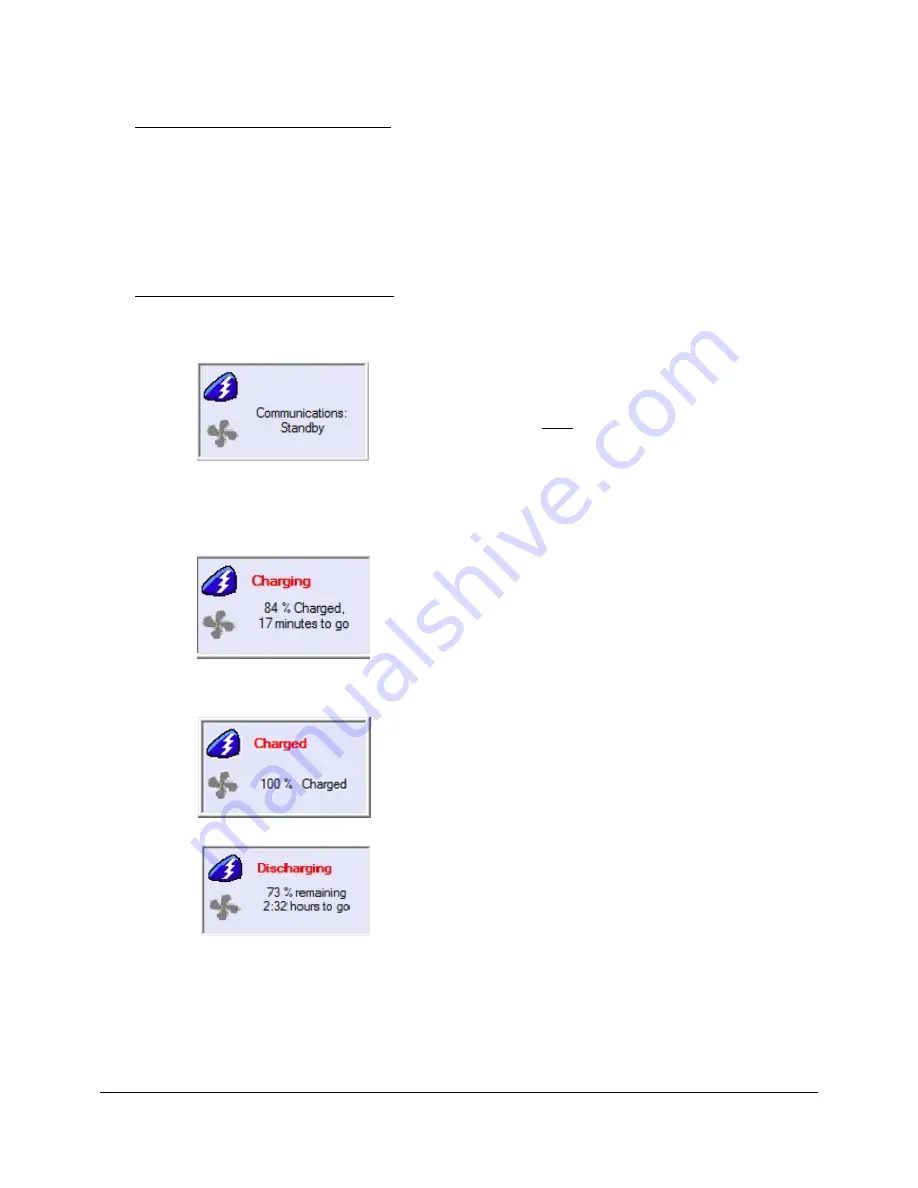
Desktop Status Window Indications 

Following are the indications and meanings of the Desktop Status Window. 

Communications: Standby

.  Power supply and 

workstation computer communications interrupted. 

Symbol may appear very briefly when Metro BatteryPro 
has just started while the power supply and computer 
establish USB communications.  The status should 
change to next state below: if it does not, the USB 
connection between the computer and power supply has 
a problem.  See “Troubleshooting” below. 


Charging

.  Power supply is plugged into AC power 

source and is charging the batteries. 

Blue will scroll across the battery icon indicating that it is 
charging. 

Battery charge level is displayed as a percentage and, 
based on the current equipment load, the calculated 
remaining charge time. 


Charged

.  Power supply is plugged into AC power 

source and the batteries are fully charged. 

Battery icon is a steady blue. 


Discharging

.  Power supply is not plugged into AC 

power and is running on batteries. 

Battery icon is steady blue to the battery charge level. 

Battery charge level is displayed as a percentage and, 
based on the current equipment load, the calculated 
remaining run time. 

Содержание Metro MPS-4009

Страница 1: ...Metro Series Mobile Computing Workstations MPS 4009 Multi Chemistry Power Supply Operations Manual Supplement L01 497 RevA Copyright 2012 InterMetro Industries Corporation www metro com ...

Страница 2: ...THIS PAGE INTENTIONALLY LEFT BLANK ...

Страница 3: ...ation is subject to the following conditions 1 This device may not cause harmful interference and 2 This device must accept any interference that may be received including interference that may cause undesired operation Notice This equipment has been tested and found to comply with the limits for a Class A digital device pursuant to part 15 of the FCC rules These limits are designed to provide rea...

Страница 4: ...le Computing Workstation when it is unplugged from the AC outlet in order to prevent accidental tripping and physical damage to the cord plug or electrical insulation To prevent damage to any cords or connectors when disconnecting always grasp and pull by the connector and not the cord Do not operate the Power Supply or Mobile Computing Workstation with damaged cords or connectors Please replace t...

Страница 5: ...the instructions may cause harmful interference to other devices in the vicinity However there is no guarantee that interference will not occur in a particular installation If this equipment does not cause harmful interference to other devices which can be determined by turning the equipment off and on the user is encouraged to try to correct the interference by one or more of the following measur...

Страница 6: ...MPS 4009 Multi Chemistry Power Supply Operations Manual Supplement InterMetro Industries Corporation Revision History REV Issue Revision Description Date Approved A Initial Release 10 29 2012 Karl Haiden ...

Страница 7: ...tion 14 Charging the Power Supply Battery 14 Powering Up the MPS 4009 Multi Chemistry Power Supply 15 Starting Metro BatteryPro 16 Metro BatteryPro Settings 16 Terminating Metro BatteryPro 17 Operation 18 Power Supply Location on the Metro Series Mobile Computing Workstation 18 Powering Up the MPS 4009 Multi Chemistry Power Supply 19 Remote Fuel Gauge 19 Starting Metro BatteryPro Application 22 Me...

Страница 8: ...g the Power Supply Batteries 36 Disassembly and Assembly Procedure of Power Supply Batteries 39 Storage and Transport Conditions 44 Shipment of Power Supply 44 Troubleshooting 46 Technical Specifications 49 Contacting InterMetro Industries Corporation 50 InterMetro Industries Corporation Contact Information 50 InterMetro Customer Service 50 Repair 50 ...

Страница 9: ...ions Manual Supplement Doc No L01 497 9 InterMetro Industries Corporation References Document Number Title 400210 Flo 1700 Series Mobile Computing Workstation Operations Manual 401504 Flo 1800 Series Mobile Computing Workstation Operations Manual ...

Страница 10: ...ons The Metro Multi Chemistry Power Supply is a fully automatic power supply charger system with a nominal DC output voltage of 12 Volts V and a battery capacity of 512 to 540 Watt hours Wh depending on chemistry When plugged into an AC outlet it supplies the Mobile Computing Workstation system equipment while also charging the cells When unplugged from the outlet the power supply switches automat...

Страница 11: ...atus battery level as a percentage and calculated remaining run time The status is displayed on the Workstation display monitor using the Windows task bar and control panels Metro BatteryPro also alerts the user when the power supply batteries are reaching the end of the discharge cycle so that the user can perform any one of three actions 1 Save any work and shut down the system 2 Allow the compu...

Страница 12: ...teries Fits conveniently in the base of the Flo Series Mobile Computing Workstations Software application Metro BatteryPro provides the power supply status on the Metro Series Mobile Computing Workstations monitor display o Status icon on Windows taskbar o Desktop status window o Power Properties dialog to configure settings and view diagnostic data Compatible with Flo 1700 and 1800 series Mobile ...

Страница 13: ...for the Mobile Computing Workstation to which the Power Supply is attached for additional information The MPS 4009 Multi Chemistry Power Supply is only TÜV certified if the equipment is left in its original configuration as shipped from InterMetro Industries Corporation If the user alters the power supply by changing components on or adding components to the power supply this will void the TÜV cer...

Страница 14: ...s been unpacked the user should inspect the unit for any shipping damage If there is any damage please contact InterMetro Customer Service immediately Battery Preparation Caution Before placing the MPS 4009 Multi Chemistry Power Supply into service on a Metro Series Mobile Computing Workstation the Lithium Ion cells must be connected Depending on the shipment they may not be connected due to USDOT...

Страница 15: ...d Storage OFF position The switch position disconnects the battery from any internal or external equipment and avoids deep discharges of the battery which can cause damage to the battery Notice If the MPS 4009 Multi Chemistry Power Supply has been switched to Extended Storage for more than 1 week connect the workstation to AC to wake up the power supply before switching it to ON ON Extended Storag...

Страница 16: ...first time Metro BatteryPro is launched the Windows Firewall may ask you if you want to continue to block Metro BatteryPro If this happens click the Unblock button Metro BatteryPro Settings Metro BatteryPro settings are configured through the Metro BatteryPro Power Properties dialog The Power Properties dialog is entered by right clicking on the Metro BatteryPro status tray icon highlighting with ...

Страница 17: ...eryPro Power Properties Dialog Terminating Metro BatteryPro Metro BatteryPro can be stopped by right clicking on the Metro BatteryPro status tray icon highlighting with the mouse pointer and selecting Exit with a left click Right click on Metro BatteryPro status tray icon and select and left click on Exit to stop Metro BatteryPro ...

Страница 18: ...bottom of the Metro Series Mobile Computing Workstation under the Base Deck The Remote Fuel Gauge located on the monitor stalk and the AC Power Cord associated with the Power Supply is also indicated Base Deck Remote Fuel Gauge AC Power Cord Power Supply Flo 1700 Series Base Showing Location of Power Supply Caution Before using the equipment for the first time the Multi Chemistry cells may need to...

Страница 19: ...g on DC power a Remote Fuel Gauge is connected to the power supply The embedded Remote Fuel Gauge is located just below the monitor in the stalk and gives the user the current battery status at eye level height Remote Fuel Gauge If the battery is fully charged all five 5 amber LEDs are illuminated The LEDs always display the battery charge level whether the computer is operating or not As the batt...

Страница 20: ...bile operation Example shown is down to about 50 charge remaining Low battery LED flashing plug power supply into AC immediately AC indicates the power supply is plugged into the wall AC CH indicates the battery is charging AC and CH LED must be ON The amber LEDs will turn on in sequence to indicate the charging status Example shown is up to about 50 charged AC indicates the power supply is plugge...

Страница 21: ...rn off indicating that the batteries of the power supply are fully charged Notice Extended Storage If the Mobile Computing Workstation will not be used for an extended period of time ensure the ON Extended Storage Switch is set to the Extended Storage OFF position If the power supply is left in the ON position the workstation equipment will continue to draw power and deep discharge the battery Not...

Страница 22: ... MPS 4009 USB B port The connection is already made if the workstation is delivered with the MPS 4009 and Metro BatteryPro installed If Metro BatteryPro is not running as indicated by the status tray icon shown below it can be started by double clicking on the Battery icon shortcut provided on the desktop by the software installation Blue Battery shape indicates Metro BatteryPro is running If Metr...

Страница 23: ...tteryPro has just started while the power supply and computer establish USB communications The status should change to a battery shape below if it does not the USB connection between the computer and power supply has a problem See Troubleshooting below Charging Power supply is plugged into AC power source and is charging the batteries Blue will scroll across the battery icon indicating that it is ...

Страница 24: ... Battery Status box is checked in the Scheme tab of the Metro BatteryPro Power Properties dialog see Scheme under Metro BatteryPro Configuration and Status below Displaying the Desktop Status Window The Desktop Status Window is enabled for display in two ways 1 Right click on Metro BatteryPro status tray icon and select and left click on Show Hide Status Window Meter to display the Desktop Status ...

Страница 25: ...o has just started while the power supply and computer establish USB communications The status should change to next state below if it does not the USB connection between the computer and power supply has a problem See Troubleshooting below Charging Power supply is plugged into AC power source and is charging the batteries Blue will scroll across the battery icon indicating that it is charging Bat...

Страница 26: ...as dropped below threshold set for Low Battery Alert see Alarms below Battery icon is light blue to the battery charge level Notice A Critical Battery Alert message may be displayed if Display Message box is checked for the Notification action See Alarm Notification and Action Settings in Alarms below For fan less operation select Charging Mode Fan off Quiet For fan operation select Charging Mode ...

Страница 27: ... allows changes to Metro BatteryPro Power Scheme settings and to reveal or hide the display of the Desktop Status Window Power Meter Displays the current summary information about the power source and batteries Alarms Displays and allows changes to low and critical battery alert levels and actions settings Status Displays RF signal strength Battery Health and BatteryPro Version Diagnosis Hidden ta...

Страница 28: ...con Click on another tab to view or edit other settings Configuration Setting The Configuration Setting sets three delays when the workstation is not actively being used 1 Turn off monitor delay until the system turns off the workstation display monitor 2 System standby delay until the system enters standby mode 3 System Hibernates delay until the computer enters hibernation 4 Charging Mode turns ...

Страница 29: ...gs Power Meter Tab Display On AC Select Power Meter tab in Metro BatteryPro Shown at left is indication of plugged in and running off AC and charging Display includes battery specifications percent of capacity charged and time remaining until fully charged Click on X to minimize the dialog back to the status tray icon Click on another tab to view or edit other settings Power Meter Tab Display No C...

Страница 30: ...ar Percentage is battery discharge level when the alarm will activate Notification and perform the Action shown 3 Click on Alarm Action button to set Alarm actions New dialog will pop up see below Click on Apply button to apply new values Click on X to minimize the dialog back to the status tray icon Click on another tab to view or edit other settings Alarm Notification and Action Settings Click o...

Страница 31: ...rm Action Setting Click check box to enable an Alarm action to be performed when the alarm occurs Click on down arrow at right of setting to open drop down list Click on desired action Hibernate or Shutdown If enabled by the checkbox the workstation computer will perform the selected action when the alarm level is reached Click on OK button to apply new value and exit the dialog Click on Cancel bu...

Страница 32: ... disk space for hibernation Click on X to minimize the dialog back to the status tray icon Click on another tab to view or edit other settings Diagnosis When revealed clicking on the Diagnosis tab provides a running list of power supply and battery data for troubleshooting purposes Notice The hidden Metro BatteryPro Diagnosis tab is revealed by holding down the Ctrl key and clicking on the Metro i...

Страница 33: ...Tab Click the Hide button to hide the Diagnosis tab again Enable Snapshot Every Checkbox Click the Enable Snapshot Every checkbox to enable debug mode Enabling the battery data to be recorded to a log file C Program Data Metro BatteryPro at a time interval set by the Interval field Data Save Interval From the dropdown choose the time in seconds into the Interval field for the desired time interval...

Страница 34: ...l handle brackets screws and other hardware used in this procedure are usually taken from a previous power supply mounted on the workstation If replacement hardware is needed please contact InterMetro Customer Service 1 Attach two handle brackets one on each side of the power supply using three 8 32 pan head screws Be sure to put the right hand bracket on the right side and left hand on the left s...

Страница 35: ...pply See Disconnecting the Power Supply Batteries for Shipment below 3 Remove the two 8 32 pan head screws from the workstation power supply mounts on each side 4 Facing the back of the workstation lift the power supply up to free the tabs from the slots on the mounts on the bottom of the workstation base Slide the handle brackets down the ramp of the mounts and lift out the power supply 5 Remove ...

Страница 36: ...y to the power supply enclosure could leak inside and cause damage Be careful not to splash solvents on the power supply enclosure Connecting the Power Supply Batteries Notice The following procedure for Connecting the Power Supply Batteries applies only to Metro Series Mobile Computing Workstation equipped with the Multi Chemistry Power Supply MPS 4009 The battery cells may or may not be connecte...

Страница 37: ...sition Power Supply switch down to Standby Open the Battery Connector Access Panel Notice On some models Metro Series Mobile Computing Workstation it may be necessary to access the Power Supply on the back by opening a cover door at the bottom of the cart Open Power Supply Cover Door As Required Remove screws on sides of power supply that hold the Battery Connector Access Panel Power Supply Rear V...

Страница 38: ...il the latch locks completely The latch should click into place Line up Cable Plug with Socket Push Cable Plug firmly into Socket until clip locks Check that all connections have been made and properly seated with latches locked There are up to of 2 battery pack connectors in an MPS 4009 Multi Chemistry power supply Properly seated connections Close the Battery Connector Access Panel Rotate the Ba...

Страница 39: ...e access panel to access the battery connector as shown in figure below Removal of Access Panel 2 Firmly grip the cable plug between thumb and index finger as shown below Press the tab on the battery terminal and remove it Unplug Cable Plug 3 Firmly pull out the battery tray to observe the 3 SLA batteries and remove positive negative battery terminals and the unused connector from the rubber band ...

Страница 40: ...d Battery Assembly Procedure 1 Place battery tray with Velcro straps on a secure or grounded table as shown in figure below Battery Tray with Velcro Straps 2 Install 2 SLA batteries on the battery tray horizontally as shown below On the third SLA battery make sure a rubber band is place around the battery as shown below The rubber band will be used to secure the extra battery connector Installatio...

Страница 41: ...other two SLA batteries as shown below Connect all positive and negative battery terminals to the SLA s Note Check all positive and negative terminals for accuracy Tighten the Velcro straps to secure the SLA batteries on the battery tray Connect Terminals to SLA Batteries 4 Install the battery tray inside the Green Cubes Power Supply compartment as shown in figure below Installation of Battery Tra...

Страница 42: ...embly Procedure 1 Remove access panel to access the battery connector as shown in figure below Removal of Access Panel 2 Firmly grip the cable plug between thumb and index finger as shown below Press the tab on the battery terminal and remove it Unplug Cable Plug 3 Pull out the battery tray to remove the CALB battery Pull Out Battery Tray ...

Страница 43: ...enclosure and secure battery connector as shown in figure below Align CALB Battery 2 Firmly grip the cable plug between thumb and index finger as shown below Press the tab on the battery terminal and insert it Note Secure the battery connector cable as well Plug Battery Connectors 3 Install the battery tray inside the Green Cubes Power Supply compartment as shown in figure below Installation of Ba...

Страница 44: ...ano Phosphate Battery Li Nano Non Class 9 Shipment In the USA the Li Nano batteries can be disconnected from the power supply for a regular Ground shipment The shipping container must have the following marking Class 9 Shipment Outside the USA in any shipping mode and air or sea transport inside the US the power supply must be shipped as fully regulated Class 9 Hazardous Material Dangerous Goods I...

Страница 45: ...egulated Class 9 shipment in any shipping mode The shipper must be certified for Li Ion Class 9 shipments The power supply must be shipped per UN3481 Lithium ion batteries contained in equipment on cargo aircraft only The power supply contains one battery pack Ratings below given per battery pack Per battery pack Battery weight 7 33 kg Wh rating 512 Wh Equivalent Li Content ELC 48 g SLA The SLA ba...

Страница 46: ...o the problem that occurs Please refer also to the Metro BatteryPro Users Manual if it is in use What programs and or optional devices are you using on the workstation See if you can cause the problem to occur again This may help you understand the source of the problem and will help you describe the problem if you must call InterMetro Customer Service for technical assistance What LEDs on the Fue...

Страница 47: ...pply Check that the fan is not blocked Check the ventilation slots around the power supply case for dust build up and clean Turn on the power supply and restart the computer equipment If this problem continues contact InterMetro Customer Service Warning 5 Battery pack overheating critical System will shut down in 2 minutes Immediately turn off computer equipment and then the power supply Let cool ...

Страница 48: ...tact InterMetro Customer Service Warning 7 Short Circuit or Overload Power supply overloaded Immediately turn off the power supply Check your workstation cart for a possible short or overload Turn on the power supply and restart the computer equipment If this problem continues contact InterMetro Customer Service Warning 10 Power supply overheating Charger module Air flow in the power supply may be...

Страница 49: ...attery packs 540 Wh CALB full load of 4 battery packs 512 Wh Charging Time 2 hours Fan with 50 W Load 3 hours Fanless with 50 W Load Operating Temperature 10 C to 30 C 50 F to 86 F Charge Status Indicator LED on remote fuel gauge Outlet rating Charge 10 carts per 20 A circuit Weight Power Supply with Li Nano Lithium Ion Nano Phosphate LiFePO4 23 8 lbs Power Supply with SLA Sealed Lead Acid Battery...

Страница 50: ...our customer service department at 1 800 992 1776 Americas 905 676 9890 Canada 31 76 58 77550 Europe 9714 811 8286 Middle East 65 6550 1291 Asia Pacific Repair Power Supply To return equipment for repair Have model and serial numbers ready obtain either the Power Supply information from its label or the Workstation information from its label as shown at left Contact InterMetro Customer Service at ...

Отзывы: