background image

12


U.L. Model No.: 42-ANT & 52-ANT

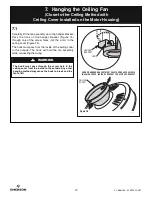
7.  Hanging the Ceiling Fan

(Close-to-the-Ceiling Method with

Ceiling Cover Installed on the Motor Housing)

HANGER
BRACKET

HOOK

HOOK ON HANGER BRACKET MUST PASS THROUGH SCREW HOLE 
IN CEILING COVER, INSIDE OF BRACKET TO OUTSIDE OF BRACKET

CEILING
COVER

Figure 15

7.1

Carefully lift the fan assembly up to the hanger bracket.
Pass  the  hook  on  the  hanger  bracket  (Figure  15)
through  one  of  the  screw  holes  (not  the  slots)  in  the
ceiling cover (Figure 15). 

The hook must pass from the inside of the ceiling cover
to  the  outside.  The  hook  will  hold  the  fan  assembly
while connecting the wiring.

The hook must pass through the screw hole in the

ceiling cover from the inside to the outside. Any other

hanging method may cause the hook to break and the

fan to fall.


WARNING

!

Содержание CF710BS02

Страница 1: ...shed Steel CF710ORB02 Oil Rubbed Bronze CF710WW02 Appliance White 42 PRO Series II Model Numbers CF711AB02 Antique Brass CF711BS02 Brushed Steel CF711ORB02 Oil Rubbed Bronze 50 PRO Series II Model Numbers Net Weight 16 5 Lbs Net Weight 19 8 Lbs READ AND SAVE THESE INSTRUCTIONS 1 800 654 3545 PRO SERIES II Ceiling Fan Owner s Manual CF711ORS02 Oil Rubbed Bronze with Scavo Glass CF711WW02 Appliance ...

Страница 2: ...shock this fan must be installed with an isolating wall control switch NOTE The CF711 fan is suitable for use with solid state speed controls WARNING To avoid fire shock or injury do not use an Emerson or any other brand of control not specifically approved for this fan WARNING This product is designed to use only those parts supplied with this product and or any accessories designated specificall...

Страница 3: ...ded view illustration NOTE Place the parts from the loose parts bags in a small container to keep them from being lost If any parts are missing call 1 800 654 3545 for replacement parts before proceeding G F H I E C B A D PACKAGE CONTENTS 1 2 3 7 8 4 5 6 9 HARDWARE CONTENTS Part Description Quantity 1 M5 x 16mm Washer Head Blade Screws 16 2 Phillips Round Head Flange Screw spare 1 3 Wire Connector...

Страница 4: ...quirements Your new ceiling fan will require a grounded electrical supply line of 120 volts AC 60 Hz 15 amp circuit To reduce the risk of fire electric shock or personal injury mount fan to outlet box marked Acceptable for Fan Support of 22 7 kg 50 lbs or less and use screws supplied with outlet box Most outlet boxes commonly used for support of light fixtures are not acceptable for fan support an...

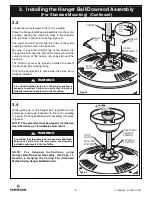
Страница 5: ...tandard method In no case should the fan blades be lower than seven feet above the floor Depending on your desired mounting method proceed to INSTALLING HANGER BALL DOWNROD ASSEMBLY for standard mounting or to INSTALLING CEILING COVER ON FAN MOTOR HOUSING for close to the ceiling mounting 3 Installing the Hanger Ball Downrod Assembly For Standard Mounting THREE 42 MOTOR LEADS CEILING COVER 3 1 Pas...

Страница 6: ...from working loose Pull on the hanger ball to make sure the clevis pin is properly installed Figure 3 MOTOR COUPLING HANGER BALL DOWNROD ASSEMBLY RETIGHTEN SETSCREW RETIGHTEN SETSCREW Figure 4 3 4 While pulling up on the hanger ball retighten the two setscrews previously loosened in the motor coupling to secure the hanger ball downrod assembly into place Figure 4 NOTE The setscrews must be properl...

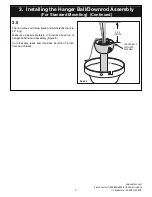
Страница 7: ...ownrod Assembly For Standard Mounting Continued HANGER BALL DOWNROD ASSEMBLY 6 to 9 INCHES 3 5 The fan comes with blue black and white leads that are 42 long Measure up approximately 6 to 9 inches above top of hanger ball downrod assembly Figure 5 Cut off excess leads and strip back insulation 1 2 inch from end of leads Figure 5 ...

Страница 8: ...s for future use Figure 6 RUBBER GASKET MOTOR HOUSING RUBBER GASKET LARGE HOLES 3 RUBBER GASKET SMALL HOLES 3 INSTALL RUBBER GASKET 4 2 Position the rubber gasket supplied in parts bag on the motor housing The three small holes in the gasket should center over the holes in the motor housing where the three screws were previously removed Figure 7 The three large holes in the gasket should center ov...

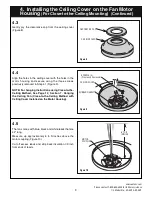
Страница 9: ...OVER 4 3 Gently pry the decorative cap from the ceiling cover Figure 8 RUBBER GASKET SCREWS 3 Previously Removed CEILING COVER 4 4 Align the holes in the ceiling cover with the holes in the motor housing and secure using the three screws previously removed in Step 4 1 Figure 9 Figure 9 Figure 8 NOTE For hanging instructions using Close to the Ceiling Method See Page 12 Section 7 Hanging the Ceilin...

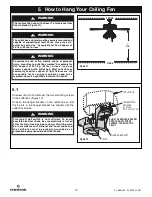
Страница 10: ...igure 11 WARNING To reduce the risk of fire electric shock or personal injury mount fan to outlet box marked Acceptable for Fan Support of 22 7 kg 50 lbs or less and use screws supplied with outlet box Most outlet boxes commonly used for support of light fixtures are not acceptable for fan support and may need to be replaced Consult a qualified electrician if in doubt WARNING 5 How to Hang Your Ce...

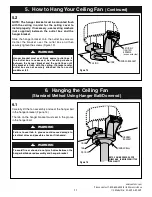
Страница 11: ...et box If the outlet box is recessed use leveling washers between the hanger bracket and the outlet box until the bracket is flush with the ceiling If bracket and or outlet box are not securely attached the fan could wobble or fall WARNING 6 Hanging the Ceiling Fan Standard Method Using Hanger Ball Downrod HANGER BRACKET HOOK TAB GROOVE HANGER BALL NOTE CEILING COVER SUPPL Y WIRES AND FAN WIRES OM...

Страница 12: ...1 Carefully lift the fan assembly up to the hanger bracket Pass the hook on the hanger bracket Figure 15 through one of the screw holes not the slots in the ceiling cover Figure 15 The hook must pass from the inside of the ceiling cover to the outside The hook will hold the fan assembly while connecting the wiring The hook must pass through the screw hole in the ceiling cover from the inside to th...

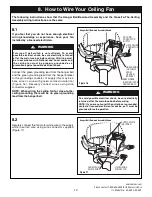
Страница 13: ... hanger ball Turning off wall switch is not sufficient To avoid possible electrical shock be sure electricity is turned off at the main fuse box before wiring All wiring must be in accordance with National and Local codes and the ceiling fan must be properly grounded as a precaution against possible electrical shock WARNING To avoid possible electrical shock be sure electricity is turned off at th...

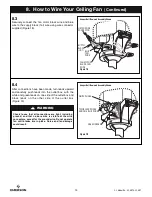
Страница 14: ... FAN WIRE BLUE FAN WIRE SUPPLY BLACK HOT Figure 18 8 3 Securely connect the fan motor black wire and blue wire to the supply black hot wire using wire connector supplied Figure 18 TWO BLACK WIRES AND ONE BLUE WIRE WHITE WIRES GREEN WIRES Figure 19 8 4 After connections have been made turn leads upward and carefully push leads into the outlet box with the white and green leads on one side of the ou...

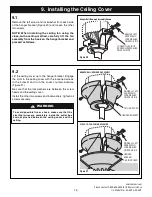
Страница 15: ...talling the ceiling fan using the close to the ceiling method carefully lift the fan assembly from the hook on the hanger bracket and proceed as follows CLOSE TO THE CEILING ASSEMBLY REINSALL LEFT SCREW AND LOCKWASHER ON EACH SIDE HANGER BRACKET CEILING COVER HANGER BALL DOWNROD ASSEMBLY CEILING COVER HANGER BRACKET REINSALL LEFT SCREW AND LOCKWASHER ON EACH SIDE Figure 21 9 2 Lift the ceiling cov...

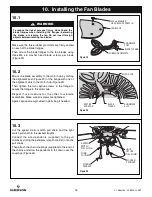
Страница 16: ...ecure the flange to the motor hub Repeat this procedure for the other four blade assemblies Make sure all screws are tightened Spare captive screw provided in parts bag if needed CHAIN COUPLER WOODEN PENDANT 3 SPEED SWITCH PULL CHAIN LIGHT FIXTURE PULL CHAIN WOODEN PENDANT Figure 24 10 3 Cut the speed control switch pull chain and the light switch pull chain to the desired lengths Connect the wood...

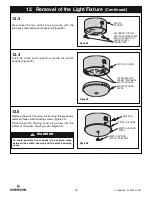
Страница 17: ...ly pull the shade off using a twisting motion 12 Removal of the Light Fixture SWITCH HOUSING LIGHT FIXTURE SCREW 3 LIGHT BULBS PREVIOUSLY REMOVED Figure 26 12 1 NOTE In some instances it may be desirable to install the ceiling fan without the light fixture If this is the case proceed as follows You may want to keep the light fixture for possible future use Light bulbs and glass shades removed Remo...

Страница 18: ...RES AND CONNECTORS INSIDE SWITCH HOUSING Figure 29 12 4 Tuck the wires and connectors inside the switch housing Figure 29 SWITCH HOUSING SWITCH HOUSING COVER SCREW 3 SWITCH HOUSING COVER PLUG SCREW Figure 30 12 5 Replace the switch housing cover using the previously removed three switch housing screws Figure 30 Place the switch housing cover plug screw into the bottom of the switch housing cover F...

Страница 19: ...he fan by gently pulling on the light switch pull chain Your fan is shipped from the factory with the reversing switch positioned to circulate air downward If airflow is desired in opposite direction turn the fan off and wait for the blades to stop turning then slide the reversing switch to the opposite position and turn the fan on again Figure 31 The fan blades will turn in the opposite direction...

Страница 20: ...rding packaging material be certain all parts have been removed HOW TO ORDER REPAIR PARTS WHEN ORDERING REPAIR PARTS ALWAYS GIVE THE FOLLOWING INFORMATION PART NUMBER NAME OF ITEM PART DESCRIPTION MODEL NUMBER The model number of your Fan will be found on a label attached to the top housing For repair parts phone 1 800 654 3545 ...

Страница 21: ...r 3 10 Hairpin Clip 11 Clevis Pin 12 Pendant Fan 13 Coupling 2 14 Pendant Light 15 Screw M5 x 6mm Washer Head 16 16 Flange Screw Phillips Round Head 1 17 Rubber Gasket 18 Blade Balance Kit Owner s Manual BP7258 9 BP7258 9 BP7258 9 BP7258 9 BP7258 9 42 PRO SERIES II Model Numbers Key No Description CF710WW02 CF710BS02 CF710ORB02 Hanger Pack Assembly Consisting of 762231 1 762231 4 762231 8 1 Hanger...

Страница 22: ... 5 Tighten screws securely 3 Fan wobbles 1 Setscrews in motor coupling are loose 1 Tighten both setscrews securely in the motor coupling excessively 2 Setscrew in hanger ball downrod assembly 2 Tighten the setscrew in the hanger ball downrod is loose assembly 3 Screws securing fan blade flanges to 3 Check to be sure screws which attach the fan blade motor are loose flanges to the motor are tight 4...

Страница 23: ... this limited warranty You can return your Emerson Ceiling Fan to your place of purchase or you can call Emerson Customer Service at 1 800 237 6511 to obtain a return authorization and service identification tag In order for us to confirm that your Emerson Ceiling Fan is still under warranty please retain your receipt or other proof of purchase and have that information readily available when retu...

Страница 24: ...ice 8 a m 6 p m Eastern Monday Friday 1 800 654 3545 www emersonfans com Retain this manual for future use Air Comfort Products DIVISION OF EmErSON ElEctrIc cO 8100 W Florissant St louis mO 63136 Part No F40BP72580009 Form No BP7258 9 Revision 150605 U L Model No 42 ANT 52 ANT Printed in China 06 15 ...

Отзывы: