


267
6)
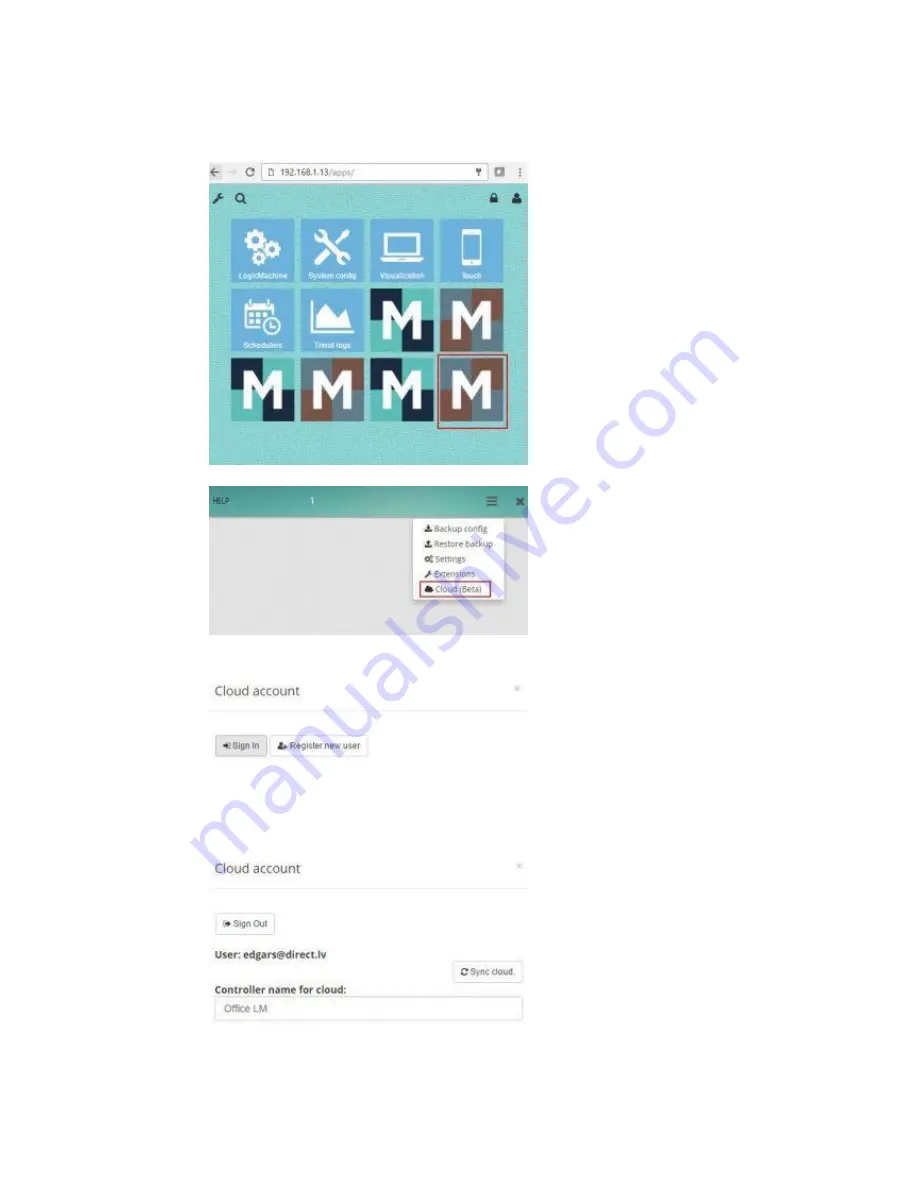
In LM mains screen you might see several versions of Mosaic (v1, v2, Cloud). After cloud
app tests are finished, we will add cloud functionality in the regular Mosaic app which is
located in app store.
7)
Click on the newly installed Mosaic editor icon
8)
Click on the Cloud in the menu
9)
You will see the following screen. Click on
Register New User
, use email address as
username and password minimum 8 symbols. Save
10)
Then click on
Sign In
, and login with registered user. You can set LM name which you
will use to find the device on the cloud dashboard (there is possibility to assign several
devices to one user account. You will be able to choose the LM to control from cloud
dashboard)
11)
Sync Cloud
button will synchronize with cloud all Mosaic elements including objects,
widgets etc. After each change in Mosaic configuration (grp addresses, new widgets
etc.), you need to click Sync Cloud button.
Содержание LM5p-GSM
Страница 10: ...10 1 Terminal connection schemes Model ...
Страница 12: ...12 canX connection Powering over 24V terminals ...
Страница 15: ...15 Digital output e g relay contactor ...
Страница 16: ...16 Digital or Analog input e g pushbutton or 0 5V current measurement sensor ...
Страница 17: ...17 Digital input e g pushbutton ...
Страница 18: ...18 1 wire connection ...
Страница 19: ...19 2 Standards supported ...
Страница 22: ...22 3 Insert SIM card and close the holder Close the front cover ...
Страница 36: ...36 ...
Страница 42: ...42 a basic background which can be changed by necessity b foreground which will stay unchanged ...
Страница 48: ...48 ...
Страница 120: ...120 Show logs window show logs in separate window Edit custom JavaScript ...
Страница 151: ...151 Visualization parameters Defines global or local visualization parameter for specific group address ...
Страница 156: ...156 Additional classes additional CSS classes for the element ...
Страница 179: ...179 9 8 KNX connection KNX specific configuration is located in Network KNX connection window General tab ...
Страница 195: ...195 9 23 Running processes System running processes can be seen in Status Running processes window ...
Страница 201: ...201 ...
Страница 221: ...221 Clear binary object value at priority 12 bacnet write 127001 binary value 2305 nil 12 ...
Страница 246: ...246 value event getvalue res value 100 255 grp write 1 1 6 res dt uint8 ...
Страница 277: ...277 ...
Страница 281: ...281 UIO16 16 channel universal input output module When the changes are done for the device it is marked in yellow ...
Страница 282: ...282 Press this button to upload new settings to all modified all devices ...


