Copy right © 2018 Shenzhen Emakefun Technology co., Ltd.
22
We can see that motor 1 and motor 2 are constantly turning and reversing.
Stepper Motor
Principle of stepper motor
Stepper motor is an open-loop control motor that converts electrical pulse signals into angular displacement
or line displacement. It is the main actuator in modern digital program control systems and widely used. In
the case of non-overloading, the speed and stop position of the motor only depends on the frequency of the
pulse signal and the number of pulses.
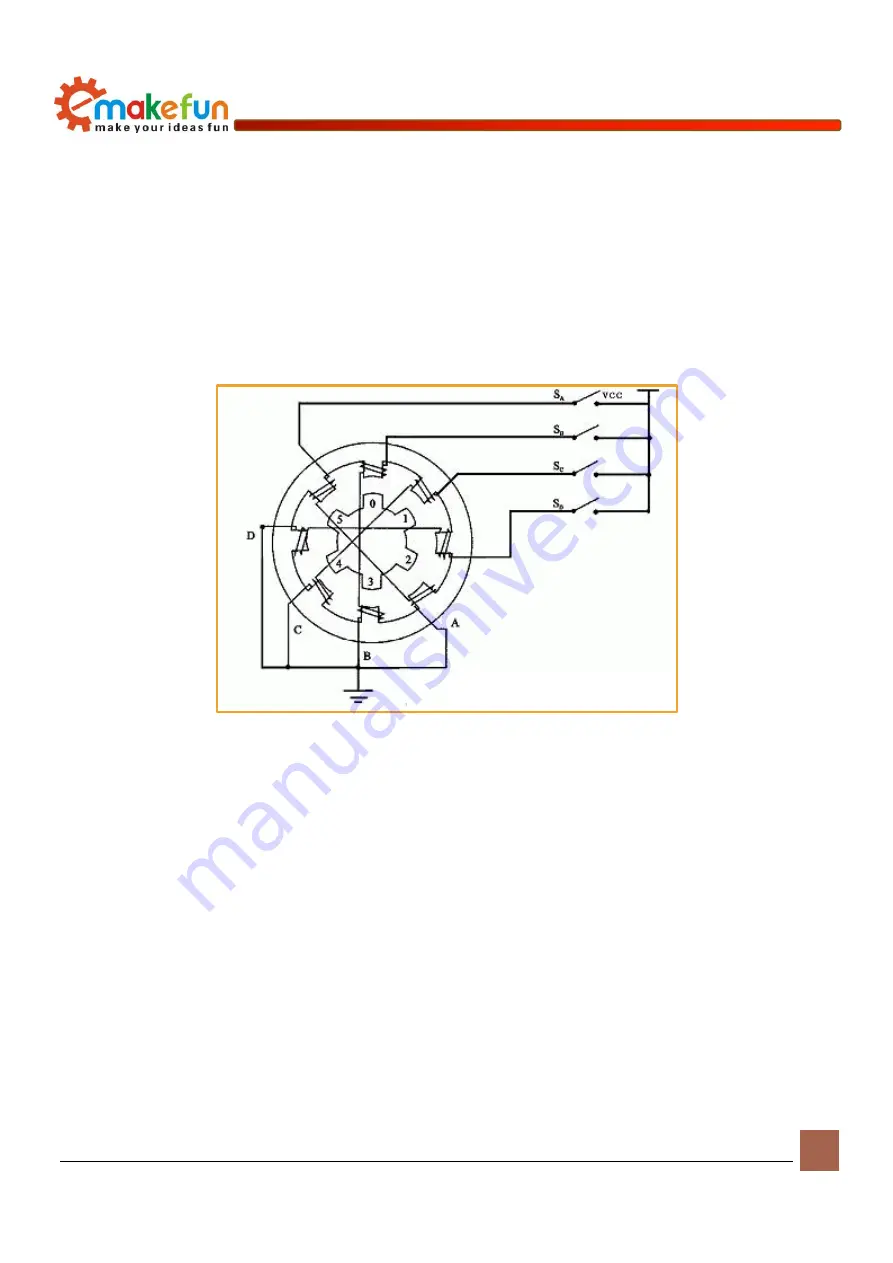
Figure 7-1 stepper motor schematic
As shown in Figure 7-1 above, there are multiple pairs of magnetic poles inside the stepping motor.If the
power-on state remains unchanged, the stepper motor will remain in a fixed state. Only by changing the
energization state of each pair of poles can the stepper motor continue to rotate. Therefore, the stepper motor
cannot be directly connected to the DC or AC power supply, and a dedicated driving power supply (stepper
motor driver) must be used. The controller (pulse signal generator) can control the angular displacement by
controlling the number of pulses to achieve the purpose of accurate positioning. At the same time, the speed
and acceleration of the motor rotation can be controlled by controlling the pulse frequency, thereby
achieving the purpose of speed regulation.
Driving stepper motor
Connect a stepper motor to port 1 and port 2 of the stepper motor as shown in Figure 6-5. The working
voltage of the stepper motor is between 5~12V. If the working voltage of the stepper motor is too low or too
high, there is a phenomenon that the burned motor or the drive board collapses, and the battery should be
Содержание PS2X
Страница 1: ...Copy right 2018 Shenzhen Emakefun Technology co Ltd 1 PS2X Motor Drive Board Instruction Manual V 1 2...
Страница 10: ...Copy right 2018 Shenzhen Emakefun Technology co Ltd 10 Driver Software option Figure 4 3 Update Driver...
Страница 12: ...Copy right 2018 Shenzhen Emakefun Technology co Ltd 12 Figure 4 5 Select drive path Figure 4 6 install driver...


