8
Chapter 1
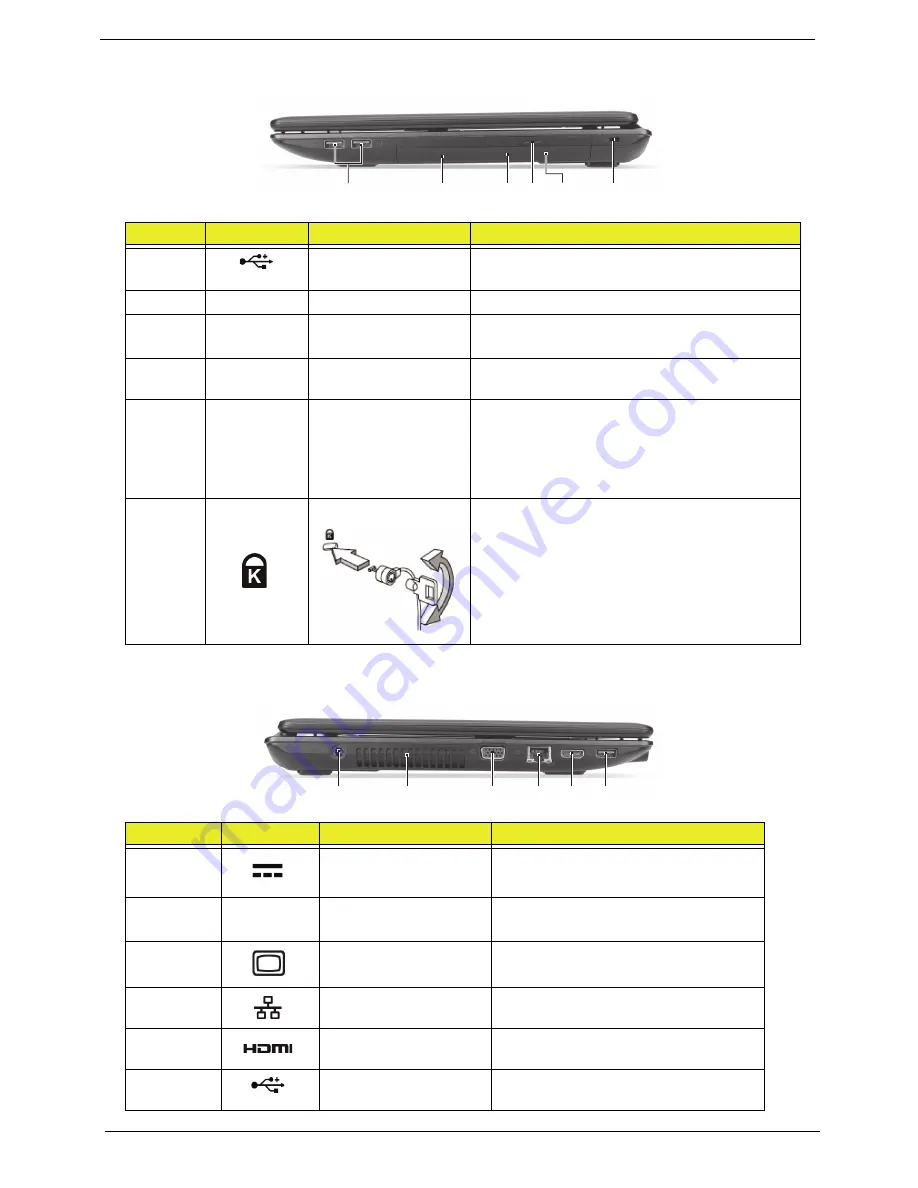
Right View
Left View
No.
Icon
Item
Description
1
USB 2.0 ports
Connect to USB 2.0 devices
(e.g., USB mouse, USB camera).
2
Optical drive
Internal optical drive; accepts CDs or DVDs.
3
Optical disk access
indicator
Lights up when the optical drive is
active.
4
Optical drive eject
button
Ejects the optical disk from the drive.
5
Emergency eject
hole
Ejects the optical drive tray when the
computer is turned off.
Note: Insert a paper clip to the emergency eject
hole to eject the optical drive tray when the
computer is off.
6
Kensington lock slot
Connects to a Kensington-compatible computer
security lock.
Note: Wrap the computer security lock cable
around an immovable object such as a table or
handle of a locked drawer. Insert the lock into the
notch and turn the key to secure the lock. Some
keyless models are also available.
No.
Icon
Item
Description
1
DC-in jack
Connects to an AC adapter.
2
Ventilation slots
Enable the computer to stay cool,
even after prolonged use.
3
External display (VGA)
port
Connects to a display device (e.g.,
external monitor, LCD projector).
4
Ethernet (RJ-45) port
Connects to an Ethernet 10/100/1000-
based network.
5
HDMI port
Supports high-definition digital video
connections.
6
USB 2.0 port
Connects to USB 2.0 devices (e.g.,
USB mouse, USB camera).
2
1
3 4 5
6
2
1
3
4 5 6
Содержание E732
Страница 6: ...VI ...
Страница 10: ...4 Table of Contents ...
Страница 15: ...Chapter 1 5 System Block Diagram ...
Страница 38: ...28 Chapter 1 ...
Страница 52: ...42 Chapter 2 ...
Страница 102: ...92 Chapter 3 7 Replace the two 2 bezel screws Step Size Quantity Screw Type LCD Bezel Assembly M2 5 4 0 2 ...
Страница 104: ...94 Chapter 3 3 Connect the Bluetooth cable to the Bluetooth module 4 Adhere the Bluetooth cable to the mainboard ...
Страница 106: ...96 Chapter 3 2 Connect the Bluetooth cable to the mainboard 3 Connect the speaker cable to the mainboard ...
Страница 114: ...104 Chapter 3 4 Using the pull tab slide the HDD module in the direction of the arrow to connect the interface ...
Страница 124: ...114 Chapter 3 4 Press down as indicated to secure the keyboard in place ...
Страница 126: ...116 Chapter 3 ...
Страница 163: ...Chapter 6 153 ...
Страница 182: ...Appendix A 172 ...
Страница 188: ...178 Appendix B ...
Страница 190: ...180 Appendix C ...


