21
INSTALLATION
Hanging Brackets
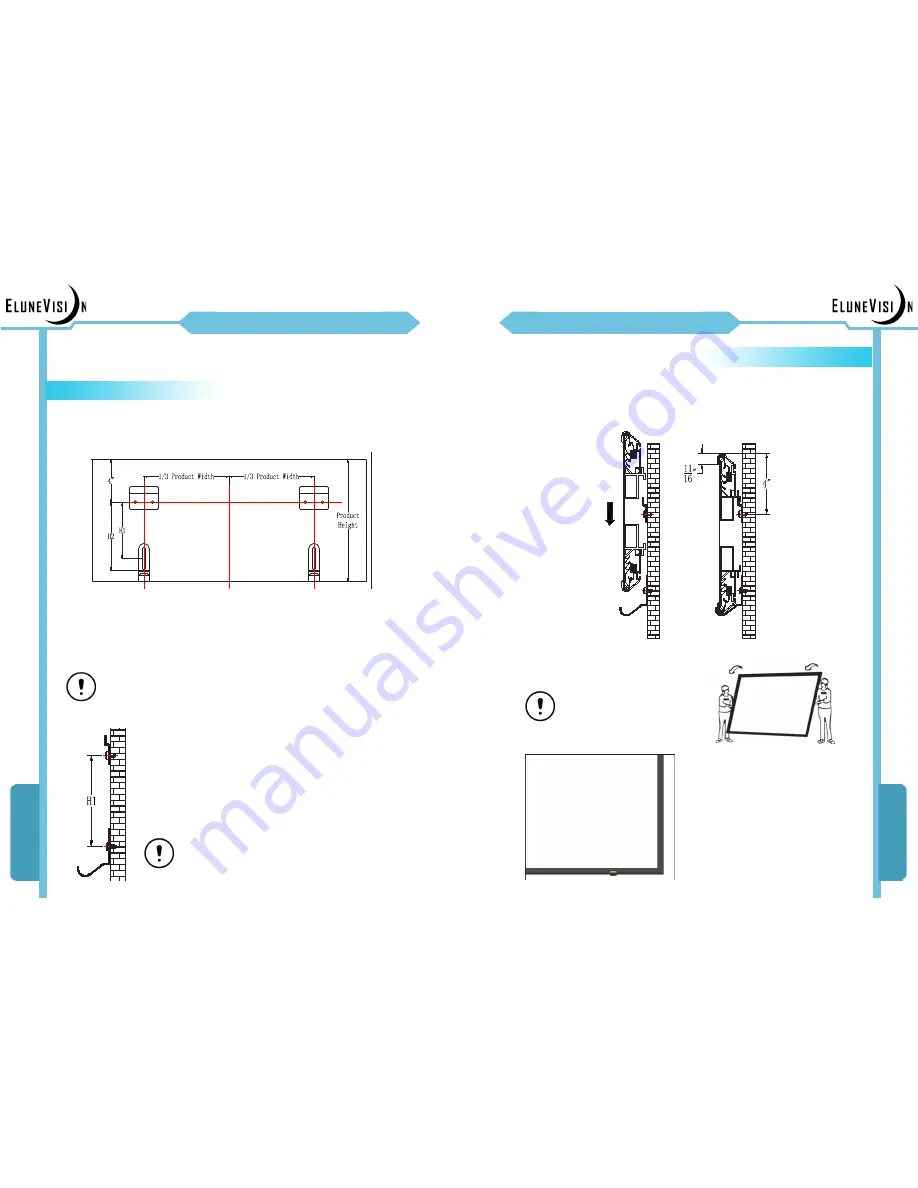
To mount the screen to the wall, the location of the 4 edges need to be
determined. For screen specs, please refer to General Dimensions (page 4)
8.
Draw a center line for your screen in the desired location. Mount the
Hanging Brackets A at one third of the product width from the center line,
and 4” (102 mm) below the top of the screen. The number of Hanging
Brackets B included may differ with different screen sizes.
Center Line
To mount Hanging Brackets B, measure a distance H1.
This will be the distance from the screws from Hanging
Brackets A to the screws on Hanging Bracket B.
The length of H1 is:
Drilling Height H1= Product Height - 5 7/16” (138mm)
Please make sure the brackets are positioned
correctly. Otherwise, the brackets will fail to
support the screen.
Please make sure the wall you are mounting your screen to is able
to support the weight of the screen. We recommend using your
own hardware for the installation. If using the hardware supplied,
(Wall Screws and Expansion Plug) ensure that it is compatible
with the wall.
You are now ready to mount your screen. Please make sure your screen is
fully assembled before proceeding.
INSTALLATION
Hanging Your Screen
The screen is now ready to be mounted onto the wall. Anchor Hanging
Brackets A into the upper frame, while the lower frame sits on Hanging
Brackets B, as shown below.
The screen needs to be
stood up vertically on
the floor. Two people are
necessary to carry and
lift the screen up onto the
brackets.
Make sure the screen is properly
anchored in Hanging Brackets A.
Now, you are ready to enjoy the
elegant design and superb perfor-
mance of Reference Studio 4k Slim.
22
9.
Содержание Reference Studio 4K Motorized Tab-Tensioned
Страница 1: ...User Guide Reference Studio 4k Reference Studio AudioWeave 4k Slim EV S 1 0 EV SAW 1 15 ...
Страница 15: ......


