background image

- 9 -

Remark: You must press “APPLY” to make the setting for submenu valid. It will be no use when exit directly.

There is a special feature of this DVR: when you move the mouse somewhere, the explanation information will be

showed automatically.

1 RECORD SEARCH 

Move the cursor to

  RECORD SEARCH


  Icon highlighted when selected

  ,press

  OK

  to enter into

the setting interface.

There are three methods of searching record.

Method 1: playback by date

Date input: You can adjust the checking date and time, press

  OK


or input the number directly to adjust the

year, month, date. And then input time in the next box, click “playback ” and then you can see the recording video.

Method 2: playback by recording status:

Input the date, click

  search

  and you can see the recording status on this date.

Instruction:

1. MONTH: It will show all the recording status in this month. Green means normal recording, Red means

alarm recording and the default color means no video. Click any date in this frame can search the recording

- 38 -

5.3 

Camera Installation

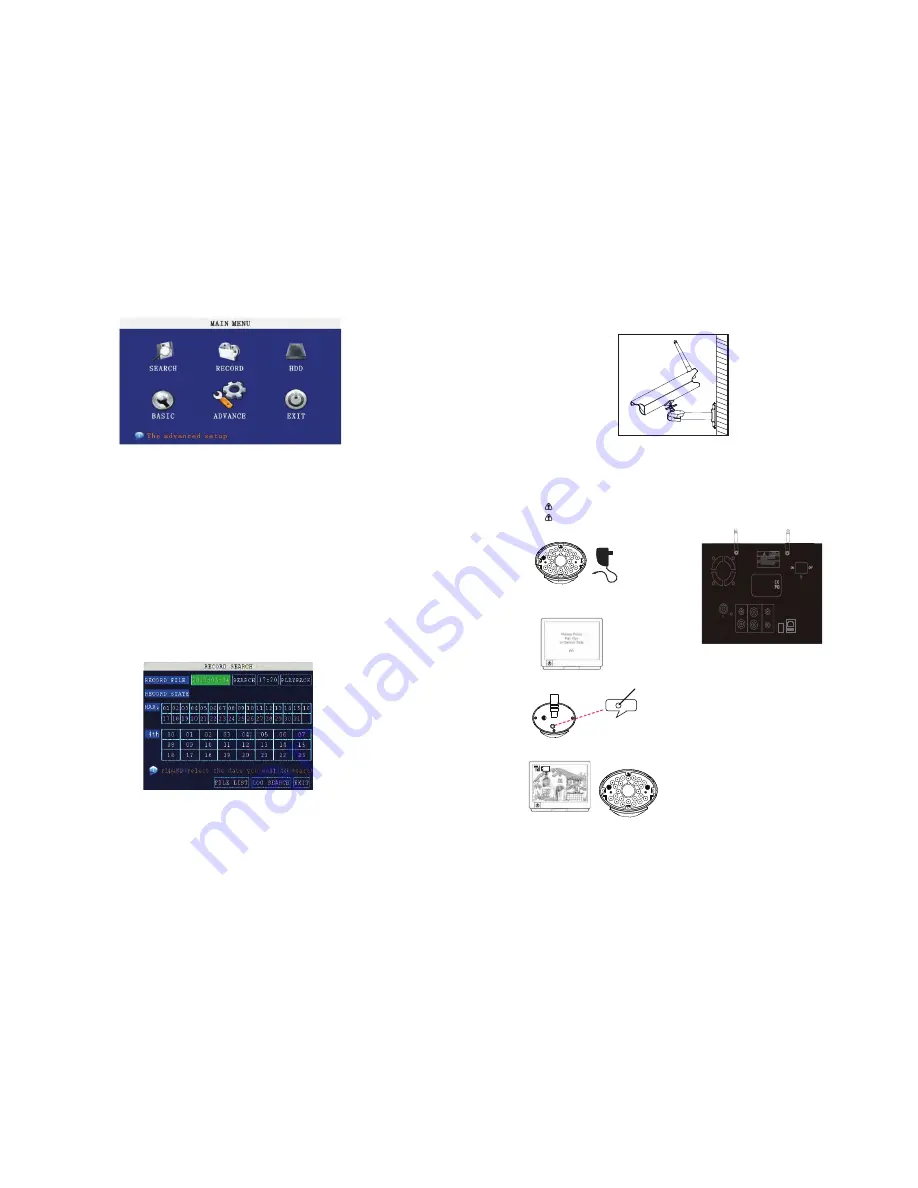
Step1: D i git a l Wi r e less C a mer a Instal l a tion 

Step2: System Operat i on 

A .  M a ke  s  u r e  a  l l c on n e c t i ons a r e c orr e c t  a  s a bov e  d  i a g r a m i n s t r u c t e d . P r e s s t h e P o w e r B u t t o n o n D V R b a c k 

P a ne l t o t u r n on t h e L C D d i spl a y. C  H 1 C H 2 w  i l l di s p l a y i m a g e s of 2 D i gi t a l W i r e l e ss ca m e r a s. 

B .  Digi t a l wir e l e ss camera and rice i ver are paired in fac t o r y. F o llow b e l o w steps for D i gi t a l Wir e less 

C a m e r a P a i r i n g  i  f n e c e ss a ry ! . 

I t i s h i g h l y r ec o mmen d ed t o p a i r t h e c a m e r a b e f o r e h a rdw a r e  i  ns t a l l a t i o n. 
B e for e p a i r i n g t  h e c a m e r a , m a k e s u r e c a m e r a  i  s pow e r ON, c a m e r a s t a t us i n d i c a t o r  a  s shown. 

a. Pr e ss (PAIR1 or PAIR2)on t h e rece i ver.. 

b .  Sys  t e m w i l l c o u n t do w n w  i t h i n 6 0 s e c o nds, s y st e m 

m e ss a ge a s sho  w n: 

c . W i t h i n 6 0 - s e c o n d c o u n t d o w n , p r e ss t h e P a i r K e y o n t h e 

ba c k  of  c a m e r a . 

d .  Onc  e  p  a i r i n g C o m p l e t e d, camer a and rec e iver s t atus 

i nd i c a t ors a s a b ov e shown . 


Pairing Key

Pairing Key

VIDEO IN

AUDIO IN

RJ45

AUDIO OUT

1

2

1

2

AUDIO OUT

USB

Содержание HDVR7-702X

Страница 1: ...HDVR7 702X 7 LCD Digital W ireless DVR w Network...

Страница 2: ...ructions may cause harmful interference to radio communications However there is no guarantee that interference will not occur in a particular installation If this equipment does cause interference to...

Страница 3: ...4 2 RESTRICTION CONDITION 25 4 3 USER LOGIN 26 4 4 OPERATION INTERFACE 27 4 4 1 LIVE 27 4 4 2 PTZ CONTROL 27 4 4 3 ZOOM 28 4 4 4 Focus 28 4 4 5 Iris 28 4 4 6 PTZ PRESET 28 4 4 7 PLAY 28 4 4 8 OTHER O...

Страница 4: ...ed Windows XP or Vista operating system using IE6 0 browser or IE7 0 browser ActiveX control is been blocked Please manual install ActiveX control Please install DX8 1 and upgrade your video card driv...

Страница 5: ...ecording It can t stop recording when it s in start recording or the video in video plan If you want to stop recording please set the time is not recording 11 Question How much space of HDD for record...

Страница 6: ...Fast fordward the video while playback press to return to normal speed press to return to normal speed STANDBY Reset the MDVR to Power on and Power off mode standby and start up LOGIN LOCK If the secu...

Страница 7: ...tion When there are many options in the option frame click left key to see down pull menu Click left key To click the left key on the playback interface can make means forward means raw I means Slow p...

Страница 8: ...e number soft keyboard will bob up first and then use the left key to select the corresponding numerical value Also click the left key to exit the number keyboard Mouse move 1 Press the left key to mo...

Страница 9: ...ify the user password and change the device ID in the base setup You can setup user and admin password Admin has all authorities while user has limited authorities of viewing image searching and play...

Страница 10: ...normal recording Red means alarm recording and the default color means no video Click any date in this frame can search the recording 38 5 3 Camera Installation Step1 Digital Wireless Camera Installat...

Страница 11: ...ok three is not all...

Страница 12: ...D1 CIF three options D1 means the resolution best corresponding to D1 HD1 CIF resolution QUALITY There are BEST FINE and NORMAL three option They are corresponding HIGHEST HIGH and NORMAL data stream...

Страница 13: ...Move the cursor to HDD Icon highlighted when selected press Enter to enter into the setting interface and you can use direction keys and cursor to change the options HDD STATUS There are three status...

Страница 14: ...cursor to select system language The big icon means select ok and press ENTER to enter into the system language setup interface press ENTER or to choose Remark System will restart after changing langu...

Страница 15: ...key to setup 33 4 4 14 NETWORK Click NETWORK to enter into setup interface you can check the parameter settings as in GUI of DVR 4 4 15 System setting Click SETUP to enter the system setting interface...

Страница 16: ...or directly drag the cursor to set colors including chromaticity luminosity contrast and saturation press APPLY to save the parameters PREVIEW ON Means the channel is allowed to view the live mode PRE...

Страница 17: ...Loop Time Set up the scan time interval...

Страница 18: ...C address serial number Picture is below 14 MOTION DETECTION Move the cursor to MOTION DETECT Icon highlighted when selected press Enter to enter into motion detect setting interface Picture is below...

Страница 19: ...ion detection of this small pane when setup finished press exit to back to MD setup interface it will save automatically Remark IR Operation press Menu key to select or cancel full screen Mouse operat...

Страница 20: ...e system upgrading picture is below 28 4 4 3 ZOOM Click to zoom in and out 4 4 4 Focus Click to focus 4 4 5 Iris Click to change the size of aperture 4 4 6 PTZ PRESET Setup preset point You can contro...

Страница 21: ...annel 18 NETWORK SETUP Move the cursor to NETWORK SETUP icon highlighted when selected and press Enter to enter into setting interface picture is below CONNECT NETWORK TYPE There are PPPOE DHCP Static...

Страница 22: ...DHCP and it will automatically connect with DHCP server Will allot IP address when connect is ok and the address will be showed on the interface 3 PPPoE Select the PPPOE and enter the interface as fol...

Страница 23: ...operation chapter 11 After downloading IE active tool successfully login the interface default is no password press OK to enter preview interface and have your following operation 3 Manufacture has a...

Страница 24: ...to a fixed domain name 7 Save and restart device it will connect to internet via PPPoE mode automatically if success it will get a dynamic public IP 8 ping xxx xxx xxx xxx The public IP of DVR to chec...

Отзывы: