background image

4

Molte grazie per aver acquistato il ciclosimulatore 
Elite RealAxiom.
Elite  RealAxiom  è  un  dispositivo  elettronico  per 
effettuare  allenamenti  e  test  ciclistici  indoor,  da 
interfacciare con un personal computer (Windows) 
per mezzo di una console applicata al manubrio 
della bicicletta.
Il programma del RealAxiom permette di allenarsi 
visualizzando  un  vero  percorso  che  scorre  con 
la  stessa  velocità  del  ciclista  regalando  una 
simulazione della strada molto più realistica. Con 
Elite RealAxiom è inoltre possibile programmare 
qualsiasi percorso.
Il  software  provvederà  a  regolare  automatica-
mente  la  resistenza  in  funzione  della  pendenza, 
velocità  e  peso  del  ciclista,  rilevando  frequenza 
cardiaca,  potenza,  velocità,  elevazione,  cadenza, 
distanza, tempo e altre informazioni.
Elite RealAxiom permette inoltre di salvare tutti i 
dati e richiamarli per analisi e comparazioni, con 
la possibilità di stampare i relativi report.
È necessario leggere questo manuale per arrivare 
ad  una  profonda  conoscenza  del  prodotto  e  del 
suo funzionamento.

ISTRUZIONI DEL SOFTWARE

Nel presente manuale non c’è alcuna indicazione 
sull’uso  del  programma.  Una  completa  guida 
dell’uso  del  programma  si  trova  sull’Help  del 
programma stesso. 
Per accedere a tale Help, è necessario installare 
il  programma.  Le  istruzioni  per  installare  il 
programma sono descritte al paragrafo “Utilizzo 
del RealAxiom con il computer – Installazione del 
programma”. 
Una volta installato il programma, 
si può accedere all’Help in 2 diversi modi:
• premere il tasto F1 della tastiera;
• sul menù del programma, scegliere 
  “Help  – Contenuto Help”.

CARDIOFREQUENZIMETRO

Il  RealAxiom  ha  al  suo  interno  un  ricevitore  per 
cardiofrequenzimetri  a  fascia  toracica.  Ciò  gli 
permette  di  rilevare  il  valore  della  frequenza 
cardiaca del ciclista e di visualizzarlo sullo schermo 
durante la corsa. Tale cardiofrequenzimetro non è 
fornito con il prodotto. 

Il  ricevitore  del  cardiofrequenzimetro  del 
RealAxiom è compatibile con tutti i trasmettitori di 
tipo “standard”, cioè con frequenze di trasmissione 
di 5 KHz.
Alcuni  trasmettitori  codificati  (ad  es.  Polar) 
potrebbero  non  essere  compatibili  con  il  nostro 
ricevitore.
ATTENZIONE:  sistemi  integrati  wireless  che 
rilevano oltre al battito cardiaco anche la cadenza 
di pedalata e la velocità, possono interferire col 
la lettura del battito cardiaco del RealAxiom. In 
questo caso allontanare il sensore della cadenza 
dalla pedivella. 

PENDENZA

Anche  la  massima  pendenza  simulabile  varia 
in  funzione  della  velocità  e  del  peso.  Infatti,  la 
potenza necessaria per affrontare una salita varia 
in funzione della velocità con cui la si affronta (più 
veloce, più potenza) e del peso (per “sollevare” più 
peso ci vuole più potenza). Quando la situazione 
richiede  una  potenza  maggiore  di  quella 
massima, allora RealAxiom continua a fornire la 
potenza massima e di conseguenza non si sentirà 
aumentare ulteriormente la resistenza. 
Ad esempio, per un ciclista di 60Kg alla velocità di 
24km/h la pendenza massima simulabile è circa 
10%.

COPYRIGHT

Nessuna della parti di questo manuale può essere 
riprodotta  o  trasmessa  senza  l’autorizzazione 
scritta di ELITE S.r.l.
Il software di Elite RealAxiom e il relativo codice 
sono di proprietà di ELITE S.r.l.
Il software è coperto dalle leggi internazionali sul 
copyright.
Il software di Elite RealAxiom deve essere trattato 
come  ogni  altro  materiale  coperto  da  copyright, 
come i libri.
Usando il software si accetta di non modificare o 
adattare  il  programma.  Si  accetta  anche  di  non 
decompilare, disassemblare o tentare in qualsiasi 
maniera di scoprire il codice nativo del software.

INTRODUZIONE

I

Содержание Real AXIOM

Страница 1: ...I GB D F E NL ISTRUZIONI INSTRUCTIONS BEDIENUNGSANLEITUNG MODE D EMPLOI INSTRUCCIONES INSTRUCTIES ...

Страница 2: ...F THE CADENCE SENSOR 17 How to fit the cadence sensor 17 Procedure for fitting the magnet 17 CABLE CONNECTIONS 18 Connecting the PC to the console 18 Connecting the console to the resistance unit 18 Connecting the resistance unit 18 USING REALAXIOM WITHOUT COMPUTER 18 USING REALAXIOM WITH COMPUTER 19 INSTALLING THE REALAXIOM PROGRAMME 19 INSTALLING THE REALAXIOM VIDEO COURSE 19 Information on the ...

Страница 3: ...BALLETE 40 MONTAJE CONSOLA EN EL MANILLAR 41 MONTAJE DETECTOR DE CADENCIA 41 Procedimiento de montaje detector de cadencia 41 Procedimiento de montaje magneto 41 CONEXIÓN CABLES 42 Conexión PC Consola 42 Conexión Consola Unidad de Resistencia 42 Conexión de la unidad 42 USO DEL REALAXIOM SIN ORDENADOR 42 USO DEL REALAXIOM CON EL ORDENADOR 43 INSTALACIÓN DEL PROGRAMA DEL REALAXIOM 43 INSTALACIÓN DE...

Страница 4: ...racica Ciò gli permette di rilevare il valore della frequenza cardiacadelciclistaedivisualizzarlosulloschermo durante la corsa Tale cardiofrequenzimetro non è fornito con il prodotto Il ricevitore del cardiofrequenzimetro del RealAxiom è compatibile con tutti i trasmettitori di tipo standard cioèconfrequenzeditrasmissione di 5 KHz Alcuni trasmettitori codificati ad es Polar potrebbero non essere c...

Страница 5: ...i 0 1 mm Essendo lo spessore totale 15 mm un consumo ben superiore non impedisce un corretto funzionamento del ciclosimulatore Contestazioni dovute ad utilizzo improprio o negligente non verranno riconosciute La console che va sul manubrio non è impermeabile Attenzioneanonsudaresopra la console perché si potrebbe danneggiare il circuito elettronico Non conservate il RealAxiom in luoghi ba gnati o ...

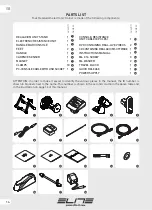
Страница 6: ... PC CONSOLE 1 9 CAVO CONSOLE UNITÀ DI RESISTENZA 8 POLI 1 J DVD ROM 2 K CD ROM 1 L MANUALE ISTRUZIONI 1 M VITE M6 X 16 3 N RONDELLE M6 2 O TRAVEL BLOCK 1 P QUICK RELEASE 1 Q ALIMENTATORE 1 R NUMERO I QUANTITÀ NUMERO QUANTITÀ ATTENZIONE nel manuale per agevolare l identificazione dei vari pezzi vicino al nome è riportato tra parentesi il numero d identificazione Questo numero è riferito alla second...

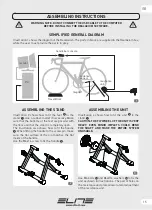
Страница 7: ...rato come deve essere montata l unità 2 sul cavalletto 1 ATTENZIONE IL VOLANO DELL UNITÀ È MOLTO PESANTE ANCHE PICCOLI URTI POTREBBERO PIEGARE L ALBERINO E RENDERE INUTILIZZA BILE TUTTO IL SISTEMA Per il fissaggio dell unità di resistenza sulla piastra utilizzare le viti M6 N e le rondelle Ø6xØ14 O come mostrato in figura 4 Sulla piastra i fori sono fatti in modo da poter regolare la posizione del...

Страница 8: ...ta manovella serrare il supporto destro sede mozzo fino a quando la boccola destra non entra in contatto con l estremità destra del bloccaggio rapido A contatto avvenuto ruotare per circa 1 2 giro la manovella per bloccare la bici al cavalletto Bloccare la manovella utilizzando l anello di bloccaggio spostandolo verso il cavalletto fig 6 Quando l anello si trova in quest ultima posizione la manove...

Страница 9: ...re il sensore il magnete e il filo alla bicicletta Procedura di montaggio sensore di cadenza Applicare il sensore di cadenza 6 al telaio sul tubo orizzontale che dal movimento centrale va all asse della ruota posteriore lato sinistro Utilizzare 2 fascette come mostrato in figura 10 Prima di stringere saldamente le fascette completare il montaggio del magnete e verificare il corretto funzionamento ...

Страница 10: ...esa elettrica e collegare la spina jack del trasformatore R al connettore presente nell unità di resistenza Verificare che l alimentazione funzioni corretta mente controllando che il led verde sulla console sia acceso Il led verde dovrebbe lampeggiare o essere acceso Se il led è spento allora la connes sione console unità e o unità rete elettrica non è stata eseguita correttamente Fissare i 3 cavi...

Страница 11: ...are le autorità locali e informarsi sul metodo di smaltimento INFORMAZIONI SULLO SMALTIMENTO DEL PRODOTTO I UTILIZZO DEL REALAXIOM CON IL COMPUTER Inserire il CD nel lettore CD rom e seguire le istruzioni del software d installazione Per accettare le impostazioni di default scelta consigliata è sufficiente premere il tasto Invio in tutte le schermate del programma d installazione Le schermate del ...

Страница 12: ...t rate monitors This allows it to measure your heart rate while training and visualise it on the monitor The heart rate monitor is not supplied with the product Elite RealAxiom s heart rate monitor receiver is compatible with all standard transmitters i e those featuring 5 KHz transmission frequencies Some coded transmitters i e Polar may not be compatible with our receiver WARNING integrated wire...

Страница 13: ... total thickness is 15 mm even far higher wear does not prevent correct operation of the cycle simulator Warranty claims resulting from improper or negligent use will not be acknowledged The console that is fitted on the handlebar is not waterproof Take care not to sweat over the console as the sweat could damage the electronic circuit Do not keep the RealAxiom in wet or damp places This could dam...

Страница 14: ...ES 1 J DVD CONTAINING REAL LIVE VIDEOS 2 K CD CONTAINING REALAXIOM SOFTWARE 1 L INSTRUCTIONS MANUAL 1 M M6 X 16 SCREW 3 N M6 WASHER 2 O TRAVEL BLOCK 1 P QUICK RELEASE 1 Q POWER SUPPLY 1 R NUMBER ATTENTION in order to make it easier to identify the various pieces in the manual the ID number is shown in brackets next to the name This number is shown in the second column in the above table and in the...

Страница 15: ...ary Make sure that the bottoms of the feet are parallel with the floor and that the stand is completely open The illustration also shows how to fit the handle 5 When fitting the handle to the screw pin make sure the flat surface of the pin matches the flat inside of the handle Use the M6x16 screw to fix the handle 5 ASSEMBLING THE UNIT Illustration 4 shows how to fit the unit 2 to the stand 1 CAUT...

Страница 16: ... Turn the handle 5 to tighten the right hand support of the hub housing until the right hand bushing touches the right hand end of the QR skewer Then rotate the handle 5 by about half a turn in order to lock the bike to the stand Lock the handle by moving the lock ring towards the stand illustration 6 When the ring is in this position the handle can no longer turn Check the stability of the bike b...

Страница 17: ...the cable to the bike How to fit the cadence sensor Fix the sensor 6 to the horizontal tube connecting the central mechanism to the axis of the rear wheel left hand side Use 2 clamps 8 as shown in illustration 10 Before tightening the clamps complete the assembly of the magnet and verify the correct functioning during a trial course If the sensor doesn t function correctly it could be possible tha...

Страница 18: ...ug coming from the cadence sensor 6 to the resistance unit The socket is in the shell of the resistance unit faced downwards Insert the plug coming from the resistance unit to the mains power supply Make sure that the power unit R works correctly by checking the green led on the console lights up or flashes If the led is not on the console resistance unit and or the resistance unit mains connectio...

Страница 19: ...rities and ask them what disposal method applies INFORMATION ON THE DISPOSAL OF THE PRODUCT USING REALAXIOM WITH COMPUTER Insert RealAxiom CD in the DVD Rom drive and follow the instructions given by the installation software To accept the default parameters recommended just press the RETURN key on all the installation programme windows The installation programme windows are shown below INSTALLING...

Страница 20: ... Empfänger erfasst den Wert der Herzfrequenz vom Fahrer und zeigt ihn während des Fahrens auf dem Schirm an Der Herzfrequenzmesser gehört nicht zum Lieferumfang vom Radsimulator Der Empfänger für Herzfrequenzmesser von RealAxiom ist mit allen Standardsendern kompatibel d h mit Herzfrequenzmessern die mit einer Übertragungsfrequenz von 5 kHz arbeiten Einige codierte Sender z B Polar könnten eventue...

Страница 21: ...ionieren vom Radsimulator nicht Beanstandungen von Defekten die durch unsachgemäßen Gebrauch oder Nachlässigkeit bedingt sind können nicht anerkannt werden Die Konsole die am Lenker befestigt wird ist nicht wasserdicht Es muss deshalb darauf geachtet werden dass kein Schweiß auf die Konsole tropft da sonst die Elektronik der Konsole beschädigt werden kann Den RealAxiom Radsimulator nicht an nassen...

Страница 22: ... WIDERSTANDSEINHEIT 8 POLIG 1 J DVD MIT DEM VIDEO EINES RENNENS 2 K CD MIT DER SOFTWARE FÜR REALAXIOM 1 L BEDIENUNGSHANDBUCH 1 M SCHRAUBE M6 X 16 3 N UNTERLEGSCHEIBEN M6 2 O TRAVEL BLOCK 1 P QUICK RELEASE 1 Q NETZGERÄT 1 R KENNZEICHNUNG MENGE KENNZEICHNUNG MENGE ACHTUNG Damit sich die verschiedenen Teile einfacher identifizieren lassen steht im Handbuch neben der Bezeichnung in Klammern die entspr...

Страница 23: ... so weit wie möglich geöffnet ist Auf Abbildung 2 ist außerdem zu sehen wie die Kurbel 5 angebracht wird Beim Aufstecken der Kurbel auf den Schraubenbolzen muss darauf geachtet werden das die flache Seite vom Stift mit der flachen Seite in der Kurbel übereinstimmt Zur Befestigung der Kurbel die Schraube M6X16 benutzen MONTAGE DER WIDERSTANDSEINHEIT Abbildung 3 zeigt wie die Widerstandseinheit 2 am...

Страница 24: ...en Durch Drehen der Kurbel 5 die Buchse auf der rechten Seite der Radnabe so weit heranführen bis sie das rechte Ende vom Schnellspanner berührt Sobald die Buchse den Schnellspanner berührt die Kurbel l nochmals mit einer 1 2 Umdrehung anziehen um das Fahrrad auf dem Ständer zu blockieren Dann die Kurbel mit dem Sperrring blockieren und diesen dazu zum Ständer verschieben siehe Abb 6 Mit dem Sperr...

Страница 25: ...Sensor der Magnet und das Kabel am Fahrrad befestigt werden können Anbringen vom Trittfrequenzsensor Den Trittfrequenzsensor 6 am Fahrradrahmen an der horizontalen Stange anbringen die von der Tretkurbel zum Hinterrad führt auf der linken Seite Dazu zwei Schellen wie auf Abbildung 10 dargestellt verwenden Bevor die Schellen angezogen werden zuerst den Magneten anbringen und bei einer Probefahrt ko...

Страница 26: ...rstandseinheit DenSteckervomStromkabelderWiderstandseinheit in eine Steckdose stecken Prüfen ob das Speisegerät korrekt funktioniert und das grüne LED an der Konsole eingeschaltet ist Das grüne LED muss an sein oder blinken Wenn das LED aus ist ist die Konsole nicht korrekt an die Widerstandseinheit angeschlossen worden u o die Widerstandseinheit nicht korrekt an das Stromnetz DiedreiKabelanhandde...

Страница 27: ...n HINWEISE ZUR ENTSORGUNG DES PRODUKTS GEBRAUCH VOM REALAXIOM MIT COMPUTER Die CD in das DVD Rom Laufwerk einlegen und die Software wie folgt installieren Um die Standardeinstellungen zu übernehmen empfohlen genügt es die Schaltfläche Weiter auf allen Seiten vom Installationsprogramm anzuklicken Auf der Abbildung unten sind die Seiten dargestellt INSTALLATION DER REALAXIOM SOFTWARE Am Ende der Ins...

Страница 28: ...t de relever la valeur de la fréquence cardiaque du cycliste et de l afficher sur l écran pendant la course Ce cardio fréquencemètre n est pas fourni avec le produit Le récepteur du cardio fréquencemètre de RealAxiom est compatible avec tous les émetteurs de type standard c est à dire avec des fréquences de transmission de 5 KHz Certains émetteurs codifiés par ex Polar pourraient ne pas être compa...

Страница 29: ... usure bien supérieure n empêche pas le fonctionnement correct du cyclo simulateur Des contestations dues à une utilisation impropre ou négli gente ne seront pas reconnues La console qui se place sur le guidon n est pas imperméable Attention à ne pas transpirer sur la console car le circuit électronique pourrait s endommager Ne pas garder RealAxiom dans des endroits souillées ou humides Ceci pourr...

Страница 30: ...E UNITÉ DE RÉSISTANCE 8 PÔLES 1 J DVD AVEC VIDÉO D UNE COURSE 2 K CD AVEC LOGICIEL DU REALAXIOM 1 L MANUEL DE MODE D EMPLOI 1 M VIS M6 X 16 3 N RONDELLES M6 2 O TRAVEL BLOCK 1 P QUICK RELEASE 1 Q ALIMENTATION 1 R NUMÉRO ATTENTION pour faciliter l identification des différentes pièces le numéro d identification est indiqué entre parenthèses à côté du nom Ce numéro est indiqué sur la deuxième colonn...

Страница 31: ...es des pieds soient parallèles au sol et que le support soit ouverte dans son extension maximum La même figure montre également comment appliquer la manivelle 5 Lorsque l on introduit la manivelle dans le pivot à vis il faut veiller à ce que la surface plane qui se trouve sur le pivot joigne bien avec celle qui se trouve à l intérieur de la manivelle Utiliser la vis M6X16 pour fixer la manivelle M...

Страница 32: ...support 1 En tournant la manivelle 5 serrer le support droit logement moyeu jusqu à ce que la bague droite entre en contact avec l extrémité droite du blocage rapide Une fois le contact effectué tournée d environ 1 2 tour la manivelle l pour bloquer le vélo du support Bloquer la manivelle en utilisant l anneau de blocage en le déplaçant vers le support fig 6 Lorsque l anneau se trouve dans cette d...

Страница 33: ... capteur l aimant et le fil à la bicyclette Procédé pour le montage du capteur de cadence Appliquer le capteur de cadence 6 au châssis sur le tube horizontal qui du mouvement central va vers l axe de la roue postérieure côté gauche Utiliser 2 colliers selon les indications de la figure 10 Avant de serrer solidement les colliers compléter le montage de l aimant et vérifier le bon fonctionnement pen...

Страница 34: ...ure 13 LE USB À L ORDINATEUR AVANT D INSTALLER LE LOGICIEL REALAXIOM La différence des connecteurs empêche de se tromper Connexion Console Unité de Résistance Pour la connexion entre la console et l unité de résistance utiliser le fil plat J Une des deux extrémités doit être branchée dans le connecteur libre de la console voir figure 14 alors que l autre doit être branchée dans le connecteur qui s...

Страница 35: ...t s informer sur la méthode d élimination INFORMATIONS SUR L ELIMINATION DU PRODUIT UTILISATION DE REALAXIOM AVEC ORDINATEUR Mettre le CD dans le lecteur DVD Rom et Suivre les instructions du logiciel d installation Pour accepter les affichages de default choix conseillé il suffit de taper sur la touche Envoi sur tous les écrans du programme d installation Les écrans du programme d installation so...

Страница 36: ... puede tomar el valor de la frecuencia cardiaca del ciclista y visualizarlo en pantalla durante la carrera Dicho pulsómetro no se entrega con el producto El receptor del pulsómetro del RealAxiom es compatible con todos los transmisores de tipo standard es decir con frecuencias de transmisión de 5 KHz Algunos transmisores codificados por ej Polar WearLink W I N D podrían ser no compatibles con nues...

Страница 37: ... mm Puesto que el espesor total es de 15 mm un desgaste superior no impide un correcto funcionamiento del ciclo simulador No se aceptarán reclamaciones debidas a un uso indebido o negligente La consola que está sobre el manillar no es impermeable Tengan cuidado en no sudar sobre la consola pues podría dañarse el circuito electrónico No guarden el RealAxiom en lugares mojados o húmedos Podrían daña...

Страница 38: ...1 9 CABLE CONSOLA UNIDAD DE RESISTENCIA 8 POLOS 1 J DVD CON VIDEO DE UNA CARRERA 2 K CD CON EL SOFTWARE DEL REALAXIOM 1 L MANUAL INSTRUCCIONES 1 M TORNILLO M6 X 16 3 N ARANDELAS M6 2 O TRAVEL BLOCK 1 P QUICK RELEASE 1 Q ALIMENTADOR 1 R NÚMERO CANTIDAD NÚMERO CANTIDAD ATENCIÓN en el manual para facilitar la identificación de las diferentes piezas junto al nombre aparece entre paréntesis el número d...

Страница 39: ...aralelas al suelo y que el caballete esté abierto en su máxima extensión En la misma figura se explica también cómo aplicar la manivela 5 Cuando se introduce la manivela en el perno a rosca hay que prestar atención para que la superficie plana presente en el perno se junte perfectamente con la superficie presente en el interior de la manivela Utilizar el tornillo M6X16 para sujetar la manivela MON...

Страница 40: ... correspondiente manivela 5 cerrar el soporte derecho alojamiento buje hasta que el casquillo derecho entre en contacto con el extremo derecho del blocaje rápido Una vez hayan entrado en contacto girar de aproximadamente 1 2 giro la manivela 5 para bloquear la bici al caballete Bloquear la manivela utilizando el anillo de blocaje moviéndolo hacia el caballete fig 6 Cuando el anillo esté en esta úl...

Страница 41: ... 8 para sujetar el detector el magneto y el cable a la bici Procedimiento de montaje detector de cadencia Aplicar el detector de cadencia 6 al cuadro sobre el tubo horizontal tirante que del movimiento central va al eje de la rueda posterior lado izquierdo Utilizar 2 cintas según se explica en la figura 10 Antes de cerrar firmemente las cintas terminar el montaje del magneto y verificar el correct...

Страница 42: ...AR EL CABLE USB AL ORDENADOR SIN HABER INSTALADO ANTES EL PROGRAMA REALAXIOM La diversidad de los conectores impide equivocarse Conexión Consola Unidad de Resistencia Para la conexión entre consola y unidad de resistencia utilizar el cable plano J Uno de los dos extremos se tiene que introducir en el conector libre de la consola véase figura 14 mientras que el otro se introduce en el especial cone...

Страница 43: ...o de eliminación sul metodo di smaltimento INFORMACIONES ACERCA DE LA ELIMINACIÓN DEL PRODUCTO USO DEL REALAXIOM CON EL ORDENADOR Introducir el CD en el lector DVD Rom y seguir las instrucciones del software de instalación Para aceptar las regulaciones de default elección aconsejada es suficiente pulsar la tecla Enviar en todas las páginas visualizadas del programa de instalación Las páginas visua...

Страница 44: ...ontvanger zorgt ervoor dat de Elite RealAxiom uw hartslag tijdens de training kan meten en tonen op het scherm De hartslagmeter wordt niet meegeleverd met de Elite RealAxiom De ontvanger in de Elite RealAxiom is compatible met alle standaard borstriemen Met standaard bedoelen we die borstriemen die een 5 KhZ frequentie gebruiken Sommige gecodeerde borstriemen bijvoorbeeld van Polar kunnen niet com...

Страница 45: ...is tast deze minimale slijtage de goede werking van het apparaat niet aan Klachten die het resultaat zijn van het oneigenlijk of onachtzaam gebruik van het toestel worden niet in overweging genomen De console op het stuur is niet waterdicht Zorg ervoor dat geen zweet de console kan binnendringen omdat het transpiratievocht het electronisch circuit kan beschadigen Plaats de RealAxiom niet in vochti...

Страница 46: ...N OMLOPEN 2 K CD MET REALAXIOM SOFTWARE 1 L HANDLEIDING 1 M M6 X 16 BOUT 3 N M6 RONDEEL 2 O TRAVEL BLOCK 1 P QUICK RELEASE 1 Q STROOMTOEVOER 1 R Onderdeelnummer OPGELET Om de herkenning van de verschillende onderdelen te vergemakkelijken staat het onderdeelnummer in deze handleiding steeds tussen haakjes achter de naam van het onderdeel Het nummer vindt u in de tweede kolom van de hierboven afgedr...

Страница 47: ...de voetjes evenwijdig met de vloer staan en dat het frame van de trainer volledig geopend is De afbeelding toont u ook hoe u de hendel 5 monteert Zorg ervoor dat de vlakke kant van de pin tot tegen de vlakke binnenkant van de hendel zit als u de hendel op de pin monteert Gebruik de M6x16 bout om de hendel 5 te bevestigen DE UNIT ASSEMBLEREN Afbeelding 3 toont hoe u de unit 2 op het frame 1 bevesti...

Страница 48: ... tegen de rechter kop van de snelsluiting van het achterwiel te brengen Vanaf het moment dat er contact is tussen de rechter framecup en de rechter kop van de snelsluiting op het achterwiel draait u de hendel nog een halve omwenteling aan om de fiets in het frame te vergrendelen Borg de hendel door de borgring in de richting van het frame te verplaatsen afbeelding 6 Als de borgring zich in deze po...

Страница 49: ...den meegeleverd om de sensor de magneet en de kabel op de fiets te bevestigen Hoe de kadanssensor plaatsen Bevestig de sensor 6 op de linker liggende achtervork van uw fiets Gebruik de twee klemmen zoals getoond in afbeelding 10 Vooraleer u de klemmen aanspant plaatst u de magneet en gaat u na of de magneet wel degelijk aan de sensor passeert telkens u de pedalen rondtrapt Als de kadansmeter niet ...

Страница 50: ...nsluiten Plaats de stekker van de kadanssensor 6 in de weerstandsunit De daartoe bestemde poort bevindt zich in de schaal van de weerstandsunit en is naar onder gericht VerbindthetransfoRmeteenstopcontactenplaats de stekker in de aansluiting op de weerstandsunit Ga na of de weerstandsunit correct werkt door te controleren of het groene lampje op de console oplichtofflikkert Alshetlampjenietbrandti...

Страница 51: ... VERNIETIGING VAN HET PRODUCT DE REALAXIOM GEBRUIKEN MET COMPUTER Plaats de RealAxiom CD in de DVD lezer en volg de instructies die u door de installatie van de software leiden Om de voorgeprogrammeerde parameters te aanvaarden wat wij aanraden drukt u gewoon op de ENTER toets in alle schermen van het installieprogramma Hieronder vindt u de verschillende schermen die tijdens de installatie van de ...

Страница 52: ...deten Materialien für einen Zeitraum von zwei Jahren ab Anschaffungsdatum 2 Von dem Garantieanspruch ausgeschlossen sind Schäden die dem Hersteller nicht zuzuschreiben sind wie z B Fahrlässigkeit und Nachlässigkeit bei der Bedienung und unsachgemässe Behandlung Schäden die durch Stösse verursacht werden oder infolge von Wartungsarbeiten auftreten die von nicht autorisiertem Personal durchgeführt w...

Страница 53: ...IENTE 7 Elite s r l se reserva el derecho de aportar modificaciones técnicas y de diseño a sus productos sin previo aviso GARANTIE DUTCH 1 In overeenkomst met rechts artikelnr 24 van 02 02 2002 en CE richtlijnen geeft ELITE s r l garantie op haar producten en componenten voor een periode van 2 jaar vanaf het moment van aankoop 2 Garantie geldt niet voor defecten veroorzaakt door redenen die niet b...

Страница 54: ...NOTES ...

Страница 55: ...NOTES ...

Страница 56: ...ELITE srl 35014 Fontaniva PD ITALY Fax 39 049 594 0064 e mail info elite it com Printed in Italy ...

Отзывы: