background image

041217 DR


www.eliteproav.com 

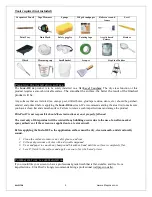
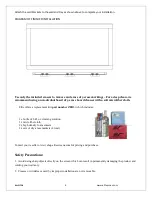
4. Procedures for attaching the material: 

a) Carefully place and align the 

Insta-DE2a

 on the right-hand side of the installation area. Once it has 

been placed,peeloff18 inches of the back film to expose the adhesive. 

b) Spray the adhesive area to allow the Insta-DE2a the ability to move within the wet installation area. 
c) Press the 

Insta-DE2a

 down with both hands to firmly position it in place. 

d) As one person holds the 

Insta-DE2a

 in place, the other person peels off the backing from right to left. 

e) Spray the exposed adhesive back of the 

Insta-DE2a

 and continue until the entire area is wet.  

f) The 

Insta-DE2a

 material at this point can be easily moved and adjusted within the installation area if 

needed. 


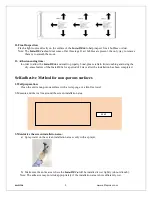
5. Smoothing, scrapping out air bubbles and water: 

Caution: 

The scraper’s edge is sharp. Carefully scrape the screen in a 45 degrees angle when removing air 

bubbles to avoid scratching the surface.


a) Start from the Right-Middle area of the 

Insta-DE2a

.  Scrape up/down/left to remove the air 

bubbles/water and dry any water excess with a lint-free cloth.  


Note 1

: Dust or other matter may reside within the Insta-DE2a and the wall.  To remove such debris, 

simply peel back the 

Insta-DE2a

 from the wall and clean it with the mixture described in step 3-a.  


b) Make sure the 

Insta-DE2a

 adheres properly to the wall after cleaning before proceeding. 

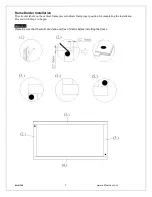
c) Continue scraping as needed in an up/down/left direction as shown in the picture below, Step-2, Step-3. 

 
Note 2

: Occasionally, water may come back in the areas that were just scrapped out. To avoid this from 

happening, please make sure to dry any excess water immediately with a clean sponge or lint-free 
cloth as soon as water is squeezed out. 


6. Final Inspection: 


Flash a light source directly on the surface of the 

Insta-DE2a

 to help inspect for air bubbles or dust.  

 
Note: The 

Insta-DE2a

 should not come off at this stage. If air bubbles are present, the only way to remove 

them is to use a scraper to squeeze them out. 
 

7. Adhesion curing time:


a) In order to allow the 

Insta-DE2a

 and wall to properly bond, please refrain from touching and using the 

dry-erase feature for a period of 2 days after the installation has been completed. 
 

b) It is normal for the surface of 

Insta-DE2a 

to have slight wavy edges. These will go away and flatten 

after1-2 days. 


Содержание IWB114XW2AF

Страница 1: ...erase marker ink making the surface more difficult to clean and will likely ruin the foam eraser 4 If there are any dry erase markings left behind even after attempting to remove themusing our high d...

Страница 2: ...me and Pen Tray Parts List Specifications Color display White Thickness 2 1mm Material composition High molecular weight copolymer of Terephthalic acid ethyl esters Weight 377g m2 Temperature At room...

Страница 3: ...e sure you have a clean flat and smooth surface Failure to remove such imperfections can damage the product EliteProAV is not responsible should these instructions are not properly followed The warran...

Страница 4: ...compound that has lumps which could result on the wall and causing bumps on the material 7 Put a 3 4 inch piece of painter s tape on the outer edge markings of the screen s installation area Space th...

Страница 5: ...e dry erase feature of the Insta DE2afor a period of 2 days after the installation has been completed Self adhesive Method for non porous surfaces 1 Wall preparation Clean the entire non porous surfac...

Страница 6: ...xcess with a lint free cloth Note 1 Dust or other matter may reside within the Insta DE2a and the wall To remove such debris simply peel back the Insta DE2a from the wall and clean it with the mixture...

Страница 7: ...tallation The circular labels on the vertical frame pieces indicate their proper position for completing the installation Proceed with Step 1 to begin Attention Please be sure that the walls are clean...

Страница 8: ...r screen 2 Peel a small portion off of the velvet border and place it about half an inch over the white area of the screen Continue to peel off and roll out the remainder of the velvet border until yo...

Страница 9: ...oft microfiber cloth Elite offers a replacement kit part number ZER3 which includes 1 x bottle of 8 45 oz cleaning solution 1 x microfiber cloth 2 x high density foam erasers 2 x sets of dry erase mar...

Страница 10: ...perfectly smooth If in case the surface is uneven it is recommended to place a smooth board over the desired space of the install first This will eliminate any bubbling of the material over time Dime...

Страница 11: ...8 IWB5X20W2AF 5 X20 N A 59 8 x219 6 59 8 219 6 59 8 221 1 50 8 0 1 1 8 IWB114XW2AF 114 16 10 55 9 x99 4 55 9 99 4 55 9 100 9 50 8 0 1 1 8 Unit mm IWB5X10W2AF 5 X10 N A 59 8 x119 6 1520 3038 1520 3076...

Отзывы: