background image

24

25

CIM3702X

GB

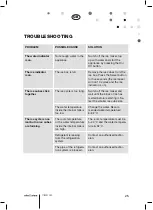
TROUBLESHOOTING

PROBLEM

POSSIBLE CAUSE

SOLUTION

The water indicator 
is on.

Not enough water in the 
appliance.

Switch off the ice maker, top 
up with water and start the 
appliance by pressing the On/
Off button.

The ice indicator 
is on.

The ice box is full.

Remove the ice cubes from the 
ice box. Press the Select button 
for five seconds (the ice maker 
will run 10 cycles and the ice 
indicator is on).

The ice cubes stick 
together.

The ice cycle is too long.

Switch off the ice maker and 
wait until the block of ice has 
melted before restarting it. Se-
lect the smaller ice cube size.

The water temperature 
inside the internal tank is 
too low.

Change the water. Recom-
mended water temperature: 
8–32 °C

The ice cycle is nor-
mal but no ice cubes 
are forming.

The room temperature 
or the water temperature 
inside the internal tank is 
too high.

The room temperature must be 
5–40 °C and the water tempera-
ture 8–32 °C.

Refrigerant is leaking 
from the refrigeration 
system.

Contact an authorised techni-
cian.

The pipe of the refrigera-
tion system is blocked.

Contact an authorised techni-
cian.

Содержание CIM3702X

Страница 1: ...e using this product please read the user manual carefully Save the user manual for future reference Les bruksanvisningen n ye f r du tar i bruk produktet Ta vare p bruksanvisningen for fremtidig bruk...

Страница 2: ...NG fara f r brand d enheten inneh ller brandfarlig gas V nligen f lj lokala f reskrifter g llande avfallshantering av enheter med brandfarlig gas VARNING h ll ventilations ppningar i apparatens h lje...

Страница 3: ...korrekt jordat v gguttag Ingen annan enhet f r anslutas till samma v gguttag F rs kra dig om att stickkontakten r korrekt isatt i v gguttaget Placera inte n tsladden p mattor eller v rmek llor T ck i...

Страница 4: ...tt omr de runt hela enheten Frys ingen annan v tska n vatten till iskuber Reng r inte ismaskinen med br nnbar v tska ngor fr n s dan v tska kan orsaka brand eller explosion Luta inte enheten Om ismask...

Страница 5: ...4 7 MER OM ENHETEN ALLM NNA ANVISNINGAR 1 Lock 2 Kontrollpanel 3 Isl da 4 Vattenbeh llare under isl da 5 Isskovel och f r ngarfinger bakom isskoveln 6 Luftutlopp 7 Vattenavtappningsplugg fram p enhete...

Страница 6: ...ats dessa ligger inuti enheten Kontakta terf r s ljaren om det saknas n gra komponenter 2 Avl gsna tejpen som h ller fast isskovel isl da och isskopa Reng r beh llare och isl da 3 Placera ismaskinen p...

Страница 7: ...insida och utsida med ren och mjuk trasa 6 T m ut allt vatten och l t enhetens insida torka innan du f rvarar enheten under l ngre period ANSLUTA ISMASKINEN Om stickkontakten anv nds felaktigt kan f...

Страница 8: ...5 Om vattenpumpen inte sprutar in vatten stoppas ismaskinen automatiskt vattenindi katorn t nds Tryck p av p knappen fyll p vatten upp till max niv och tryck d r efter p av p knappen igen enheten sta...

Страница 9: ...er fast i varandra Iscykeln r f r l ng St ng av ismaskinen och v nta tills isblocket har sm lt innan du startar om den igen V lj den mindre typen av iskuber Vattentemperaturen i den inre beh llaren r...

Страница 10: ...s king 17 INNHOLD ADVARSEL fare for brann hvis enheten inneholder brannfarlig gass Vennligst f lg lokale forskrifter for avhending av enhetene med brannfarlig gass ADVARSEL Hold ventilasjons pningene...

Страница 11: ...M kun koples til korrekt jordet stikkontakt Ingen annen enhet m koples til samme stikkontakt Forviss deg om at st pselet er satt korrekt i stikkontakten Ikke plasser ledningen p tepper eller varmekil...

Страница 12: ...fritt rom rundt hele enheten Ikke frys annen v ske enn vann til isbiter Ikke rengj r isbitmaskinen med brennbar v ske Damp fra slik v ske kan for rsake brann eller eksplosjon Ikke hell p maskinen Hvis...

Страница 13: ...ENHETEN GENERELLE ANVISNINGER 1 Lokk 2 Betjeningspanel 3 Isskuff 4 Vannbeholder under isskuff 5 Isskovl og fordamperfinger bak isskovlen 6 Luftutl p 7 Vannavtappingshull foran p enhetens underside 8 I...

Страница 14: ...ger med disse ligger inne i enheten Kontakt forhandleren dersom det mangler noen komponenter 2 Fjern tapen som holder fast isskovl isskuff og isskje Rengj r beholder og isskuff 3 Plasser isbitmaskinen...

Страница 15: ...nnside og utside med ren og myk klut 6 T m ut alt vann og la e hetens innside t rke f r du skal sette bort enheten i en lengre periode KOPLE TIL ISBITMASKINEN Hvis st pselet brukes feil kan det medf r...

Страница 16: ...kke spr yter inn vann stanses isbitmaskinen automatisk vannin dikatoren tennes Trykk p p av knappen fyll p vann opp til maks niv og trykk deretter p p av knappen igjen enheten starter p nytt Vent 3 mi...

Страница 17: ...ast i hverandre Issyklusen er for lang Sl av isbitmaskinen og vent til isblokken har smeltet f r du starter den p nytt Velg den minste typen isbiter Vanntemperaturen i den indre beholderen er for lav...

Страница 18: ...lease according to local regulations regarding disposal of the appliance for its flammable blowing gas WARNING Keep ventilation openings in the appliance enclosure or in the built in structure clear o...

Страница 19: ...its plug Only plug into a correctly earthed wall socket No other appliance should be plugged into the same wall socket Make sure the plug is correctly inserted in the wall socket Do not place the pow...

Страница 20: ...tire appliance Do not freeze any liquids other than water to make ice cubes Do not clean the ice maker with flammable liquids The fumes from such liquids can result in fire or explosion Do not stand t...

Страница 21: ...UT THE APPLIANCE GENERAL INSTRUCTIONS 1 Lid 2 Control panel 3 Ice box 4 Water tank under the ice box 5 Ice paddle and evaporator finger behind the ice paddle 6 Air outlet 7 Water drain plug at the fro...

Страница 22: ...ed these will be inside the appliance Contact your dealer if any components are missing 2 Remove the tape holding the ice paddle ice box and ice shovel Clean the tank and ice box 3 Place the ice maker...

Страница 23: ...wn with a clean soft cloth 6 Empty all the water out and allow the inside to dry before storing the appliance for long periods PLUGGING IN THE ICE MAKER Incorrect use of the mains plug can result in e...

Страница 24: ...ot injecting water the ice machine will stop automatically the water indicator comes on Press the On Off button fill up with water to the maximum mark and then press the On Off button again the applia...

Страница 25: ...ice cycle is too long Switch off the ice maker and wait until the block of ice has melted before restarting it Se lect the smaller ice cube size The water temperature inside the internal tank is too...

Страница 26: ......

Страница 27: ......

Страница 28: ...r ndringar samt eventuella tryckfel Subject to changes and printing errors Med forbehold om endringer og trykkfeil Guarantee of quality for the consumer does not include wear parts Kvalitetsgaranti g...

Отзывы: