11
Complete Installation
1
Replace grease filters� See the “Maintenance” section�
I
WARNING
ELECTRICAL SHOCK HAZARD
I
WARNING
PLUG INTO A GROUNDED 3 PRONG OUTLET�
DO NOT REMOVE GROUND PRONG�
DO NOT USE AN ADAPTER�
DO NOT USE AN EXTENSION CORD�
FAILURE TO FOLLOW THESE INSTRUCTIONS CAN RESULT
IN DEATH, FIRE, OR ELECTRICAL SHOCK�
2
Plug 3-prong power cord into a grounded 3-prong outlet
located inside the cabinet above the range hood�
3
Check the operation of the range hood fan and light�
See “Description of the hood” section� If range hood does
not operate, check to see whether a circuit breaker has
tripped or a household fuse has blown� Disconnect power
and check wiring connections�
NOTE
: To get the most efficient use from your new range
hood, read the “Description of the hood” section�
Description of the Hood
The range hood is designed to remove smoke, cooking vapors
and odors from the cooktop area� For best results, start the
hood before cooking and allow it to operate several minutes
after the cooking is complete to clear all smoke and odors
from the kitchen�
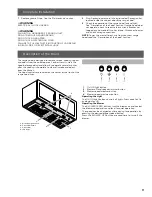
The hood controls are located on the center of the front of the
range hood liner�
A
B
C
D
A. Blower and light controls
B. Grease filter handle
C. Grease filter
D. LED lamps
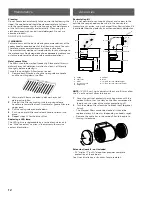
Control
1
On/Off light button
2
Blower off and speed minimum button
3
Blower speed medium button
4
Blower speed maximum button
Operating the Light
The On/Off light button controls all lights� Press once for On
and again for Off�
Operating the Blower
The BLOWER SPEED buttons turn the blower on and control
the blower speed and sound level for quiet operation�
The speed can be changed anytime during fan operation by
pressing the desired blower speed button�
Press the BLOWER OFF button a second time to turn off the
blower�


