background image

27

Reduce volume before connection.

Plug type: 3.5 mm stereo

Note:  Avoid  listening  for  prolonged  periods  of  time  to  prevent  hearing 

damage.

If the surfaces are dirty

  To clean this unit, wipe with a soft, dry cloth.

  Never use alcohol, paint thinner or benzene to clean this unit.

  Before using chemically treated cloth, read the instructions that came 

with the cloth carefully.

For a cleaner crisper sound

  clean the heads after every 10 hours of use to assure good quality play-

back and recording.

  Use a cleaning tape (not included).

Tuning

  Press “Tuner” on the front of this unit or on the remote control to acti-

vate Radio and to choose radio band. You can all switch bands with the 

“N/P/Fm/Am” button on the Remote control.

  Press ◀◀/▶▶ for 2 seconds then release to automatically search for the 

nearest station. To stop during the process press and release button. 

Press and release the button immediately to fine tune 0.05 mHz (for Fm) 

or 9/10 KHz (for Am) each time.

Presetting a memory station

  When a desired station is located, Press Pre/Ent or Setup/ Preset on the 

remote control a two digital number appears and flashes on the LcD dis-

play. Press  , - on the unit or press number key on the remote 

control to set a desired number of the station.

Note: A maximum of 20 stations each can be preset for Am and Fm.

  The preset station will be overwritten if next time the same number is 

chosen for another station, preset station is permanently set and will not 

be clear even disconnected from power source.

Switch to a preset station

  Press , - to switch between preset stations or press number key 

to go to a preset station.

If noise is excessive in Fm

  Press  (RPT/ST-mO)  on  the  unit  or  (R/L/S/m)  on  the  remote  control  to 

display “mONO”.

  monaural sound is selected (“STEREO” goes off) and noise reduces when 

reception is week.

USING HEADPHONES

mAINTENANcE

RADIO REcEIVER

Содержание MC-4090

Страница 1: ...DVD mc 4090...

Страница 2: ...1 3 2 4 3 4 4 4 5 6 6 7 7 8 8 8 9 8 10 9 11 9 12 9 13 DVD VCD CD 10 14 13 15 USB 14 16 15 17 16 18 16 19 17 20 18...

Страница 3: ......

Страница 4: ...PE 2 RADIO BAND 3 DVD USB 4 PRE ENT 5 RPT ST MO 6 7 8 EJECT CLOSE 9 10 BASS BOOSTER 11 SLEEP 12 STANDBY ON 13 PLAY PAUSE PRESET 14 STOP PRESET 15 16 17 18 SOUND MODE 19 VOLUME 20 PREV REW TUNE 21 NEXT...

Страница 5: ...23 24 25 26 S VIDEO 27 RGB 28 29 30 FM SW 31 AM 32 33 34 35 USB DISC...

Страница 6: ...9 SETUP PRESET 10 11 ENTER 12 ZOOM 13 SLOW 14 REPEAT 15 ANGLE 16 SUBTITLE 17 FM AUDIO S M 18 EQ 19 EJECT CLOSE 20 SEARCH 21 22 23 I 24 I 25 PROGRAM 26 REC 27 DISC 28 STOP 29 RETURN TITLE 30 OSD 31 NTS...

Страница 7: ...5 1 SVCD SVCD MP3 3 DVD DVD TUNER TAPE MPEG 4 MPEG 4 2 REP1 REPAII 3 MUTE STEREO FM Mono 4 II 5...

Страница 8: ...VIDEO OUT COMPONENT VIDEO OUT S VIDEO PB PR Y S VIDEO VIDEO OUT 1 2 PRE ENT SETUP PRESET CLOCK SET 3 REW F FWD 4 Vol 5 SETUP PRESET 24 Sleep SLEEP10 10 SLEEP OFF...

Страница 9: ...3 5 10 Tuner N P FM AM FM 2 0 05 FM 9 10 AM Pre Ent Setup Preset TUNE 20 AM FM TUNE FM RPT ST MO R L S M Stereo...

Страница 10: ...10 FM FM AM DVD VCD INVALID KEY ERR DISC 1 Disc 2 open close 3 READ 4 DVD VCD ON Auto Play 5 DVD VCD PRE ENT ENTER PLAY PAUSE 6 DVD DVD 7 VOL 8 MUTE DVD VCD CD...

Страница 11: ...11 1 stop 2 PLAY 3 STOP 4 5 play pause play pause I I OSD 1 2 OSD 1 search 2 title chapter track time ENTER PRE ENT VCD PBC VCD PBC 1 2 4 8 20 2 2 4 8 20 Play pause DVD VCD 1 Step 2 Play Pause...

Страница 12: ...DVD VCD Slow 1 2 1 3 1 4 1 5 1 6 1 7 DVD VCD JPEG 1 Zoom 2 3 4 1 2 1 3 1 4 OFF 2 DVD ANGLE REPEAT REP1 REP ALL 1 A B A Repeat A 2 A B B Repeat A B 3 prog PRE ENT ENTER Play pause STOP prog clear ENTE...

Страница 13: ...ono Stereo setup preset ENTER System Setup 1 TV system NTSC PAL 2 Auto Play ON OFF 3 TV type 4 3 16 9 4 Password Rating 0000 5 Rating MPAA Level 7 NC 17 17 Level 6 R Level 4 PG 13 Level 3 PG Level 1 G...

Страница 14: ...ogue 2 Mic Setup External Microphone Auto Off 3 Echo 4 MicVol 5 Key Video Setup 1 Brightness 2 Contrast 3 Hue NTSC 4 Saturation Karaoke Setup 1 Mic Setup enable disable 2 Echo 3 MicVol 4 Key DVD USB U...

Страница 15: ...15 CD DVD MP3 WMA Mpeg 4 DivX JPEG DISC ISO 9660 level 1 level 2 15 1 2 music pictures movies 2 ENTER 3 4 ENTER PLAY 5 RETURN MENU...

Страница 16: ...16 1 TAPE 2 3 4 5 NORMAL TYPE I 100 REC NEXT PREVIOUS REC NORMAL TYPE I 0000 PRE ENT a b c d e BASS...

Страница 17: ...17 5 CD 1...

Страница 18: ...8 100 20000 32 1000 CD DVD CD VCD SVCD CD R RW MP3 WMA PAL NTSC 650 790 0 5 105 FM 64 108 88 108 MW 530 1600 FM 75 AM 80 12500 8 0 4 DIN 220 50 50 4 185 x 290 x 280 150 x 208 x 235 4 2 35 3 08 2 4 2 3...

Страница 19: ...DVD Micro Component System With Stereo Radio Cassette Recorder mc 4090 INSTRUCTION MANUAL...

Страница 20: ...nitor 26 8 Setting the Clock 26 9 Sleep Timer 26 10 Using Headphones 27 11 Maintenance 27 12 Radio Receiver 27 13 DVD VCD CD Playback 28 14 Initial setting 31 15 USB flash disk and Card reader 32 16 C...

Страница 21: ...long time with doors and windows closed as this may deform the cabinet Avoid cuts scratches or poor connections in the AC power supply cord as they may result in possible fire or electric shock hazar...

Страница 22: ...BUTTON TAPE 2 RADIO FUNCTION BAND BUTTON RADIO BAND 3 DISC PLAYBACK FUNCTION DVD USB 4 PRESET ENTER BUTTON PRE ENT 5 REPEAT STEREO MONO BUTTON RPT ST MO 6 LCD DISPLAY 7 REMOTE SENSOR R 8 DISC COMPART...

Страница 23: ...26 S VIDEO OUT 27 RGB VIDEO OUT 28 MIC INPUT SOCKET 29 MIC VOLUME CONTROL 30 FM SW ANTENNA SOCKET 31 AM LOOP ANTENNA SOCKET 32 RIGHT AUDIO OUT SOCKET 33 LEFT AUDIO OUT SOCKET 34 AC POWER CABLE 35 USB...

Страница 24: ...UND MODE BUTTON EQ 19 DISC COMPARTMENT EJECT CLOSE 20 SEARCH BUTTON SEARCH 21 REWIND 22 FAST FORWARD 23 PREVIOUS BUTTON I 24 NEXT BUTTON I 25 PROGRAM MODE SWITCH 26 RECORDING BUTTON REC 27 DISC PLAYBA...

Страница 25: ...identical indica tions have the same functions 1 SVCD SVCD disc indicator MP3 MP3 disc indicator DVD DVD video disc indicator TUNER Radio Tuner function indicator TAPE Tape Function indicator MPEG 4 M...

Страница 26: ...s a more vivid picture than the VIDEO OUT terminal by separating the chrominance C and luminance Y signals 1 Turn the unit to Standby mode 2 Press PRE ENT on front of the unit or SETUP PRESET on remot...

Страница 27: ...press and release button Press and release the button immediately to fine tune 0 05 MHz for FM or 9 10 KHz for AM each time Presetting a memory station When a desired station is located Press Pre Ent...

Страница 28: ...is Chapter Select the desired language for the on screen menu if required See U 2 1 in this Chapter If ERR DISC appears on the TV screen that means the disc is either unreadable due to disc damage or...

Страница 29: ...o skip to next track s OSD 1 OSD refers to On Screen Display 2 Press OSD the following information will be displayed on TV screen Disc type track NO and total number of tracks Chapter track time searc...

Страница 30: ...fied to Zoom 2 3 4 This action will not function in Zoom out 1 2 1 3 and 1 4 mode Selecting the desired camera angle DVD In the case of a DVD disc Multi Angle that contains scenes shot simul taneously...

Страница 31: ...ultiple audio soundtrack language are recorded Press Audio button repeatedly during play until the desired language appears on the screen Changing the audio channel output VCD During VCD play press Au...

Страница 32: ...level of echo of external microphone 4 MicVol to adjust level of microphone volume 5 Key to adjust key level of karaoke disc Video Setup 1 Brightness to adjust the picture brightness 2 Contrast to adj...

Страница 33: ...level 1 and level 2 It would take 15 seconds or more for this unit to read the disc before it is ready to play depending on the disc structure All files may not be played at recorded order Due to lim...

Страница 34: ...uses when NEXT or PREVI OUS is pressed press REC once to continue recording Note Recording with a TYPE I tape Using TYPE II or III tape may not be able to record or erase them correctly Recording leve...

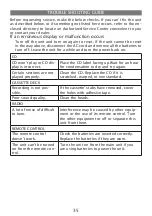
Страница 35: ...for an hour for condensation to dry and try again Certain sections are not played properly Clean the CD Replace the CD if it is scratched warped or nonstandard Cassette deck Recording is not pos sibl...

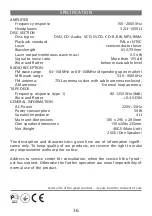
Страница 36: ...APE DECK Frequency response type 1 80 12500Hz 8dB Wow and flutter 0 4 DIN GENERAL INFORMATION AC Power 220V 50Hz Power consumption 50W Speaker impedance 4 Main unit dimensions 185 x 290 x 280mm One sp...

Отзывы: