OPERATING INSTRUCTIONS
Preparation
1.
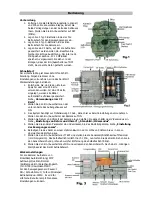
Remove the Steel security bar (Optional parts) and open the front door by pulling up the two
latches on the side of the cabinet. Push the power switch to OFF (Center).
2.
Install 3 pcs C type Alkaline batteries into the
battery compartment on the right for Motion
sensor working.
3.
Install 4 pcs D type Alkaline batteries to the
compartment on the left for Digital Camera
operation.
4.
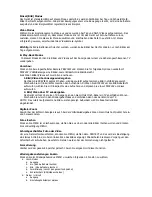
Install a CF card if you wish to take more pictures
or video clips. Be careful to insert the CF card
according to direction shown on the CF card. 16M
internal Flash memory will able to store around
50 frame 1.3Mp images only. Before replacing a
CF card, be sure the PW switch is already at OFF
position in order to avoid the data in the CF might
be flushed.
Quick Start
An easy way below to tell you step by step for getting
a quick start with the unit, it will run under the
factory default
if you do not change any parameter:
1.
Determine if using internal flash memory
or insert a CF card for the device storage
media. Since a CF card is used, all
pictures will be saved in it automatically
without a further setting. Regarding a CF
card usage, skip to view a description in
the paragraph below for
“Using a CF
Card”
2.
Push the main power switch which is
allocated in the bottom of out-side
cabinet to ON
3.
After 20s since PW is ON, system will finish initialization and ready for setup. Press CAM-PW to
switch On the camera section.
4.
Set date and time for the Camera and choose either Picture or Video mode.(See the paragraph
below for “
Date and time Setting”; Still Picture / Video Mode
)
5.
Set other parameters of scouting and exit the setting mode after finished. (See more paragraphs
about the
Setting for Motion Sensor
below)
6.
Hang unit on a steady tree around 1 meter height that almost point to the area which you wish
to monitor.
7.
Push the main PW switch to TEST
and turn the Sensor Gain to Max.
(Clock-wise). After the SELF-
TEST light goes OFF after 1
minute, try to walk in front of
motion sensor in order to verify
how much distance and a zone
you will be detected according to
the flashing walk-test light .
8.
Push PW back to ON and leave.
Now the scouting camera will
ready to work after 1 minute of
warm-up time.
Содержание 10007194
Страница 1: ...IR Wildkamera 4MP 10007194 ...


