ENGLISH 27
4.2
WALL DISCHARGE
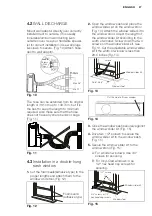
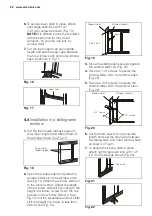
Mount wall adaptor directly over correctly
installed duct to outside. (This usually
includes aluminum wall ducting & an
outside cover. See your hardware special-
ist for correct installation.) Use wall plugs
& screws to secure. (Fig. 10) Attach hose
duct to wall adaptor.
Fig. 10
The hose can be extended from its original
length of 38.1cm up to 139.7cm, but it is
the best to keep the length to minimum
required. Also make sure that the hose
does not have any sharp bends or sags.
(Fig. 11)
Fig. 11
4.3
Installation in a double-hung
sash window
1.
Cut the foam seals(adhesive type) to the
proper lengths and attach them to the
window and stool. (Fig. 12)
Fig. 12
2.
Open the window sash and place the
window slider kit on the window stool
(Fig. 13). Attach the window slider kit to
the window stool. Adjust the length of
the window slider kit according to the
width of window. Screw down the two
screws on the window slider kit. See
Fig.13. Cut the adjustable window slider
kit if the width of window is less than
26.6 inches (Fig. 14).
Fig. 13
Fig. 14
3.
Close the window sash securely against
the window slider kit. (Fig. 15)
4.
Drive two 1/2" screws to secure the
window slider kit to the window sash.
(Fig. 15)
5.
Secure the window slider kit to the
window stool (Fig. 15):
A: For wooden windows: Use 3/4"
screws for securing.
B: For Vinyl-Clad windows: Use
1/2" hex head cap screws for
securing.
Fig. 15
150mm
Wall
adaptor
a
Screws
& Wall
Plugs
Plu
Max 48"
Min 12"
Foam seal A
(adhesive type)
screws
Window slider kit
Window stool
26.6"~48.5"
Cut this side to fit your window
Window slider kit
3/4" screws or 1/2"
hex head cap screws
Window stool
1/2" screws
Содержание EXP12HN1W6
Страница 131: ...ý 6 ...
Страница 132: ...www electrolux com shop ...

