ENGLISH 31
SLEEP OPERATION:
In this mode the selected temperature
will increase by 1 °C 30 minutes after
the mode is selected. The temperature
will then increase by another 1 °C after
an additional 30 minutes. This new
temperature will be maintained for 7 hours
before it returns to the originally selected
temperature. This ends the “Sleep” mode
and the unit will continue to operate as
originally programmed. The “Sleep” mode
program can be cancelled at any time
during operation by again pressing the
“Sleep” button.
Note:
This feature is unavailabe under
FAN or DRY modes.
SWING OPERATION:
When you turn on the unit, the louver will
swing and stop at a certain angle. You can
press the SWING button to let the louver
swing automatically. Press the SWING
button again while you want the louver
stop at desired angle.
POWER MANAGEMENT FEATURE:
When the ambient temperature reaches
the setting temperature, after a period of
time the unit will automatically switch to
power management mode. The power
management indicator light “ “ will
illuminate and the unit will be turned off.
When the ambient temperature varies from
the setting temperature, after a period
of time the unit will automatically quit the
power management mode. The indicator
light will be turned off and the unit will be
turned on again.
FAULT CODE:
If the display reads “E1”, the room
temperature sensor has failed. Call for
service.
temp/timer setting
If the display reads “E2”, the evaporator
temperature sensor has failed. Call for
service.
temp/timer setting
If the display reads “E3”, the condenser
temperature sensor has failed. Call for
Service.
temp/timer setting
If the display reads “E4”, the display panel
communication has failed. Call for Service.
temp/timer setting
If the display reads “P1”, bottom tray is
full. Carefully move the unit to a drain
location, remove the bottom drain plug
and let the water drain away. Restart the
machine until the “P1” symbol disappears.
If error repeats, call for Service.
temp/timer setting
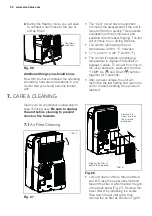
DRAINAGE:
1.
During the dehumidifying mode, you will
need a garden hose (sold separately)
to drain the condensate from the unit.
Remove the rubber stopper from
the hose connector, then screw on a
garden hose to the connector as shown
on Fig.25.
The hose may then:
A. Discharge into a drain that is lower than
the unit.
B. Be connected to a condensate pump
(sold separately).
Fig. 25
Garden hose
Remove the
supplied rubber
stopper
Содержание EXP12HN1W6
Страница 131: ...ý 6 ...
Страница 132: ...www electrolux com shop ...

