background image

electrolux ESD24HRA & ESD30HRA   

part names

Indoor unit

NOTE: Actual unit might vary slightly from above illustration.

1

Inlet (Air)

2

Open Panel

3

AUX. Button

4

Air Filters

5

Receiver Window

6

Power Supply Cord

(AY-XP18GR only)

7

Indicator

8

Vertical Adjustment

Louvres

9

Horizontal Adjustment

Louvres

10

Outlet (Air)

11

Remote Control

12

FULL POWER Lamp

(green

 )

13

SELF CLEAN Lamp

(green

 )

14

PLASMACLUSTER Lamp

(blue)

15

TIMER Lamp

(orange

 )

16

OPERATION Lamp

 (red 

 )

NOTE: -Actual units might vary slightly from those shown above.

17

Inlet (Air)

18

Refrigerant Tube and

Interconnecting Cord

19

Drainage Hose

20

Outlet (Air)

1

2

3

4

5

6

7

8

9

10

11

12

13

14

15

16

 17

18

19

20

17

18

19

20

Outdoor unit

1


inlet (air)

2


open panel

3


aux. button

4


air filters

5


receiver window

6


indicator

7


vertical adjustment louvres

8


horizontal adjustment louvres

9


outlet (air)

10

  remote control

11

  turbo lamp (green)

12

  self clean lamp (green)

13

  plasmacluster lamp (blue)

14

  timer lamp (orange)

15

  operation lamp (red)

16

  inlet (air)

17

  refrigerant tube and interconnecting cord

18

  drainage hose

19

  outlet (air)

1

Inlet (Air)

2

Open Panel

3

AUX. Button

4

Air Filters

5

Receiver Window

6

Power Supply Cord

(AY-XP18GR only)

7

Indicator

8

Vertical Adjustment

Louvres

9

Horizontal Adjustment

Louvres

10

Outlet (Air)

11

Remote Control

12

FULL POWER Lamp

(green

 )

13

SELF CLEAN Lamp

(green

 )

14

PLASMACLUSTER Lamp

(blue)

15

TIMER Lamp

(orange

 )

16

OPERATION Lamp

 (red 

 )

NOTE: -Actual units might vary slightly from those shown above.

17

Inlet (Air)

18

Refrigerant Tube and

Interconnecting Cord

19

Drainage Hose

20

Outlet (Air)

1

2

3

4

5

6

7

8

9

10

11

12

13

14

15

16

 17

18

19

20

17

18

19

20

electrolux ESD24HRA & ESD30HRA 

part names

Remote control

Remote control display 

DISPLAY

OFF

ON

TEMP

MODE

OFF 

1

 HR

CLEAN

TIMER

ON

TIMER

OFF

FAN

SWING

SET/C

I N V E R T E R   A I R   C O N D I T I O N E R

PLASMA

CLUSTER

TIME

ADJUST

TIME

ADJUST

TIMER

CLOCK

SET

COLD

HOT AIR

TURBO


indirect (Coanda) air symbol   

21

self clean symbol   

22

plasmacluster symbol   

23


mode symbols   

24


25

  thermostat setting for  


auto and dry modes 

26

  temperature indicator

27

  transmitting symbol

28

  turbo symbol

29

  fan speed symbols

30

  timer on indicator clock indicates the  


on  timer preset time or current time

31

  timer off indicator  indicates the preset  


time for timer off or off one-hour timer

1


transmitter

2


display (liquid crystal display)

3


plasmacluster button

4


display button

5


on/off button

6


temperature up/down buttons

7


turbo button

8


indirect (Coanda) air button

9


mode button

10

  timer on button (for setting the timer)

11

  off one-hour timer button

12

  timer off button (for setting the timer)

13

  self clean button

14

  time advance button

15

  fan speed button

16

  time reverse button

17

  swing button 

18

  timer set/cancel button

19

   clock set button

20

   indicates battery compartment is below this mark

auto

heat

DISPLAY

OFF

ON

TEMP

MODE

OFF 

1

 HR

CLEAN

TIMER

ON

TIMER

OFF

FAN

SWING

SET/C

I N V E R T E R   A I R   C O N D I T I O N E R

PLASMA

CLUSTER

TIME

ADJUST

TIME

ADJUST

TIMER

CLOCK

SET

COLD

HOT AIR

TURBO

dry

cool

DISPLAY

OFF

ON

TEMP

MODE

OFF 

1

 HR

CLEAN

TIMER

ON

TIMER

OFF

FAN

SWING

SET/C

I N V E R T E R   A I R   C O N D I T I O N E R

PLASMA

CLUSTER

TIME

ADJUST

TIME

ADJUST

TIMER

CLOCK

SET

COLD

HOT AIR

TURBO

auto

high

medium

low

DISPLAY

OFF

ON

TEMP

MODE

OFF 

1

 HR

CLEAN

TIMER

ON

TIMER

OFF

FAN

SWING

SET/C

I N V E R T E R   A I R   C O N D I T I O N E R

PLASMA

CLUSTER

TIME

ADJUST

TIME

ADJUST

TIMER

CLOCK

SET

COLD

HOT AIR

TURBO

DISPLAY

OFF

ON

TEMP

MODE

OFF 

1

 HR

CLEAN

TIMER

ON

TIMER

OFF

FAN

SWING

SET/C

I N V E R T E R   A I R   C O N D I T I O N E R

PLASMA

CLUSTER

TIME

ADJUST

TIME

ADJUST

TIMER

CLOCK

SET

COLD

HOT AIR

TURBO

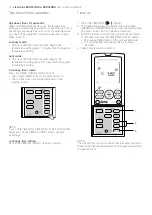
Содержание ESD24HRA

Страница 1: ...d ask for the correct method of disposal This air conditioner uses R410A refrigerant electrolux ESD24HRA ESD30HRA contents Plasmacluster is a trademark of SHARP Corporation Electrolux Home Products Australia telephone 1300 363 640 fax 1800 350 067 email customercare electrolux com au web www electrolux com au user manual inverter split type air conditioners ESD24HRA ESD30HRA Parts code TINSEA486JB...

Страница 2: ...d ask for the correct method of disposal This air conditioner uses R410A refrigerant electrolux ESD24HRA ESD30HRA contents Plasmacluster is a trademark of SHARP Corporation Electrolux Home Products Australia telephone 1300 363 640 fax 1800 350 067 email customercare electrolux com au web www electrolux com au user manual inverter split type air conditioners ESD24HRA ESD30HRA Parts code TINSEA486JB...

Страница 3: ...Cord 19 Drainage Hose 20 Outlet Air 1 2 3 4 5 6 7 8 9 10 11 12 13 14 15 16 17 18 19 20 17 18 19 20 electrolux ESD24HRA ESD30HRA part names Remote control Remote control display DISPLAY OFF ON TEMP MODE OFF1 HR CLEAN TIMER ON TIMER OFF FAN SWING SET C I N V E R T E R A I R C O N D I T I O N E R PLASMA CLUSTER TIME ADJUST TIME ADJUST TIMER CLOCK SET COLD HOT AIR TURBO indirect Coanda air symbol 21 s...
Страница 4: ...Cord 19 Drainage Hose 20 Outlet Air 1 2 3 4 5 6 7 8 9 10 11 12 13 14 15 16 17 18 19 20 17 18 19 20 electrolux ESD24HRA ESD30HRA part names Remote control Remote control display DISPLAY OFF ON TEMP MODE OFF1 HR CLEAN TIMER ON TIMER OFF FAN SWING SET C I N V E R T E R A I R C O N D I T I O N E R PLASMA CLUSTER TIME ADJUST TIME ADJUST TIMER CLOCK SET COLD HOT AIR TURBO indirect Coanda air symbol 21 s...

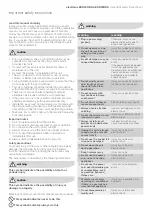
Страница 5: ...riousness is classified by the following indications warning This symbol indicates the possibility of death or serious injury caution This symbol indicates the possibility of injury or damage to property Meanings of symbols used in this manual are shown below This symbol indicates never to do this This symbol indicates always do this Important safety instructions warning warning meaning Plug in po...

Страница 6: ...when not using the unit for a long time It may cause failure of product or fire caution meaning Do not place obstacles around air inlets or inside of air outlet It may cause failure of appliance or accident Ensure that the installation bracket of the outdoor appliance is not damaged due to prolonged exposure If bracket is damaged there is concern of damage due to falling unit Always insert the fil...

Страница 7: ...2 Do not operate the buttons with wet hand It may cause electric shock 3 For safety turn the circuit breaker off when not using the unit for an extended period of time 4 Check the outdoor unit mounting periodically for wear and to make sure it is firmly in place 5 Do not put anything on the outdoor unit nor step on it The object or the person may fall down or drop causing injury 6 This unit is des...

Страница 8: ...room The outside temperature therefore greatly affects the heating efficiency If the heating efficiency is reduced due to low outside temperatures use an additional heater It takes time to warm up and heat the entire room because of the forced air circulation system Tips on saving energy Below are some simple ways to save energy when you use your air conditioner Set the correct temperature Setting...

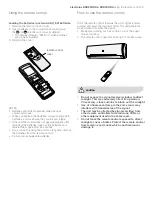
Страница 9: ...e control Point the remote control towards the unit s signal receiver window and press the desired button The unit generates a beep when it receives the signal Make sure nothing such as curtains block the signal receiver window The remote control operates from up to 7 metres away Do not expose the signal receiver window to direct sunlight This may adversely affect its operation If necessary close ...

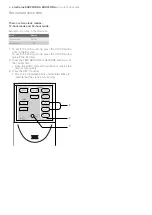
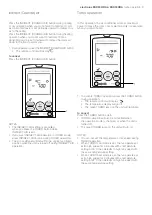
Страница 10: ...mode press the CLOCK button twice in the first step 2 Press the TIME ADVANCE or REVERSE button to set the current time Keep the button pressed to advance or reverse the time display quickly 3 Press the SET C button The colon between hours and minutes blinks to indicate that the clock is functioning Clock Display 12 hour mode PM 5 00 24 hour mode 17 00 2 3 1 6 electrolux ESD24HRA ESD30HRA set curre...

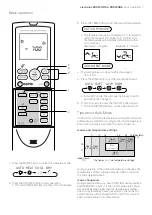
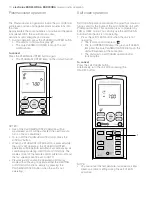
Страница 11: ...Mode In the AUTO mode the temperature setting and mode are automatically selected according to the room temperature and outdoor temperature when the unit is turned on modes and temperature settings During operation if the outdoor temperature changes the temperature settings will automatically slide as shown in the chart detailed above mode changeover During seasons when you need COOLING during day...

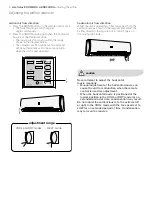
Страница 12: ...nge horizontal air flow direction Whilst the unit is operating on low fan speed hold the vertical louvre as shown in the diagram and adjust the air flow direction taking care not to catch fingers on the moving fan blade Never attempt to adjust the horizontal louvre manually Manual adjustment of the horizontal louvre can cause the unit to malfunction when the remote control is used for adjustment W...

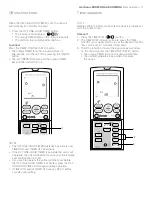
Страница 13: ...peration Turbo operation In this operation the air conditioner works at maximum power to make the room cool or warm rapidly for example when you return home 1 To activate TURBO operation press the TURBO button during operation The remote control will display The temperature display will go off The green TURBO lamp on the unit will illuminate to cancel Press the TURBO button again TURBO operation w...

Страница 14: ... remote control will remain off and the fan speed cannot be set to AUTO Plasmacluster can also be operated in FAN only mode without having to operate either the HEATING or COOLING functions simply by pressing the PLASMACLUSTER button when the unit is not operating 1 Self clean operation Self CLEAN operation will reduce the growth of mould or fungus and dry the inside of the air conditioner unit wi...

Страница 15: ... the formerly set condition then turn off If you wish to operate the unit for another hour before the OFF ONE HOUR TIMER is activated press the OFF ONE HOUR TIMER button again during operation If TIMER ON and or TIMER OFF are set SET C button cancels every setting 1 Timer operation NOTE Before setting the timer make sure the clock is properly set with the current time timer off 1 Press the TIMER O...

Страница 16: ...ontrol NOTE If any of the TIMER ON TIMER OFF or OFF ONE HOUR timers are set the TIMER CANCEL button cancels all settings to change time setting Cancel the TIMER setting first then set it again 1 Press the TIMER ON button 2 The TIMER ON indicator will blink press the TIME ADVANCE or REVERSE buttons to set the desired time the time can be set in 10 minute increments 3 Point the remote control at the...

Страница 17: ...utton on the operation panel again The red OPERATION lamp on the unit will turn off NOTE If the AUX button is pressed during normal operation the unit will turn off Combined use of timer on and off electrolux ESD24HRA ESD30HRA maintenance 13 Maintenance 1 2 3 The air purifying filters are packed as an accessory of this unit During operation of the air conditioner the filters remove dust and tobacc...

Страница 18: ...erve the life of the filter Ensure the filter is stored away from direct sunlight Changing the purifying dust collection filter green The filter should be changed every 3 6 months 1 Remove the air filter in accordance with Figure A 2 Remover the old purifying dust collection filter pad 3 Place the new purifying dust collection filter under the filter stoppers 4 Replace the air filters as shown in ...

Страница 19: ...its fan for about a minute to cool down the unit Odour emitted from the plasmacluster air outlet This is the smell of ozone generated from the Plasmacluster Ion generator The ozone concentration is very small posing no adverse effect to your health The ozone discharged into the air rapidly decomposes and its density in the room will not increase Before calling for service If the unit appears to be...

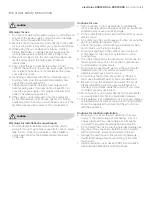
Страница 20: ...supply v incomplete or improper installation vi incorrect improper or inappropriate operation vii insect or vermin infestation b The Appliance is modified without authority from Electrolux in writing c The Appliance s serial number or warranty seal has been removed or defaced d The Appliance was serviced or repaired by anyone other than Electrolux or its Authorised Service Centres 9 This warranty ...

Страница 21: ...Cord 19 Drainage Hose 20 Outlet Air 1 2 3 4 5 6 7 8 9 10 11 12 13 14 15 16 17 18 19 20 17 18 19 20 electrolux ESD24HRA ESD30HRA part names Remote control Remote control display DISPLAY OFF ON TEMP MODE OFF1 HR CLEAN TIMER ON TIMER OFF FAN SWING SET C I N V E R T E R A I R C O N D I T I O N E R PLASMA CLUSTER TIME ADJUST TIME ADJUST TIMER CLOCK SET COLD HOT AIR TURBO indirect Coanda air symbol 21 s...
Страница 22: ...d ask for the correct method of disposal This air conditioner uses R410A refrigerant electrolux ESD24HRA ESD30HRA contents Plasmacluster is a trademark of SHARP Corporation Electrolux Home Products Australia telephone 1300 363 640 fax 1800 350 067 email customercare electrolux com au web www electrolux com au user manual inverter split type air conditioners ESD24HRA ESD30HRA Parts code TINSEA486JB...

Отзывы: