background image

Electrical connection

The unit is preset to work with a voltage of
single phase 230 V.
Before making the connection make sure
that:
• the energy power available in the user's

house is sufficient for the normal supply of
this appliance (see rating plate)

• the unit is correctly connected to earth

through a suitable plug and according to
the installation country Laws

• the socket or the omnipolar switch used

for the connection must be easilv reached
with the installed appliance

The appliance is supplied with electric cable,
therefore you will have to fit it with a standard
plug, suitable for the total electric load shown
on the rating plate. The plug is to be inserted
into a suitable wall socket.
If you wish to directly connect to the mains,
you have to interpose an omnipolar switch
with a minimum opening between contacts
of 3 mm, between the unit and the mains,
complying with the existing regulations.
The brown live wire (originating from the
clamp of the appliance junction box) must al-
ways be connected to the phase of the mains
supply. In any case, the supply cord must be
positioned in such a way as it does not reach
in any point a temperature higher by 50

°

 C

than the room temperature.

Replacement of the electric cable

Warning!

 The replacement of electric

cable must be carried out exclusively by
the service force centre or by personnel
with similar competencies, in
accordance with the current regulations.

Should the supply cord need to be replaced,
use only the following cable types: H07 RN-
F, H05 RN-F, H05 RRF, H05 VV-F, H05
V2V2-F (T90), H05 BB-F. It is necessary that
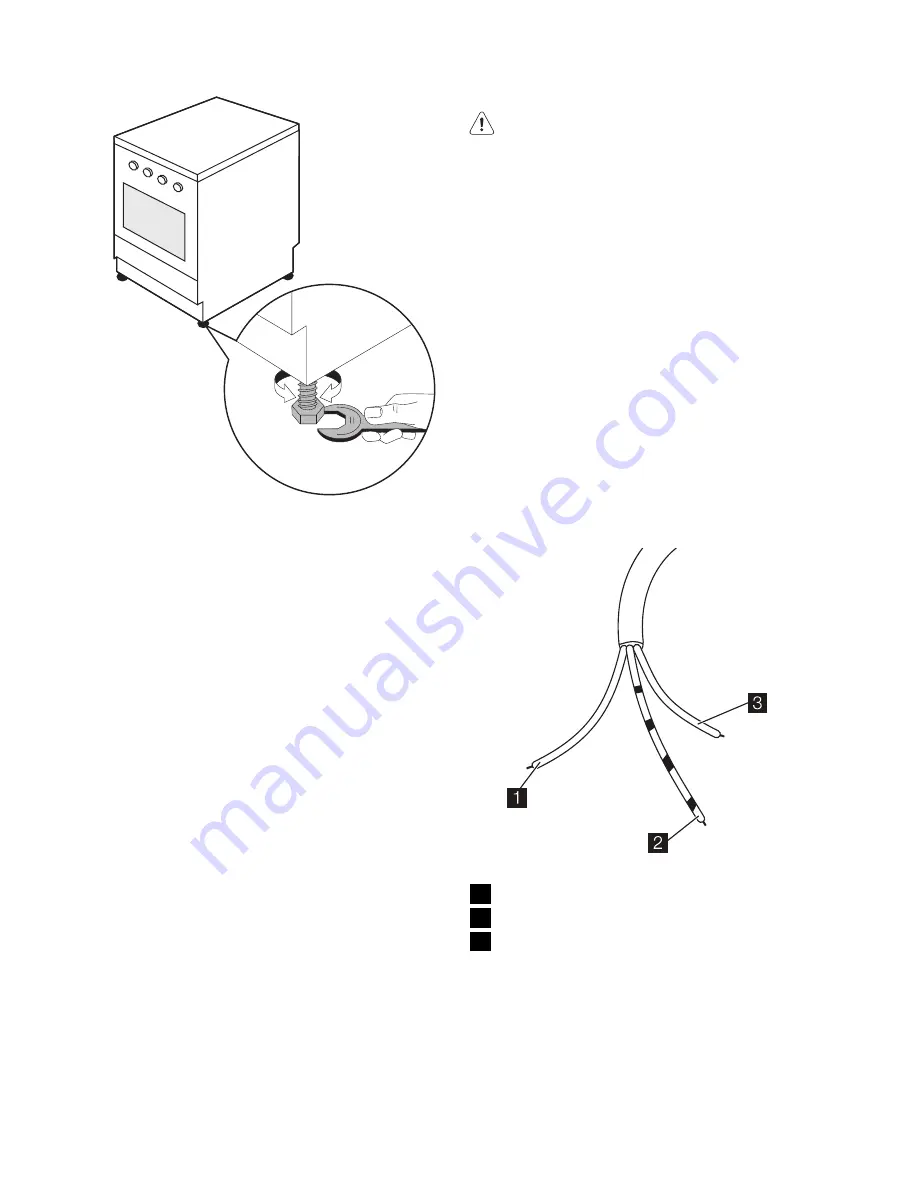
the yellow/ green earth wire is about 2 cm
longer than the live and neutral ones (see di-
agram).
The section of the cable should be 3 x 1,5
mm

2

 minimum.

After the connection, test the heating ele-
ments for about 3 minutes to ensure that they
are working correctly.

Important!

 The manufacturer refuses any

responsibility in cases where normal safety
measures are not observed.

1

Phase

2

Ground (yellow - green)

3

Neutral wire

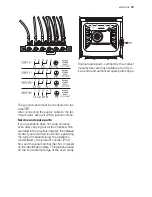
Connecting the terminal board

The appliance incorporates an easily acces-
sible 6-pole terminal board whose jumpers
(bridges) are already pre-set for operation on
400 V three-phase with neutral wire. In case
where different mains voltage is present, the
jumpers on the terminal board must be ar-
ranged as shown on the picture.

18 

 electrolux

Содержание EKC601503

Страница 1: ...user manual Ceramic Cooker EKC601503 ...

Страница 2: ...ing the appliance and clean the parts involved us ing a soft cloth wrung out in warm water to which a little washing up liquid has been added Ensure that the gas and electrical supply complies with the type stated on the rating plate located near the gas supply pipe Child safety This appliance is not intended for use by children or other persons whose physical sensory or mental capabilities or lac...

Страница 3: ...eriod of time therefore flammable mate rials such as oven gloves tea towels plas tic aprons etc should not be stored in the drawer Oven accessories such as baking sheets will also become hot therefore care should be taken when removing these items from the drawer whilst the oven is in use or still hot Only heat resistant plates may be placed in the drawer situated under the oven Do not put combust...

Страница 4: ...ng zone 3 Back right cooking zone 4 Front right cooking zone 5 Oven function control knob 6 Oven thermostat control knob 7 Minute minder control knob 8 Oven thermostat control light 9 General control light The oven cavity 2 3 1 4 1 Oven fan 2 Grill element 3 Oven light 4 Oven shelves 4 electrolux ...

Страница 5: ...on the smaller circular cooking zone turn the relevant control knob clockwise to the required heat set ting 2 knob for double circuit cooking zone has two heating element To switch on both heating ele ments turn the control knob clockwise to maximum heat setting position 3 Then turn the knob further to nearly reach the 0 symbol You will hear a click and the wider cooking zone will switch on Then t...

Страница 6: ...he fan ensures air is circulated to cook the pizza toppings or pie fillings Fan cooking This allows you to roast or roast and bake simultaneously using any shelf without flavour transference Defrosting This setting is intended to assist in thawing of frozen food Oven thermostat control knob By turning the oven thermostat control knob clockwise select the cooking temperature between 50 C and maximu...

Страница 7: ...fore using the appliance remove all packaging both inside and outside the appliance including the advertising labels and any protective film Before cooking for the first time carefully wash the oven accessories Heating the empty oven Before first use the oven should be heated without food During this time an unpleasant odour may be emitted This is quite normal 1 Switch the oven function control kn...

Страница 8: ...r to make use of the residual heat use the residual heat of the cooking zones for keeping food warm or for melting always place pots and pans centrally on the cooking zones Saucepans and frying pans Saucepans and frying pans should not be smaller than the cooking zone and prefera bly not more than 10 15 mm larger than the diameter of the cooking zone Important Always use cooking and frying utensil...

Страница 9: ...ning Always stand back from the oven when opening the oven door during cooking or at the end of it to allow any build up of steam or heat to release When food is heated it produces steam in the same way as a boiling kettle does When steam comes in contact of the oven door glass it will condense and produce water droplets To reduce condensation ensure the oven is well heated before placing food in ...

Страница 10: ...emember to place the dripping pan in the lower position with some water in it Cooking times Cooking times vary according to the type of food to be cooked its consistency and vol ume We suggest that you take particular note of your first cooking experiments with the oven since operating in the same con ditions for the same dishes you will of course obtain similar results Only experience will enable...

Страница 11: ... on the grid 500 Bread rolls 2 200 2 175 20 35 6 8 rolls in bak ing tray 250 Pizza 1 200 2 1 and 3 1 190 15 30 On baking tray on the grid Pasta flan 2 200 2 1 and 3 1 175 40 50 In mould on the shelf Vegetable flan 2 200 2 1 and 3 1 175 45 60 In mould on the shelf Quiches 1 200 2 1 and 3 1 180 35 45 In mould on the shelf Lasagne 2 180 2 160 45 65 In mould on the shelf Cannelloni 2 200 2 175 40 55 I...

Страница 12: ...3 1 175 25 35 4 6 fillets 1 If you need to cook more than one dish at the same time we recommend you to place them on the levels quoted between brackets Shelf positions are counted from bottom of the oven If you wish to cook more than one dish at the same time we suggest that you change the cooking levels of your dishes during the last 5 10 minutes in order to obtain a more uniform colour of your ...

Страница 13: ...o contact with the ceramic surface it must be scraped off immediately while still hot and wiped away to avoid damage to the surface Cleaners cannot stay in contact with the ce ramic glass when hot All cleaners must be removed with plenty of clean water after cleaning as they may have a caustic effect when the rings are next heated Do not use any aggressive cleaners such as e g grill or oven sprays...

Страница 14: ...ttle washing up liquid has been added To prevent damaging or weakening the door glass panels avoid the use of the following Household detergent and bleaches Impregnated pads unsuitable for non stick saucepans Pads or steel wool pads Chemical oven pads or aerosols Rust removers Bath Sink stain removers Clean the outer and inner door glass using warm soapy water Should the inner door glass become he...

Страница 15: ... Periodically check the condition of this gas ket If necessary clean it without using abra sive cleaning products If the gasket shows to be damaged call you local Service Centre Do not use the oven until it has been repaired Oven shelves Warning Before proceeding ensure the oven is cool and disconnected from the electricity supply To clean the oven shelves soak in warm soapy water and remove stubb...

Страница 16: ...ry results check the cooking pan is the correct size for the cooking zone check the cooking pan has a flat base check the setting is correct for the type of cook ing The oven does not come on check that a cooking function has been selec ted check that the oven door is completely closed check that the socket switch or the switch from the mains supply to the cooker are ON The oven light does not com...

Страница 17: ...ation regulation and service are executed according to the existing regula tions Whenever changes are made involving the disconnection of the appliance it is necessary to proceed with maximum caution Warning Prior to installation ensure that the local distribution conditions nature of the gas and the gas pressure and the adjustment of the appliance are compatible Warning The manufacturing company ...

Страница 18: ...y cord must be positioned in such a way as it does not reach in any point a temperature higher by 50 C than the room temperature Replacement of the electric cable Warning The replacement of electric cable must be carried out exclusively by the service force centre or by personnel with similar competencies in accordance with the current regulations Should the supply cord need to be replaced use onl...

Страница 19: ...which are listed in the previous chapter then please contact your local Service Centre specifying the type of malfunctioning the appliance model Mod the product number Prod No and the serial number Ser No marked on the identification plate This plate is placed on the front external edge of the oven cavity Original spare parts certified by the product manufacturer are only available at our Serv ice...

Страница 20: ...892931731 A 032009 www electrolux com www electrolux com ...

Отзывы: