background image

EHC Electric Combination Radiators – 

Installation and technical manual

Page 7

3.

Installation 

(cont.)

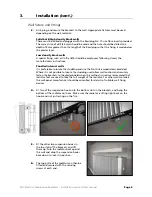
7.

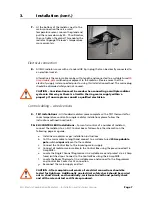
At the bottom of the radiator, next to the
mains connection there is a small
temperature sensor. Loosen the gland and
pull the sensor down by 50 - 70 millimetres,
then re-tighten the gland. This enables the
radiator to gauge the room’s temperature
more accurately.

Electrical connection

8.

All EHC radiators come with a standard UK 3 pin plug that can be directly connected to
an electrical socket.

Alternatively the mains cable can be cut to length and connected to a suitable Fused 

20

Amp


double

-

pole

 switched spur adjacent to the radiator. Please ensure that the

electricity supply is disconnected prior to using this installation method. The mains plug
should be discarded safely and not re-used.

CAUTION – Consideration must be made when connecting a multiple radiator
system in this way as there is a limit to the ring mains supply within a
property. If unsure please consult a qualified electrician.

Control cabling – wired versions

9.

TEI1 installations

 – All standard radiators come complete with a TEI1 thermostat for

room temperature control. For single radiator installations please follow the
instructions outlined in section 8.

10.


EHC CONTROL BOX installations

 – For central control of a number of radiators,

connect the radiators to an EHC Control box as follows. See the schematic on the
following page as a guide.

a.


Install new radiators as per installation instructions

b. 

Cut the mains cable to length and connect to a suitable Fused 

20 Amp


double

pole

 switched 

spur

 adjacent to the radiator

c.


Connect the Control Box to the incoming mains supply.

d.

  Connect all radiator mains cables to the Control Box using the pre-connected 16

Amp MCBs.

e.


Locate the Single Channel Programmer in a suitable area and protect via a 3 Amp
fused switched spur. Connect to the Control Box using the 6 Amp MCB.

f.


Locate the Room Thermostat in a suitable area and connect to the Programmer
and Control Box Contactor A1 connection.

g.

  Reconnect the mains supply and test.

CAUTION - After completion of works all electrical connections should be
tested for tightness. Additionally an electrical safety check should be carried
out ie: short circuit, earth continuity, resistance to earth and polarity check
and all the relevant test certificates produced.

Содержание Electric Combination Radiators

Страница 1: ...Y AND RETAINED FOR FUTURE REFERENCE BE SURE TO OBSERVE ALL LABELS AND WARNINGS ON THE APPLIANCE The Electric Heating Company Ltd Unit 40 Block 5 Third Road Blantyre Industrial Estate Blantyre Glasgow...

Страница 2: ...electrician in accordance with I E E Regulations for Electrical Equipment The radiator is fitted with a standard UK 3 pin plug that can be directly connected to an electrical socket Care must be take...

Страница 3: ...floor 80 mm Cover plate combustible covering installed on top of it 150 mm Cover plate non combustible covering installed on top of it 100 mm Please note that our IPX4 rated models should be used in...

Страница 4: ...d Radiant heat for your added comfort The radiators can be simply plugged in to a Standard socket or Hard wired to an existing spur connection The range has the flexability of being Wall mounted or fr...

Страница 5: ...ddition to the radiator body there should be a top grille a pair of mounting brackets four suspension hooks a set of mounting screws plugs and an instruction manual 2 Check page 3 of this manual to fi...

Страница 6: ...e to locate the studding and use the No 10 size woodscrews provided Where it is not possible to locate the studding use Hollow wall anchors and securely fasten the brackets to the plasterboard when th...

Страница 7: ...radiators come complete with a TEI1 thermostat for room temperature control For single radiator installations please follow the instructions outlined in section 8 10 EHC CONTROL BOX installations For...

Страница 8: ...EHC Electric Combination Radiators Installation and technical manual Page 8 3 Installation cont...

Страница 9: ...ingle radiator installations b Locate the TEI 8 digital room thermostat on a suitable wall in the same room as the radiator c Configure the TEI 8 digital room thermostat and TEI 5 receiver located on...

Страница 10: ...the thermostat components and as such will invalidate the warranty 5 Operating safety This appliance complies with the European Standards EN 60 335 1 EN 60 335 2 61 EN 61000 3 2 EN 61000 3 3 EN 55014...

Страница 11: ...ve the radiator without first seeking specialist advice If you are not happy that the radiator has been securely fixed please inform your installer UNDER NO CIRCUMSTANCES SHOULD YOU ATTEMPT TO MOVE TH...

Страница 12: ...d be taken to wipe over with a damp cloth Do not use abrasive cleaning powders or furniture polish Discoloration of wall finishes can sometimes occur immediately above a radiator due to the properties...

Страница 13: ...ory radiators Model No Colour Rating BTUs Width mm Height mm Depth mm Weight kg EH500 68 34 500W EHC ELECTRIC CONSERVATORY RAD White 1706 680 340 70 21 EH1000 85 34 1000W EHC ELECTRIC CONSERVATORY RAD...

Страница 14: ...uest one of our free Product guide and Installation DVDs Tel 01698 820533 Fax 01698 825697 info electric heatingcompany co uk www electric heatingcompany co uk The Electric Heating Company Ltd Unit 40...

Отзывы: