


7
www.electia.se
Worth knowing
•
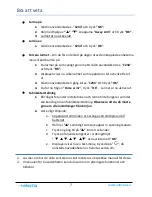
Arming the alarm
1.
Enter your user code, for example ”
1234
” and press
”OK”.
2.
Use the
“
” “
”
buttons to select ”
Away Arm”
and press
”OK”.
3.
The alarm is now activated!
•
Disarming the alarm
1.
Enter your user code, for example ”
1234
” and press ”
OK
”.
•
Force the alarm
– If you get an error code on any of the connected units but
would still like to arm the alarm.
1.
You arm the alarm in the usual manner by entering your user code,
for example ”
1234
” and press
”OK”.
2.
The display will show the unit that has reported an error and you will
see what this error is.
3.
Enter your user code one more time, for example ”
1234
”
and press
”OK”
.
4.
You will be prompted ”
Force arm?
”, press ”
OK
” - the alarm is now
activated.
•
Restore the factory settings
1.
If something goes wrong during the installation and the alarm is not
working as it is supposed to, you have to restore the factory settings.
Note that you will have to reconfigure all settings from scratch
afterwards.
2.
Proceed as follows:
a.
Disconnect the power supply and turn off the battery power
switch.
b.
Press down
“
”
at the same time as you connect the power
supply cable.
c.
Press
“
”
one more time within 3 seconds.
d.
Press the following keys in the following order:
”
” and finish with “
OK
”.
e.
A test menu will appear on the display ” ”. Then the main
unit will be reset and restarted
.
Read more about mounting in the respective sensor manual.
You can find information about additional functions and accessories in the manual
of the main unit.
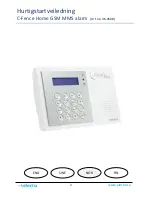
Содержание C-Fence
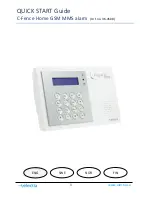
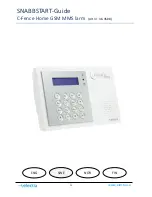
Страница 1: ...1 www electia se QUICK START Guide C Fence Home GSM MMS alarm Art no 36 4508 ENG SWE NOR FIN...
Страница 9: ...1 www electia se SNABBSTART Guide C Fence Home GSM MMS larm Art nr 36 4508 SWE NOR FIN ENG...
Страница 17: ...1 www electia se Hurtigstartveiledning C Fence Home GSM MMS alarm Art no 36 4508 NOR SWE ENG FIN...
Страница 25: ...1 www electia se PIKA ALOITUSOPAS C Fence Home GSM MMS alarm Art no 36 4508 FIN SWE NOR ENG...


