


11
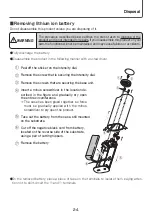
Preparation for Use
Be sure to charge the battery fully on first use (following purchase or after a long period without
use) or if the batteries have run out during use.
1
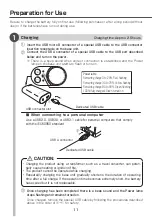
Charging
Charging time: Approx. 2.5 hours
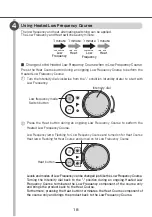
①
Insert the USB micro B connector of a special USB cable to the USB connector
insertion receptacle on the base unit.
②
Connect the USB A connector of a special USB cable to the USB port described
below and turn on the power.
※ There is a beep sound when correct connection is established and the Power
lamp on the base unit starts to flash or tuns on.
①
②
• Charging the product using a transformer, such as a travel converter, can poten-
tially cause heating or ignition of fire.
• The product cannot be operated while charging.
• Repeatedly charging the base unit gradually shortens the duration of operating
time after a full charge. If the operation time becomes extremely short, the battery
has expired but it is not replaceable.
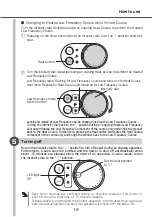
③
Once charging has been completed there is a beep sound and the Power lamp
stops flashing and remains turned on.
Once charged, remove the special USB cable by following the procedures described
above in the order of ②→① for safety.
Dedicated USB cable
Dedicated USB cable
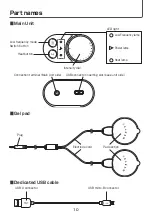
USB connector slot
Power lamp
Remaining charge 0 to 29%: Red, flashing
Remaining charge 30 to 79%: Yellow, flashing
Remaining charge 80 to 99%: Green, flashing
100% (fully charged): Green, turned on
USB A connector
■
When connecting to a personal computer
Use a USB2.0, USB3.0 or USB3.1 cable for personal computers that comply
with the IEC60950 standard
LED light
CAUTION:


