32
en
8.
Press MEAS to calculate the material velocity and return to the menu screen, or ESC to
cancel.
CALIBRATING TO THE SECOND POINT (ON THE THICK CALIBRATION STANDARD)
1.
Repeat the steps given in section
above, but this time:
•
Use the 4” calibration standard
(instead of the 1” calibration stand-
ard)
•
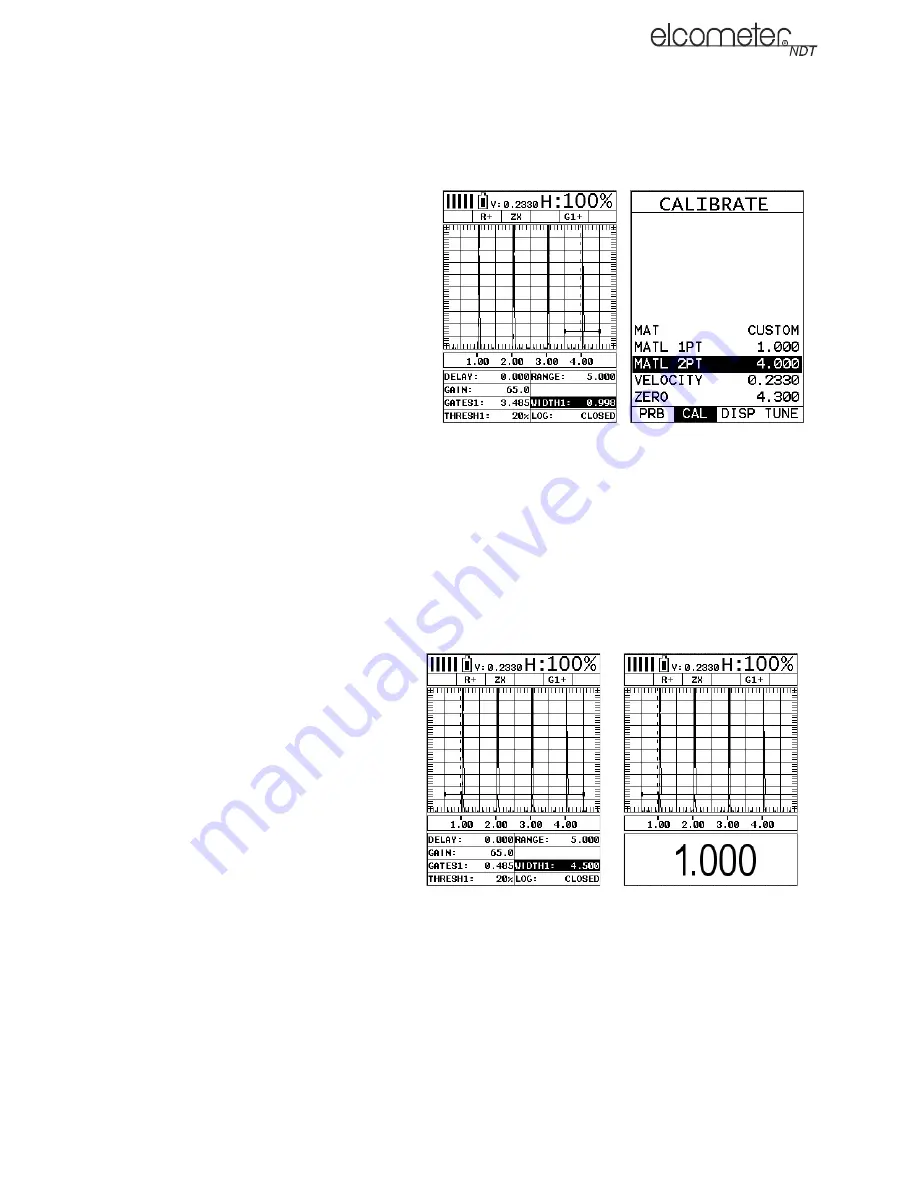
Adjust GATE1 over the waveform -
as shown in this screenshot.
•
Adjust the value of MATL 2PT to
match the length of the 4” calibra-
tion standard (instead of MATL
1PT).
The material velocity and zero value
are calculated and displayed as
shown.
2.
Press MEAS to return to the measurement screen.
ADJUSTING THE GATE TO THE CALIBRATED RANGE
In order to trigger on anything that is detected in the calibrated range, the boundaries of the gate
must be adjusted to include the entire range.
Note: Caution: in both z-cross & flank detection settings, the first signal to cross the gate will be
triggered on. However, if the peak detection setting has been enabled, the signal with the most
amplitude will be detected.
1.
Press MEAS to view the
measurement screen.
2.
In the hot menu, scroll to GATE1.
3.
Move the gate start to a position
less than 1”.
4.
In the hot menu, scroll to WIDTH1.
5.
Adjust the width of the gate until its
right hand end is at a position
greater than 4”.
6.
Place the transducer back on the
calibration points (1” and/or 4”).
7.
Press OK to display the thickness.
The thickness reading should now
match the known thickness. If the
thickness is not correct, repeat the
calibration procedure.
15.7 CALIBRATION FOR ANGLE BEAM TRANSDUCERS
Further information on Calibration for Angle Beam Transducers can be found on the Elcometer NDT
Knowledge Centre on www.elcometerndt.com.
WIDTH1 adjusted
Press OK to display
thickness


