background image

09/2005 - Art. Nr. 13 019 533A

7

Installation

Mounting the burner to the heat generator
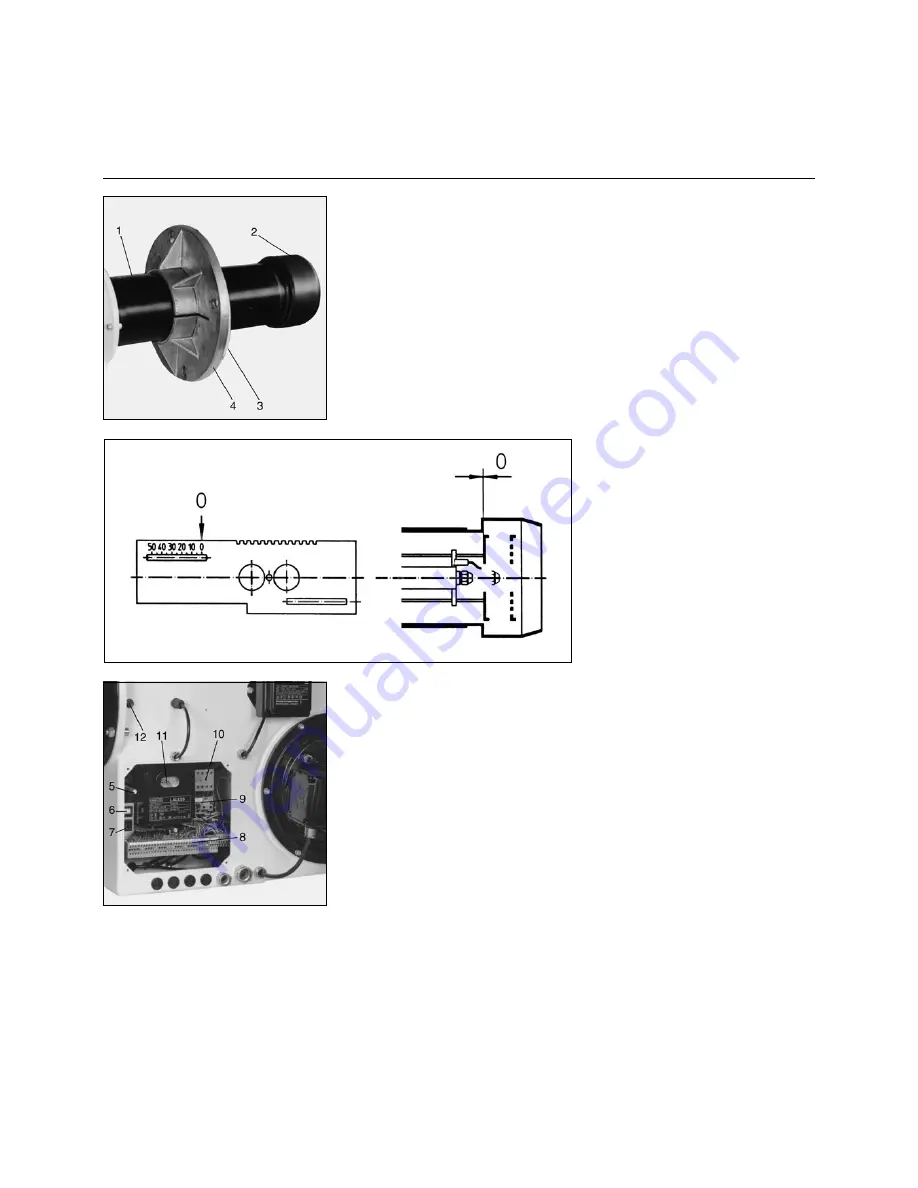
Zero point adjustment
Electrical connection

Mounting the burner to the heat
generator

To mount the burner connecting flange
to the heat generator, prepare the con-
necting plate according to the dimen-
sions given on page 4. The connecting
flange

4

with the insulating base

3

have

been factory-mounted to the front of the
burner tube.

·

Set the desired burner tube length in
the furnace by moving the flange on
the burner tube

·

Insert the burner into the opening of
the heat generator and secure it.

Inspection glass cooling

To keep the boiler inspection glass cool
and clean, a cooling line may be
connected to connection

12

R

1/4

”.

The cooling line can be either a hose or
a copper pipe.
A hose union is enclosed with the
burner.
To connect a copper pipe, a suitable
clamping ring connection is required.

Zero point adjustment, flame cup

Before the burner is operated for the
first time, the zero point must be
checked and adjusted, if necessary, so
that the zero mark on the scale corre-
sponds to the zero position in the
burner head. Adjustment is made by
displacing the flame cup after releasing
the screw

1

.

Electrical connection

Electric wiring must be carried out by
an

authorized electrician

according to

the enclosed wiring diagram.
The connecting terminals are located in
the built-in switch box.

For cable connection, ensure the
following:

·

Connect to terminal strip

8

.

·

Provide sufficient length of cable so
that the burner and the boiler door
can be opened.

·

Do

not

install the sensor lead in the

multi-conductor cable.

The electric module can be removed for
connection, replacement or adjustment
of components.

5

Lock nut for electric module

6

Pushbutton, stage 1 - stage 2

7

Pushbutton On/Off

8

El. connecting terminals

9

Overload relay

10 Protective motor switch
11 Automatic burner control unit with

reset button

12 Connection for inspection glass

cooling

Disassembling the electric module

·

Set the main switch to off, remove
the fuse

·

Release the lock nuts

5

·

Carefully remove the electric module.

Caution!

Never apply voltage to the electric
module after disassembly.
After making the connections, check all
system components for correct wiring.
Then start the motor for a short time to
check its sense of rotation.

Содержание EK 4.100 L-ZA

Страница 1: ...09 2005 Art Nr 13 019 533A Operating instructions for authorized experts Light oil burners EK4 L ZA Designs Basis CEN DIN...

Страница 2: ...generators EN 60335 1 Safety of electrical appliances for domestic use Site of installation The burner must not be operated in rooms with aggressive fumes e g hairspray tetrachloroethylene carbon tetr...

Страница 3: ...age 230 400 V 50 60 Hz 230 400 V 50 60 Hz Power consumption 2 5 kW 2 5 kW Weight approx 83 kg 98 kg Burner equipment Electric motor 2800 min 1 2 2 kW 2 2 kW Automatic burner control unit LAL 1 25 LAL...

Страница 4: ...rner tube 10 Flame cup 11 Electric motor 12 Flame monitor 13 Burner housing 14 Air suction box 15 Oil pressure pump 16 Hydraulic air damper drive 17 Inspection glass 18 Ignition transformer Burner typ...

Страница 5: ...onnection B Return oil connection C Combustion air inlet D1 Nozzle 1 D2 Nozzle 2 1 Oil pressure pump with pressure regulator 2 Solenoid valve for nozzle 1 3 Solenoid valve for nozzle 2 4 Nozzle rod wi...

Страница 6: ...terval for flame formation B Burner in operating position B C Burner operation heat generation C Controlled shutdown t1 Pre venting time t2 Safety time t3 Preignition time short t30 Preignition time l...

Страница 7: ...n the scale corre sponds to the zero position in the burner head Adjustment is made by displacing the flame cup after releasing the screw 1 Electrical connection Electric wiring must be carried out by...

Страница 8: ...ump The correct setting is approx 15 20 bar depending on the burner capacity The pressure regulator is actuated by turning the screw 6 Vacuum test suction line The maximum permissible vacuum is 0 4 ba...

Страница 9: ...e Ignition electrodes The ignition electrodes are directed to nozzle 1 Spare ignition electrodes must be bent for replacement at an angle of approx 30 to the nozzle Burner head 1 Oil connection minimu...

Страница 10: ...full load air Tighten the lock nut after adjustment Important Make sure that you do not turn the stops of the hydraulic drive forcefully towards each other i e adjust the stop screws only as long as...

Страница 11: ...een terminals 4 and 5 x Start aborted because the OPEN signal from limit reversing switch A is missing on terminal 8 Terminals 6 7 and 15 remain energized until the fault is eliminated Burner malfunct...

Страница 12: ...a GmbH Aredstr 16 18 2544 Leobersdorf 0810 400010 ELCO Belgium n v s a Pontbeeklaan 53 1731 Zellik 02 4631902 ELCOTHERM AG Sarganserstrasse 100 7324 Vilters 0848 808 808 ELCO GmbH Dreieichstr 10 64546...

Отзывы: