Elan GMV64 Скачать руководство пользователя страница 6

6 of 12 

i.


The all analog zone outputs and any analog/digital mirror output has a DSP (digital 
signal processing) circuit. One of the features of the circuit is to allow a source to be 
converted to Stereo, Mono, only Left or only Right, or Swap the L/R channels. 
Whatever you set here will be the output for all analog and analog/digital mirror 
zones. 

n.


Input Level Gain 

i.


Set an increase or decrease in the signal level for this device. The adjustment 
applies only to analog and analog/digital mirror zones. 

o.


Lip Sync Delay 

i.


Set a delay of the analog and analog/digital mirror outputs for this device. The delay 
applies every time the device is selected on these types of outputs. Save the setting 
to apply it. You may Edit and Save as many times as necessary to get this where you 
want it. 

p.


EDID Configuration 

i.


EDID is explained in considerable depth in the installers manual for the UltraMatrix 
switcher. Getting these settings correct is important to your clients’ ultimate 
satisfaction. Select the outputs to which this device will be routed. Selecting an 
output adds the Display’s video and audio EDID’s to the table for this device. The 
device will then output the highest common specification for both audio and video 
digital signals. If you are going to route an audio only source to an HDMI device 
then you need to select the outputs that will receive the signal. This allows the 
UltraMatrix switcher to send a blank video screen along with the audio signal. 

q.


Once all items are set press save and use the Source Device to select which of your Sources 
is connected. Select a new Icon if necessary. 

r.


After you have added and saved one source the Save+Add button becomes active in the 
Add/Edit Source dialog. You can use this to speed adding sources. 

s.


From the main menu right click any source to add another source. 
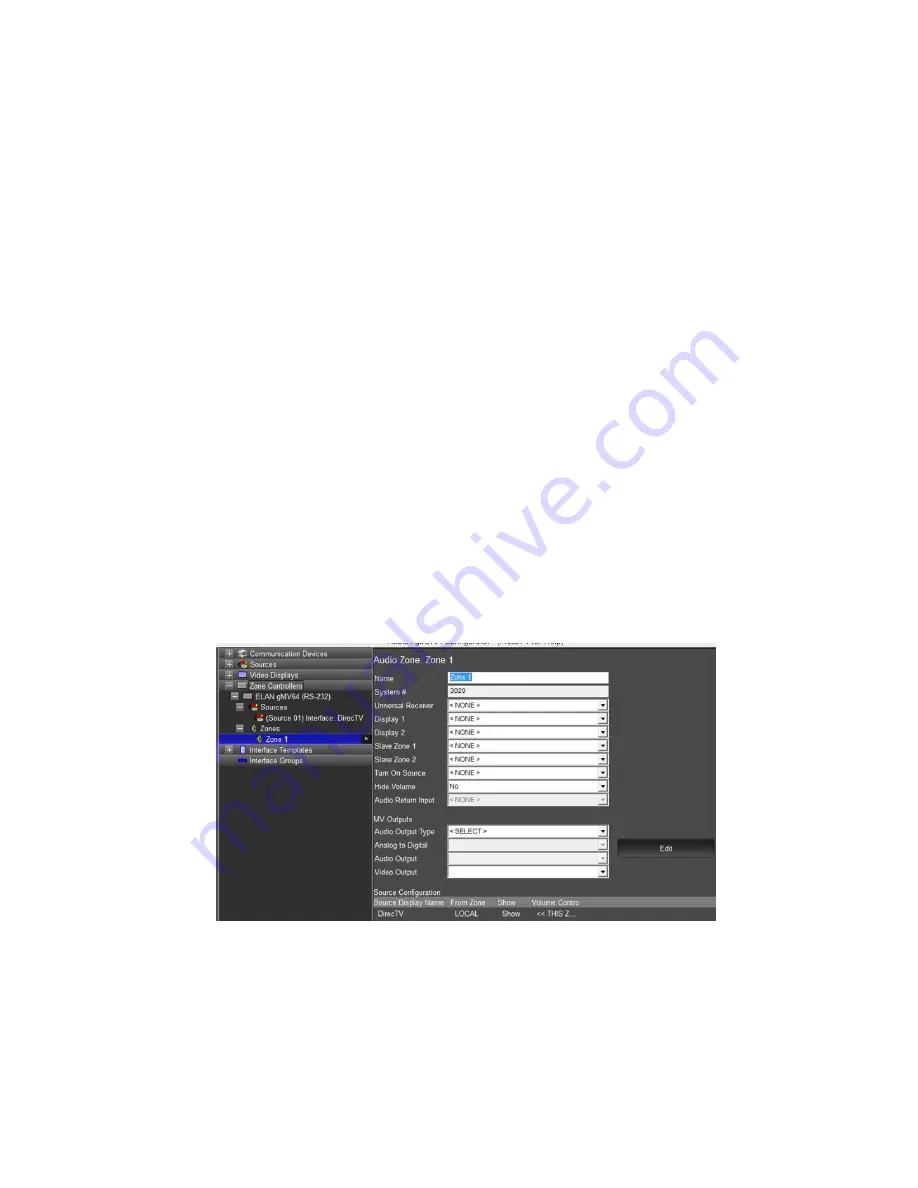
4.


Zones 

a.


Like Sources, we start with one default zone. 


b.


The zone Name may be set from the summary screen (above) or from the Edit dialog. Items 
above “MV Outputs” must be set from the summary screen. These settings are the same 
here as with any other g! zone controller. If you need help with them please refer to the g! 
training manual. 

c.


The gMV Outputs section is best set with the Add/Edit dialog. Press the “Edit” button to 
access the dialog. 

Содержание GMV64

Страница 1: ...centric features were included that provide enhanced end user experience while input output configurations that embrace the complexities of local source inputs like video from a display with audio fr...

Страница 2: ...communications 3 Install the switch the sources amplifier displays and speakers 4 Connect the g system to the switch electrically See the wiring diagrams for more information 5 Configure the g system...

Страница 3: ...AGRAMS The ELAN UltraMatrix can be wired in various configurations and does not have a standard wiring diagram Please refer to the ELAN UltraMatrix Designer s Guide for a comprehensive list of wiring...

Страница 4: ...ng a CAT5 jumper and an 890000598 RJ 45 to Male DB9 adaptor 1 You must add a Standard Connection Serial Port Communications Device and select the appropriate serial port 2 Set Paging a Paging is for a...

Страница 5: ...en set this to Yes If audio from the HDMI device will only be routed to HDMI outputs then set this to No i 2 ch Multi ch i When Audio Breakout is set to Yes we need to know if the HDMI audio is 2ch or...

Страница 6: ...ill be routed Selecting an output adds the Display s video and audio EDID s to the table for this device The device will then output the highest common specification for both audio and video digital s...

Страница 7: ...log sources will be routed to digital outputs Does this installation require analog sources to be routed to a digital output If so select Yes if not then No ii Yes sets up an output mirror where the d...

Страница 8: ...f synchronizing to the main zone volume adjustments or retaining independent volume If you synchronize the volume then you would generally hide this zone from the user interfaces k Turn On Settings wh...

Страница 9: ...nage the sources for the zone q To create the second zone right click Zone 1 and choose Add A New Zone i On this and subsequent zones you will be able to Save Add to make things go quicker If you use...

Страница 10: ...sion the system i The Lock EDID button changed to an Unlock EDID button when you locked it To re commission the system select Unlock EDID then follow the Commissioning steps from above e Clear HDCP Ke...

Страница 11: ...ide for full details Audio Breakout Select Refer to ELAN UltraMatrix Designer s Guide for full details 2 Ch Multi Ch Select Refer to ELAN UltraMatrix Designer s Guide for full details Bi Wire Select R...

Страница 12: ...the paging input Either the left or right input can be used as the driver will sum the left and right channels to create MONO output 2 Incorrect Firmware Using firmware Prior to 1 13 can result in the...

Отзывы: